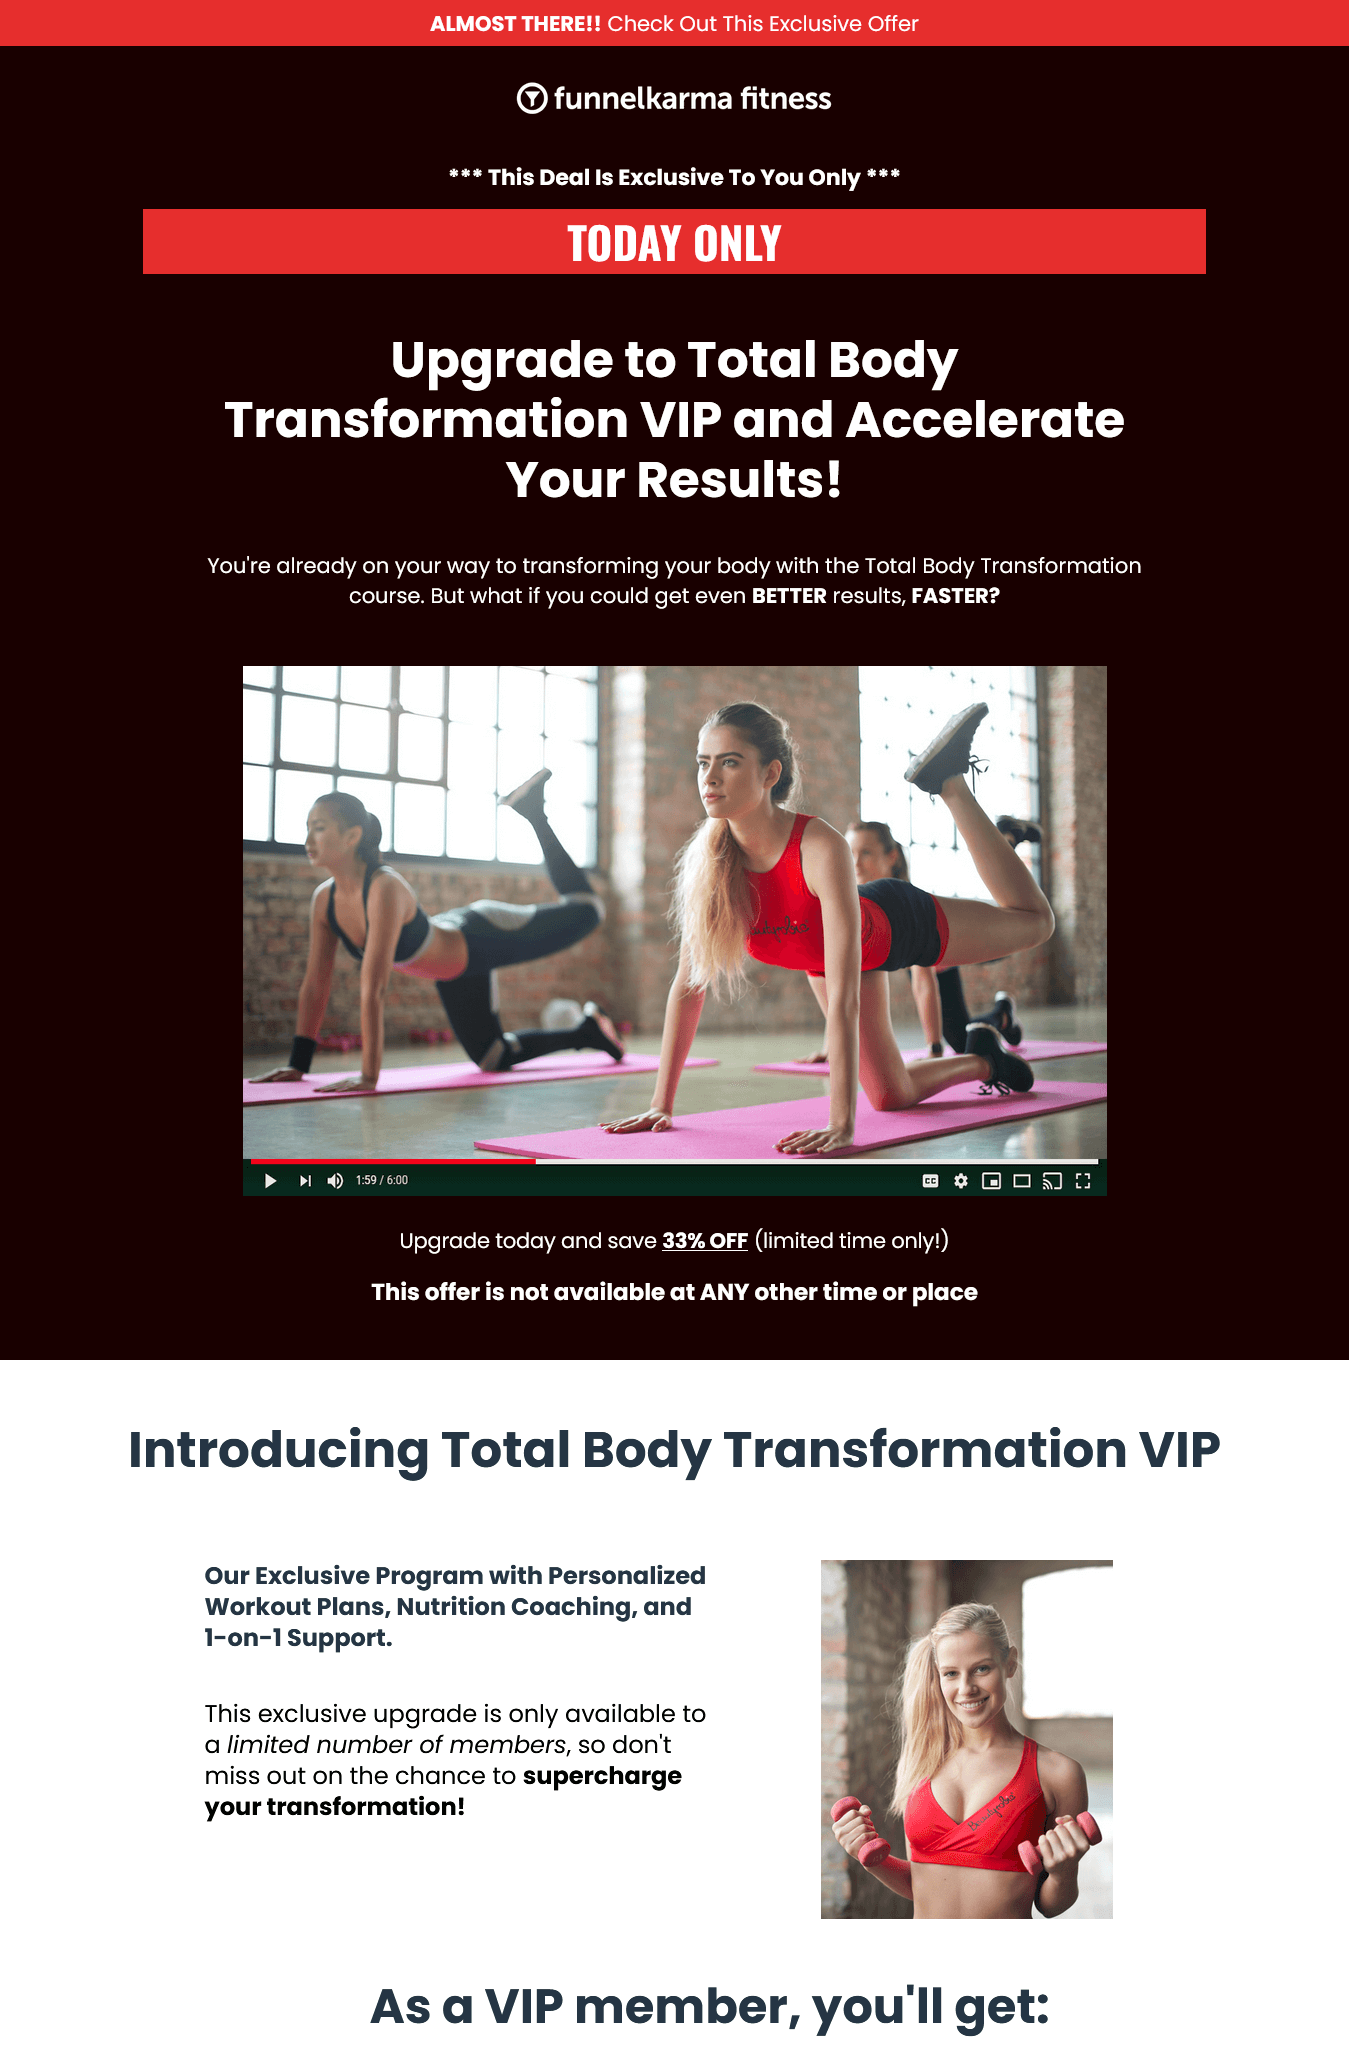
How to Create a Sales Funnel: From Scratch to Success!
So, you’ve got this amazing business idea, right? You’ve been dreaming about it for ages, and now you’re finally ready to take the leap. But there’s just one thing holding you back: the dreaded sales funnel.
We know – creating a sales funnel is intimidating. And let’s face it, it’s not exactly the most exciting part of starting or growing a business.
But here’s the harsh reality:
Without a killer sales funnel, your dreams of entrepreneurial success might just stay dreams forever.
Maybe you’re thinking, “Sales funnels? Heard the term, but I’m clueless about creating one” or “I’m drowning in marketing tactics.”
Take a deep breath, my friend. We’ve all been there. Feeling lost in the vast universe of online marketing is completely normal.
The silver lining?
You’re about to discover a step-by-step blueprint to create a sales funnel that will help you conquer those fears and frustrations, and catapult you onto the path of success.
In this guide, we’ll walk you through creating a sales funnel that’ll have your target audience eager to buy. No marketing degree or huge budget needed – just know-how and some elbow grease.
We’ll show you how to build a sales funnel from scratch – a tried-and-true funnel complete with attractive lead magnet, irresistible landing page, persuasive sales page, tempting upsell, and powerful emails to close the deal. The whole enchilada!
And the cherry on top? You won’t have to spend a single penny to make it happen. It’s totally free.
So, are you ready to conquer your fears, annihilate those frustrations, and unlock the hidden treasure of online success?
Let’s dive headfirst into the adventure and begin!
How to Create a Sales Funnel: From Scratch To Success (Step-by-Step)
Alright, let’s fuel your motivation and kick-start your journey to business success.
If you’re an absolute beginner with no experience or knowledge about sales funnels, we highly recommend checking out our comprehensive post, ‘Sales Funnels For Beginners: The Ultimate Guide [2024]’ before diving into this guide.
It’ll provide you with a solid foundation and understanding of sales funnels, ensuring you’re well-equipped to make the most of the steps that follow. Once you’ve soaked up that knowledge, come back to this guide, and we’ll be here waiting to help you create your first sales funnel.
If you’re already familiar with the basics of sales funnels and are eager to start building one, then it’s time to roll up our sleeves and get to work.
The Ultimate Roadmap to Building Your Funnel
So you’ve decided to take the plunge and learn how to build sales funnels. Congratulations! You’re about to embark on an exciting journey that’ll help you launch or significantly grow your business.
But where do you start? What steps do you need to follow? And how can you be sure you’re on the right track? Don’t worry, we’ve got your back.
In this guide, we’ll take you from sales funnel rookie to confident creator, all with the help of a beginner-friendly tool called Systeme.io.
This powerful software will be your trusty sidekick as we navigate through the entire process of creating a sales funnel – from crafting you’re your irresistible offer to launching your funnel and everything in between.
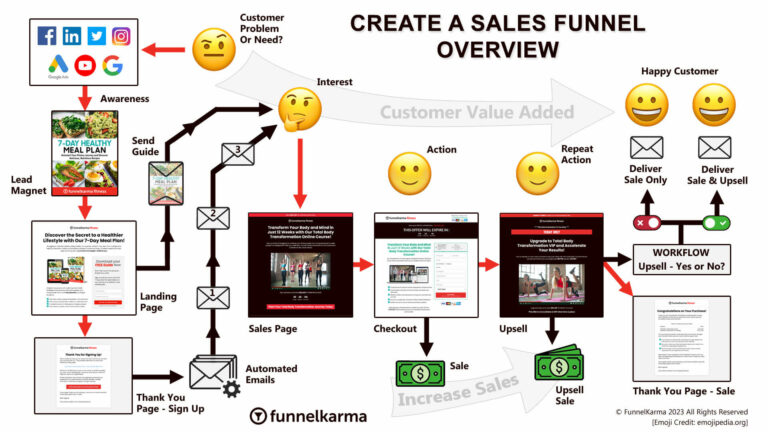
Click on the sales funnel flowchart above to enlarge and view in a full lightbox
Here’s a sneak peek at what we’ll cover in this sales funnel guide:
- Setting the stage for success: We’ll help you lay the groundwork for your sales funnel by setting up your account, understanding your target audience, and crafting an irresistible offer.
- Designing a lead magnet: You’ll learn how to create a compelling lead magnet that will attract potential customers like bees to honey.
- Creating a landing page: We’ll guide you through the process of building a high-converting landing page (also called a squeeze page or opt-in page) that captures your audience’s attention and encourages them to take action.
- Crafting a main offer and upsell: You’ll discover how to create a persuasive sales page for your main offer, as well as an enticing upsell to maximize your revenue.
- Creating an online course: You’ll learn to create an engaging and valuable online course as your main offer with ease, making it an irresistible addition to your sales funnel.
- Setting up an email marketing campaign: We’ll show you how to nurture your leads and drive them towards your main offer and upsell through a series of well-crafted emails.
- Launching Your Sales Funnel: We’ll walk you through the exhilarating moment of setting your sales funnel live and unleashing its full potential into the world.
- Driving traffic: We’ll show you how to attract potential customers to your new funnel through various marketing channels and strategies.
- Monitoring performance: And finally, you’ll discover how to analyze your funnel’s performance and optimize it for continuous growth and success.
With each of these funnel building steps, you’ll move closer to launching or transforming your business and making your mark.
Need Expert Help Turning Browsers into Buyers?

Let’s Personalize Your Sales Funnel Together!
Ready to Master the Visitor-to-Customer Dance and Elevate Your Online Success?
Introducing Your Sales Funnel Blueprint to Success
Throughout this guide, we’ll be building a versatile sales funnel that can work for any business in any industry, following the classic, time-tested sales funnel formula that includes a lead magnet, a main product (or service), and an upsell.
For our funnel, we’ll use a PDF guide as a lead magnet. Our main product will be an online course. And we’ll offer a 1-on-1 coaching service as an upsell.
To make this guide more engaging, we’ve created a fictitious division of our company called FunnelKarma Fitness, showcasing a fitness and nutrition sales funnel for the health and wellness industry.
What sets this guide apart is that we’ve already completed the challenging task of preparing every step and crafting all the essential sales copy if you’re a personal trainer.
This means all you need to do is substitute your branding and products, and you’ll have a field-tested sales funnel designed to sell your services efficiently.
And for those of you outside the fitness industry, fret not – our sales funnel blueprint covers the same principles that can be applied to any product or service, whether you’re a coach, consultant, photographer, artist, musician, or anything in between.
You can even use our sales copy as a model to create your offers and master the art of enticing customers too.
Here’s the breakdown of our FunnelKarma Fitness sales funnel example:
- Funnel Type: Sales funnel for online course
- Product/Service: Digital Product – Online fitness and nutrition program
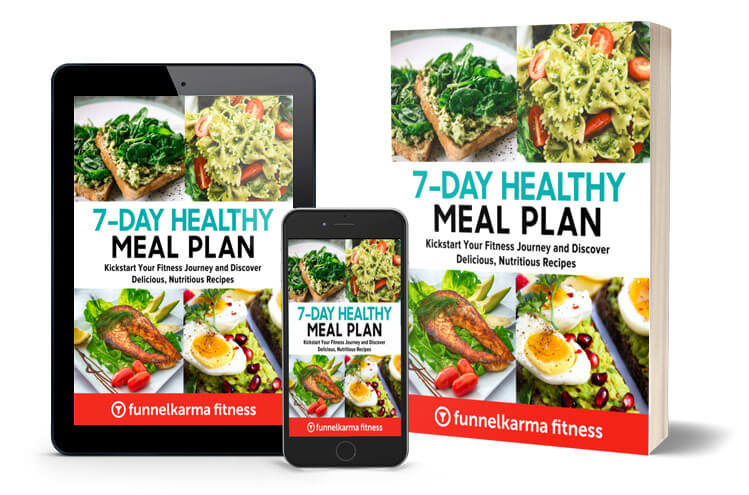
- Lead Magnet: PDF Guide – “7-Day Healthy Meal Plan: A Free Guide to Help You Kickstart Your Fitness Journey and Discover Delicious, Nutritious Recipes.”
- Main Offer: Online Course – “Total Body Transformation: A 12-Week Online Fitness and Nutrition Program to Help You Get Fit, Lose Weight, and Feel Great.”
- Upsell: Service – “Total Body Transformation VIP: Upgrade to Our Exclusive Program with Personalized Workout Plans, Nutrition Coaching, and 1-on-1 Support.”
Click on each of the sales funnel steps above to enlarge and view in a full lightbox
This sales funnel design is perfect for anyone looking to sell their expertise as a service, such as personal trainers, yoga teachers, life coaches, online course creators, and other digital product makers.
However, it is not confined to these niches alone. If you are in a different industry or offer physical products, this sales funnel formula can still work for you. Simply replace the lead magnet, main offer and upsell with your unique offerings.
The key is understanding how all the components, including an email marketing campaign, come together to attract and nurture leads, drive sales, and ultimately grow your business.
Remember, the secret to success is to just get started. You don’t need to have everything figured out right away – building a sales funnel is an iterative process, and you’ll learn and improve as you go.
So, whether you’re looking to create a sales funnel for coaches, photographers, or artists, the principles remain the same.
Ready to dive in and create your very first sales funnel?
Without further ado, let’s kick things off with Step 1: Sign Up for Systeme.io.
Step 1: Sign Up for Systeme.io
First things first: you’re going to need a platform to build your funnel on. And that’s where Systeme.io comes in. It’s like the Swiss Army knife of sales funnel tools, and we highly recommend it for beginners like you to get started with ease.
With user-friendly templates and a drag-and-drop editor, you’ll be a funnel-building pro in no time.
And hey, they even offer a free plan that includes all the essential features you’ll need to get started. What’s not to love?
Here’s how to sign up:
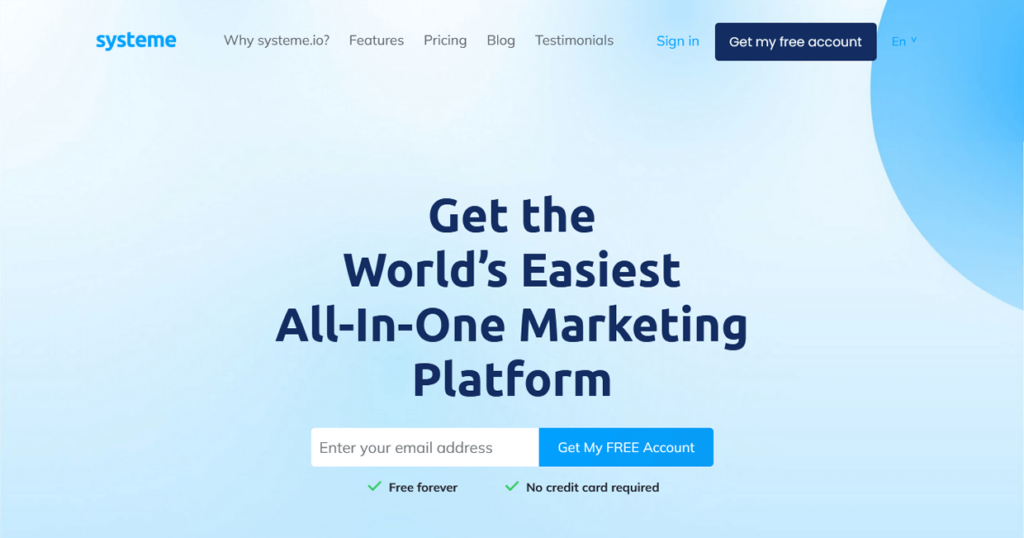
- Head over to Systeme.io to get your free account. On the homepage enter your email address in the white box, and then click on the “Get My FREE Account” light-blue button next to it. Make sure to use a valid email address, as you’ll need to confirm it shortly.
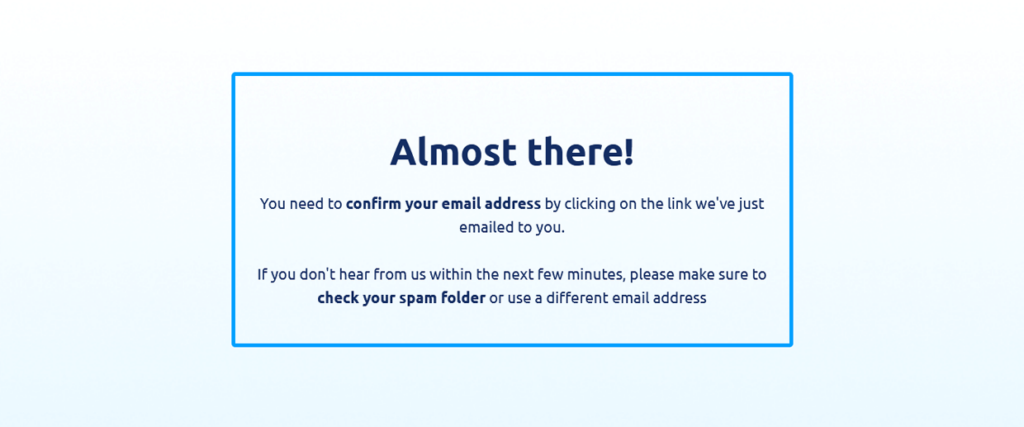
- This will take you to an ‘Almost there’ page that informs you that Systeme.io has sent you an email with your login details to access your account.
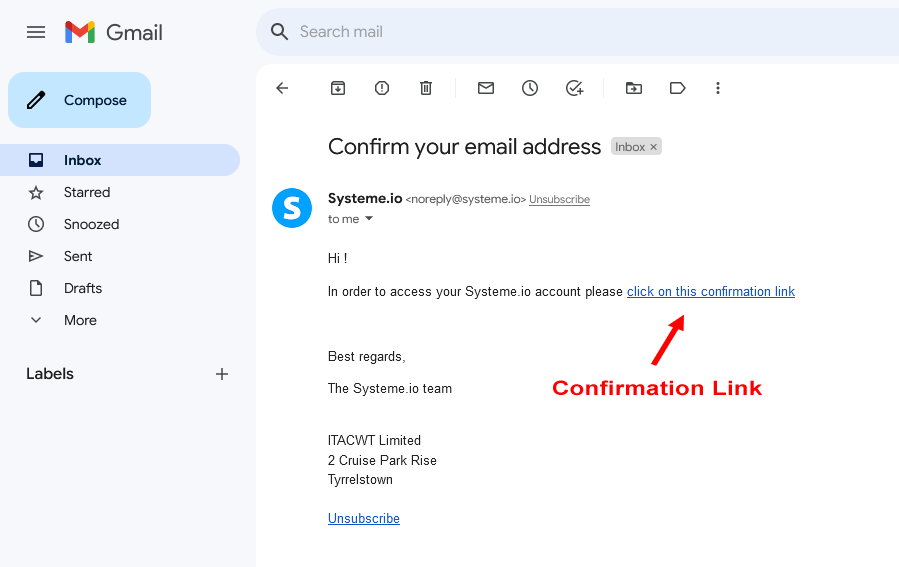
- Check your inbox for an email from Systeme.io titled ‘Confirm your email address’. Inside the email, click on the confirmation link to access your Systeme.io account. This will take you to a Systeme.io page that asks you to create a password for your account.
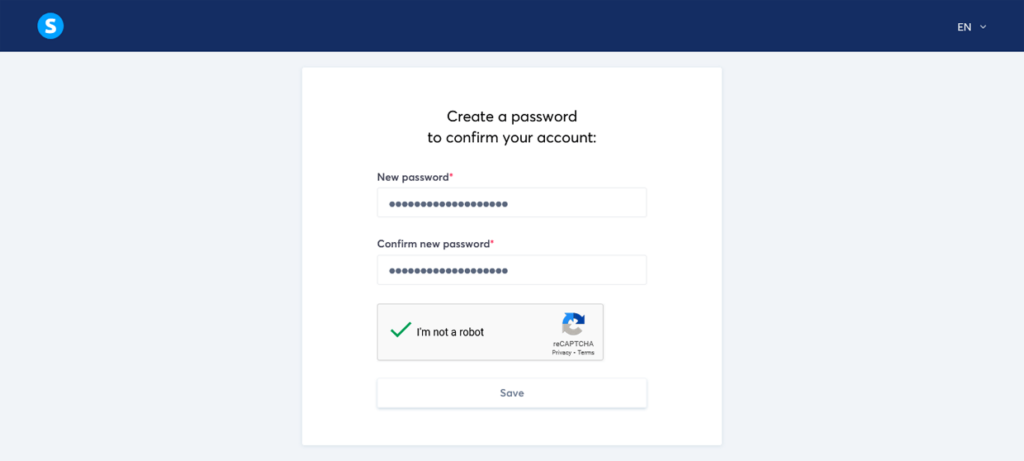
- Create your password and then confirm your new password. Check the ‘I’m not a robot’ box if you see one. Then click “Save”. This will take you to the Systeme.io dashboard.
- Now that you’re logged in, take a moment to explore the dashboard and get familiar with the platform. You’ll find everything you need to create and manage your sales funnel right here.
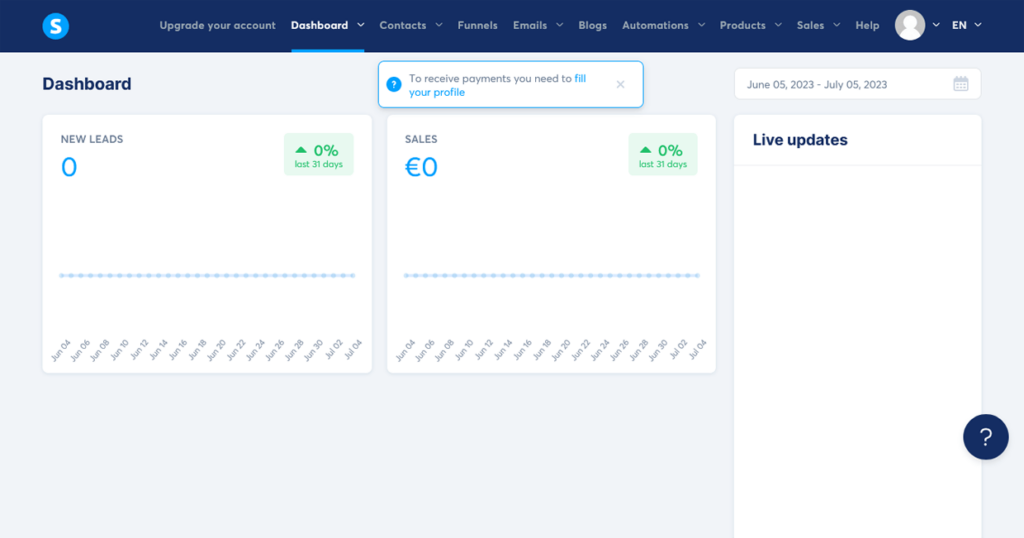
And that’s it! You’re now officially a Systeme.io user. With your account set up, you’re one step closer to creating your very own sales funnel.
As your business grows, you can upgrade to a higher plan with more features and capabilities. But for now, the free plan is perfect for getting your feet wet and learning the ropes of sales funnel creation.
Step 2: Systeme.io Account Housekeeping
Now that you’ve signed up for Systeme.io, let’s take a moment to familiarize ourselves with the platform and ensure everything is set up correctly. This will help you feel more confident and organized as you begin to create your sales funnel.
Here’s a quick rundown of some essential housekeeping tasks to complete within your Systeme.io account:
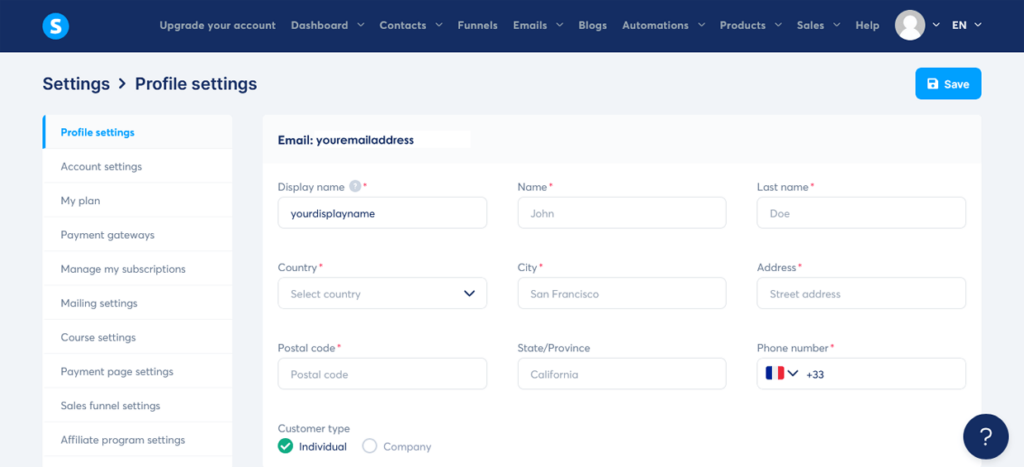
Complete your profile
If you haven’t already, make sure to fill out your profile with your preferred display name and details. For now, your To access your profile settings, click on your profile picture in the top right corner of the dashboard and selecting ‘Settings’.
Set up your payment processor
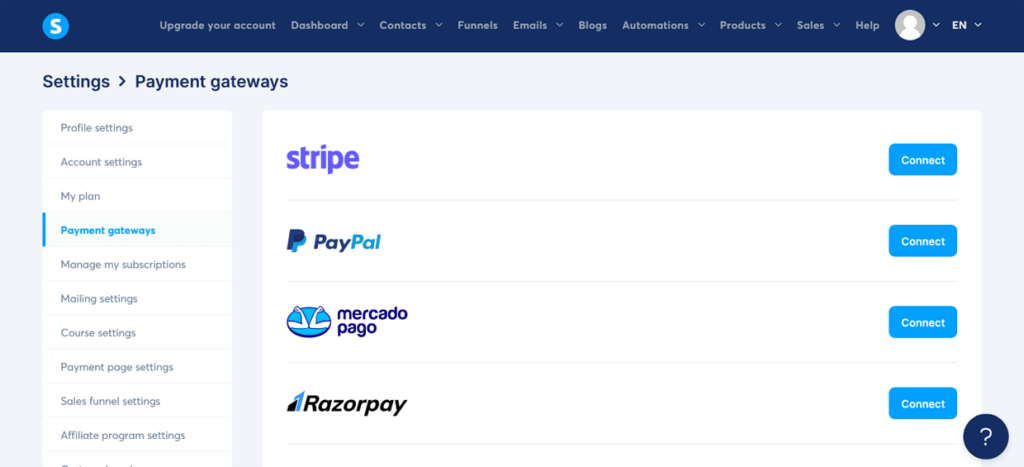
In order to accept payments through your sales funnel, you’ll need to connect a payment processor. Systeme.io supports popular payment gateways like Stripe and PayPal.
To set up your payment processor, go to ‘Settings’ and click on ‘Payment gateways’. Choose your preferred payment gateway and follow the instructions to connect it to your account.
Configure your email settings
To send emails through Systeme.io, you’ll need to set up your email settings. Go to ‘Settings’ and click on ‘Mailing settings’. Here, you can choose to use Systeme.io’s default email service or connect your own SMTP service.
If you’re unsure, we recommend that you stick with the default option for now – you can always change it later if needed.
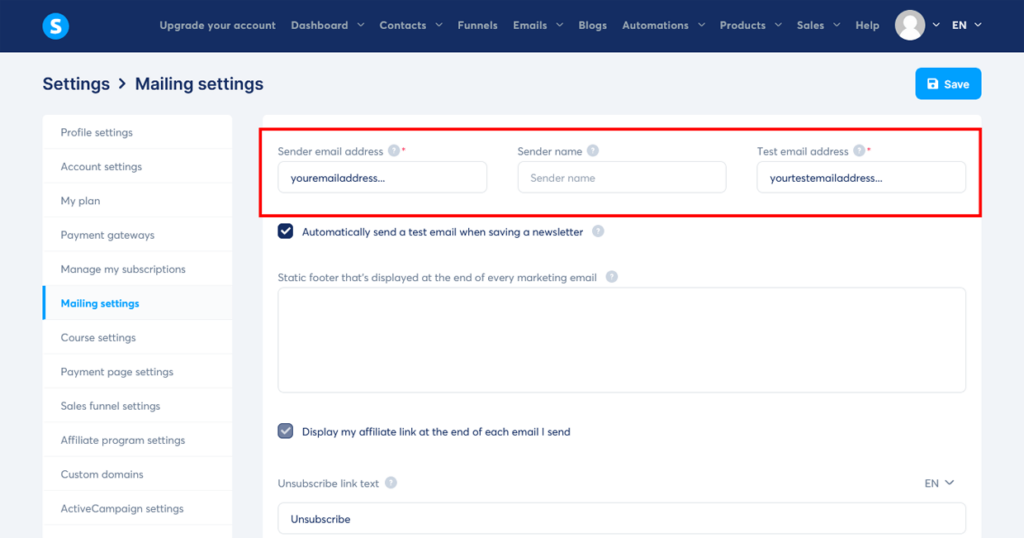
Just make sure to enter your ‘Sender email address’, your ‘Sender name’ (e.g., John Doe from XYZ Company), and a ‘Test email address’.
You can also add your email signature by entering the text you want to include at the bottom of each email, such as your name, title, company, and contact information.
Systeme.io refers to this as the ‘Static footer that’s displayed at the end of every marketing email’.
Connect your domain
If you have a custom domain (e.g. yourwebsite.com), you can connect it to your Systeme.io account for a more professional look by going to the ‘Settings’ section and clicking on “Custom domains” in the left-hand menu.
Click on “Create” and then follow the instructions provided by the blue link to connect your domain. If you don’t have a custom domain, don’t worry! Systeme.io’s default subdomains will still make your funnel look great.
Edit your Systeme.io Subdomain
To check and edit your custom subdomain name that Systeme.io gives you, go to ‘Settings’ and click on ‘Custom domains’. You will see your default domain name that Systeme.io has given you.
This is usually the first part of your email address that you gave when you signed up, followed by ‘.systeme.io’ – for example ‘youremail.systeme.io’.
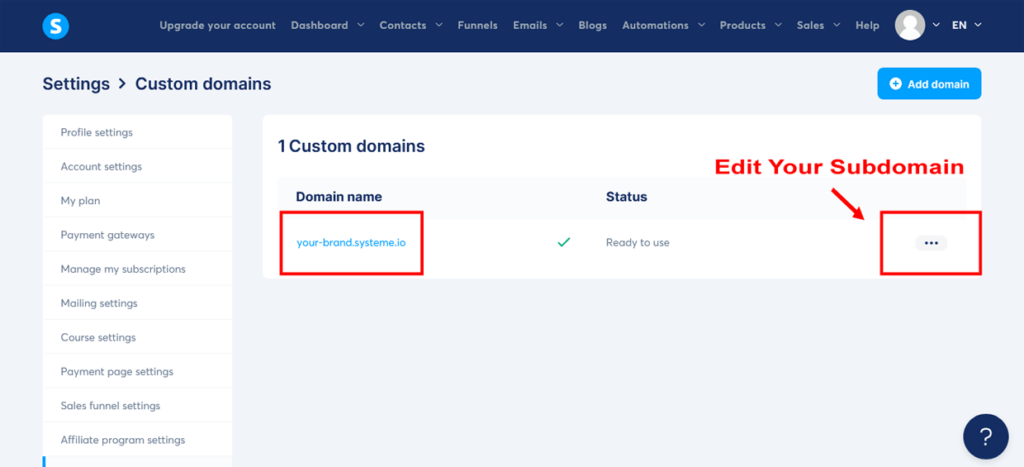
To change this to something that looks more appropriate for your brand, click on the three dots on the right, and select “Edit subdomain name”.
Then in the ‘Edit systeme.io subdomain name’ popup, change the first part of the subdomain to your preferred brand. Then click “Save”.
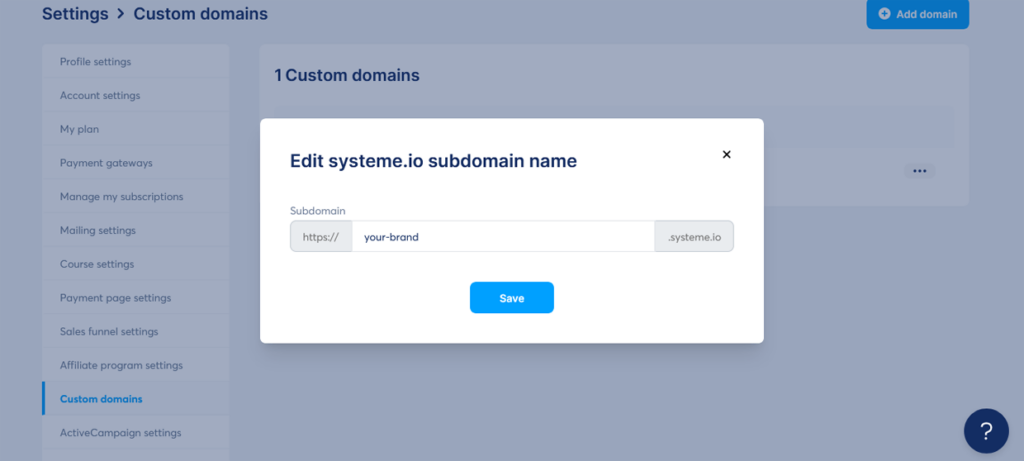
All of your sales funnel pages will now start with this subdomain as part of their URL. This will help you to look more professional to your potential customers and clients.
Explore the dashboard
Spend some time exploring the Systeme.io dashboard to familiarize yourself with its features and layout. You’ll find various sections like Funnels, Emails, Contacts, and more.
As we progress through this guide, we’ll cover each section in detail.

By completing these housekeeping tasks, you’ll have a solid foundation for building your sales funnel.
With your account set up and ready to go, it’s time to dive into the heart of the sales funnel process – understanding your target audience and crafting an irresistible offer that speaks to their needs and desires.
In the next step, we’ll show you how to do just that. Get ready to make some magic happen!
Step 3: Identify Your Target Audience
Now, let’s talk about your peeps – your target audience. You know, the people who are going to love your product or service so much, they’ll be throwing their wallets at you.
While it’s true that knowing your target audience can make your sales funnel more successful, don’t worry if you don’t have all the answers just yet.
Many beginners create sales funnels without a clear idea of their target audience, so that shouldn’t stop you from taking action and building your sales funnel either.
Remember, the key is to get started and learn as you go. As you gain more insights into your audience, you can refine your funnel, craft more tailored offers, and create persuasive sales copy. So, take a leap of faith and dive into the sales funnel creation process.
As you progress, you’ll discover more about your people how to make your funnel even more effective. After all, even the pros have to adjust and adapt their funnels as they move forward.
So how do you find your target audience?
Well, you’ve got to do a little digging. Think about who your ideal customer is, what they want, and what keeps them up at night.
Once you’ve got a clear picture of your target audience, you’ll be one step closer to creating a sales funnel that speaks their language.
Here are some steps to help you identify your target audience:
- Define your ideal customer: Start by creating a detailed profile of your ideal customer. Consider factors such as demographics (age, gender, location, income, education), psychographics (interests, hobbies, values, beliefs), and pain points or problems they’re facing that your product or service can solve.
- Analyze your existing customers: If you already have customers, take a close look at their profiles. Identify common characteristics and trends among them. This information can help you refine your target audience and better understand their needs and desires.
- Research your competitors: Investigate the target audience of your competitors. Who are they targeting, and how are they positioning their products or services? While you don’t want to copy their strategy, this can give you valuable insights and help you identify potential gaps in the market that you can fill.
- Conduct surveys and interviews: Reach out to potential customers, existing customers, or even friends and family who fit your target audience profile. Ask them questions about their needs, preferences, and pain points. This direct feedback can help you better understand your target audience and tailor your offer to their specific needs.
- Use online tools and resources: There are various online tools and resources available to help you gather data about your target audience. Google Analytics, social media insights, and keyword research tools can provide valuable information about the interests, behaviors, and demographics of your potential customers.
With a rock-solid grasp of your target audience, you’re now better equipped to create a sales funnel that speaks their language and resonates with their deepest desires.
In the next step, we’ll dive into the art of crafting an irresistible offer that your audience won’t be able to resist. Brace yourself to leave an indelible mark and transform those leads into devoted customers!
Got The Vision But Need The Right Tools?
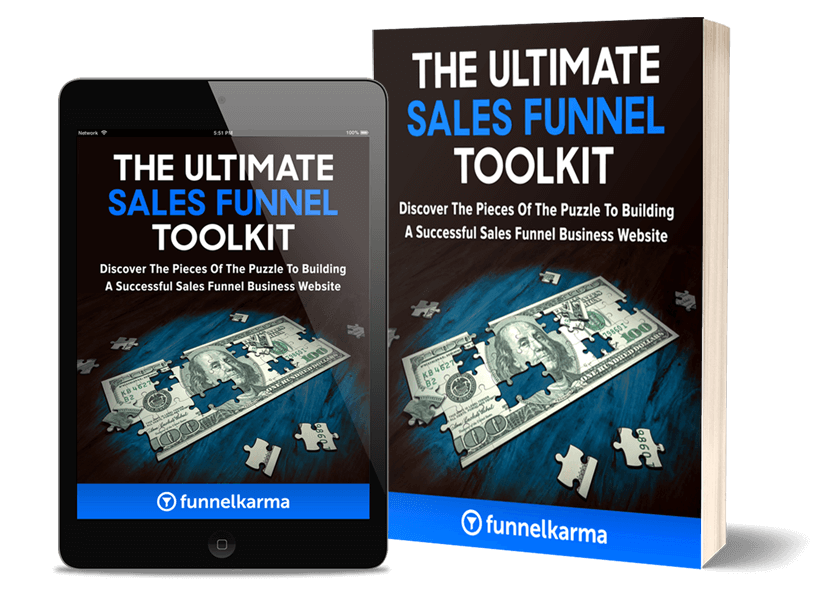
Unlock The Toolbox That Turns Browsers Into Buyers
Dive into our Ultimate Sales Funnel Toolkit for FREE and grab our exclusive selection of 37 pivotal sales funnel tools – every tool a game changer for savvy professionals!
Step 4: Create an Irresistible Offer
You’ve got your audience, now it’s time to make them an offer they can’t refuse. No, I’m not talking about strong-arming them into buying from you. I’m talking about creating a product or service that’s so amazing, so life-changing, that they’d be crazy not to want it.
But don’t let the pressure of crafting the perfect irresistible offer hold you back from creating your sales funnel either. As long as you have a product or service, that’s enough to get started.
As you learn more about your target audience, you can refine and adjust your offer to make it more appealing to potential buyers. So put on your thinking cap and get creative. What can you offer that’ll make your target audience’s lives better, easier, or more fun?
Here are some tips to help you create an irresistible offer:
- Focus on the benefits: Instead of just listing the features of your product or service, emphasize the benefits your target audience will receive. How will it improve their lives, solve their problems, or fulfill their desires? Make sure your offer speaks directly to their needs and showcases the value they’ll get from it.
- Create a sense of urgency: Encourage potential customers to act quickly by adding a sense of urgency to your offer. This can be achieved through limited-time discounts, exclusive bonuses, or limited availability. The fear of missing out can be a powerful motivator for people to take action.
- Offer a strong guarantee: Build trust and reduce the perceived risk for your potential customers by offering a strong guarantee. This could be a money-back guarantee, a satisfaction guarantee, or a results-based guarantee. A strong guarantee shows that you stand behind your product or service and are confident in its ability to deliver on its promises.
- Price your offer strategically: Consider the pricing of your offer carefully. It should be competitive within your market while still reflecting the value of your product or service. You can also use pricing strategies like offering different tiers or packages, providing payment plans, or using anchor pricing to make your offer more appealing.
- Include social proof: To further build trust and credibility, incorporate social proof into your offer. This can include customer testimonials, case studies, or endorsements from influencers or experts in your industry. Social proof helps potential customers feel more confident in their decision to invest in your product or service.
- Make it easy to say ‘yes’: Remove any barriers or objections that your potential customers may have by addressing them in your offer. This could involve offering a free trial, providing flexible payment options, or showcasing the ease of use of your product or service.
By masterfully sculpting an offer that speaks to the very core of your target audience’s needs and desires, you’ll set yourself on the path to transforming leads into loyal customers.
Putting Your Irresistible Offer into Action
With these tips in mind, let’s apply them to our FunnelKarma Fitness sales funnel example. Imagine offering a 12-week online Total Body Transformation program priced at $97.
This 12-week online fitness package will include:
- Comprehensive workout routines designed for all fitness levels
- Customizable meal plans to fuel the body and satisfy taste buds
- Weekly mindset coaching sessions to keep motivation on track
- Access to our supportive community of like-minded individuals
- Lifetime access to course materials and future updates
To make this offer even more irresistible, you can introduce a VIP upgrade 1-on-1 coaching package, which is normally priced at $297. However, as a special deal, customers can get the VIP upgrade for a discounted price of $197 when they purchase it together with the main program.
The VIP upgrade package will include:
- Personalized 1-on-1 coaching sessions (30-minutes) every two weeks, providing valuable guidance and support from a skilled trainer
- Customized workout plans tailored to individual fitness levels, goals, and preferences
- Personalized nutrition coaching to optimize meal plans for faster results
- Priority email support to answer specific questions and enhance motivation
- Exclusive access to the VIP community of like-minded individuals on the same fitness journey
By offering this VIP upgrade package, you address your target audience’s hopes, dreams, fears, and frustrations, providing them with an enhanced and personalized fitness experience.
The sense of urgency created by the limited availability and discounted price, along with the strong guarantee and social proof, make this offer truly irresistible for your customers.
And for your business, consider the financial potential of this sales funnel strategy. Your course creation cost boils down to time, filming a few videos on a smartphone, and crafting learning materials.
Once you have this digital product set-up, every $97 purchase is pure profit. The VIP package, priced at a reduced $197, when combined with the course, brings in $294 per client.
Essentially, you’re earning this income for a few hours of your time, spent on six 30-minute, 1-on-1 coaching sessions. In essence, you nearly charge $100 per hour, falling on the higher-end of the fitness training pricing scale. A promising feat, right?
Yet, the beauty extends beyond raw numbers and doesn’t strictly apply only to fitness trainers.
Coaches, consultants, artists, musicians – anyone selling their services – can profit handsomely with this sales funnel for service business model.
It’s about flexibility, the promise of not only making a substantial full-time income but also maintaining a lifestyle you love. Working just a part-time schedule of 4 hours a day, five days a week, you can still rake in $100,000 a year.
The freedom that comes with being your own boss is irreplaceable – the power to choose when to work, how much to work, and with whom to work.
With this regular sales funnel for coaches model coupled with an attractive upsell, you get control over your income, a sense of stability, and the liberty to grow.
And what happens once your clients finish the VIP package?
Transition them to monthly subscriptions and behold the joy of steady recurring revenue.
Need more?
Your sales funnel opens up a world of opportunities to upsell different products and broaden your income streams. Exciting isn’t it?
So set up your sales funnel, let it work its magic for you, and watch your growth potential skyrocket without boundaries!
With your irresistible offer locked and loaded, it’s time to venture forth to the next stage – crafting a magnetic lead magnet that will captivate your audience and launch them on an unforgettable journey through your sales funnel.
Step 5: Design a Lead Magnet
Alright, you’ve got your offer. Now you need a way to reel those potential customers into your sales funnel. Enter the lead magnet.
A lead magnet is like a little taste of what you’re offering, and it’s designed to get people interested in your product or service – in exchange for their contact information, usually their email address.
It could be a free ebook, a webinar, or even a discount code – just make sure it’s something your target audience will find valuable.
Here are the different types of lead magnets that are commonly used for sales funnel lead generation:
- eBooks or guides: Comprehensive resources packed with valuable information, helping your audience dive deep into a topic and gain expert insights.
- Checklists or cheat sheets: Quick, actionable tools that simplify complex tasks, making it easy for your audience to achieve their goals.
- Templates or worksheets: Time-saving assets that provide structure and guidance, helping your audience efficiently complete tasks or projects.
- Video or audio content (e.g., webinars, podcasts): Engaging multimedia experiences that educate and entertain, making learning enjoyable and memorable for your audience.
- Free trials or demos: Risk-free opportunities for your audience to test-drive your product or service, showcasing its benefits and features firsthand.
- Quizzes or assessments: Interactive tools that provide personalized insights and recommendations, helping your audience understand their needs and make informed decisions.
- Exclusive discounts or promotions: Limited-time offers that create urgency and incentivize your audience to take action, making your product or service even more appealing.
In this tutorial, we’ll be using a simple PDF guide as our FunnelKarma Fitness lead magnet.
We’ll call it “7-Day Healthy Meal Plan: A Free Guide to Help You Kickstart Your Fitness Journey and Discover Delicious, Nutritious Recipes”.
Click on each lead magnet image above to enlarge and view in a full lightbox
This guide type of lead magnet is easy to create and time-tested to provide immediate value to your audience. If you’ve never created a lead magnet before, we strongly recommend you give this one a try.
To help you succeed, here are some tips to help you design an effective lead magnet when creating your sales funnel:
- Ensure it’s relevant: Your lead magnet should be closely related to your core offer and address a specific problem or need of your target audience. This ensures that the leads you attract are genuinely interested in your products or services and are more likely to convert into customers.
- Provide value: The lead magnet should provide immediate value to your target audience. Make sure it’s something they can put into action right away, giving them a taste of what your core offer can deliver.
- Keep it simple: Your lead magnet should be easy to consume and understand. Avoid overwhelming your audience with too much information or complex concepts. The goal is to provide a quick win that leaves them wanting more.
- Make it visually appealing: Design your lead magnet in a professional and visually appealing manner. This not only makes it more enjoyable for your audience to consume, but it also helps build trust and credibility.
To create a simple PDF guide like our example, you can use Google Docs or Microsoft Word to write the content and then convert it to a PDF.
For any graphics, such as a logo or book mockups for your free guide, you can use online tools like Pixlr or Canva. To find free photos and images to include in your guide, explore sites like Pixabay, Pexels, and Unsplash.
For this tutorial, don’t stress about having a picture-perfect lead magnet. Simply whip up a document with some text, save it as a PDF, and you’re good to go.
With your lead magnet in hand, get ready for some excitement – in the next step, we’ll dive into building your funnel in Systeme.io!
Step 6: Set Up Your Landing Page
With our audience defined, our irresistible offer crafted, and our lead magnet primed, we’re ready to tackle the most exciting part – building the essential landing page stage of your sales funnel in Systeme.io!
A top-notch landing page acts as a powerful attraction, generating leads and propelling potential customers further down your sales funnel.
In this step, we’ll guide you through creating a high-converting landing page, a heartfelt thank you page, and uploading your PDF lead magnet for seamless delivery.
Are you ready to skyrocket your conversions? Let’s do this!
Creating a landing page with Systeme.io
- Log in to your Systeme.io account: If you’re not already logged in, head over to Systeme.io and log in using your email and password.
- Navigate to the Funnels section: Once you’re logged in, click on “Funnels” in the main header menu. This will take you to your main sales funnel dashboard.
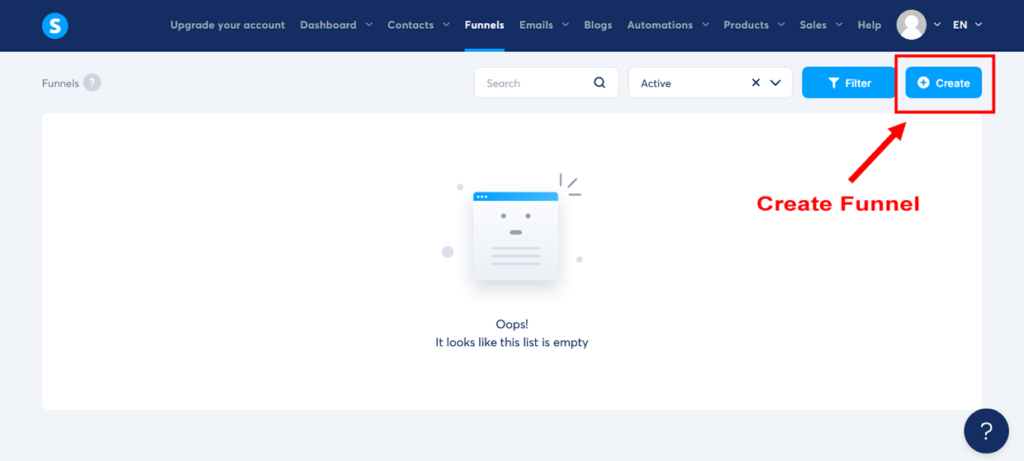
- Create a new funnel: Click the “Create” button in the top-right corner of the Funnels dashboard. This will open a pop-up window where you can name your funnel, choose your funnel goal, and select your currency.
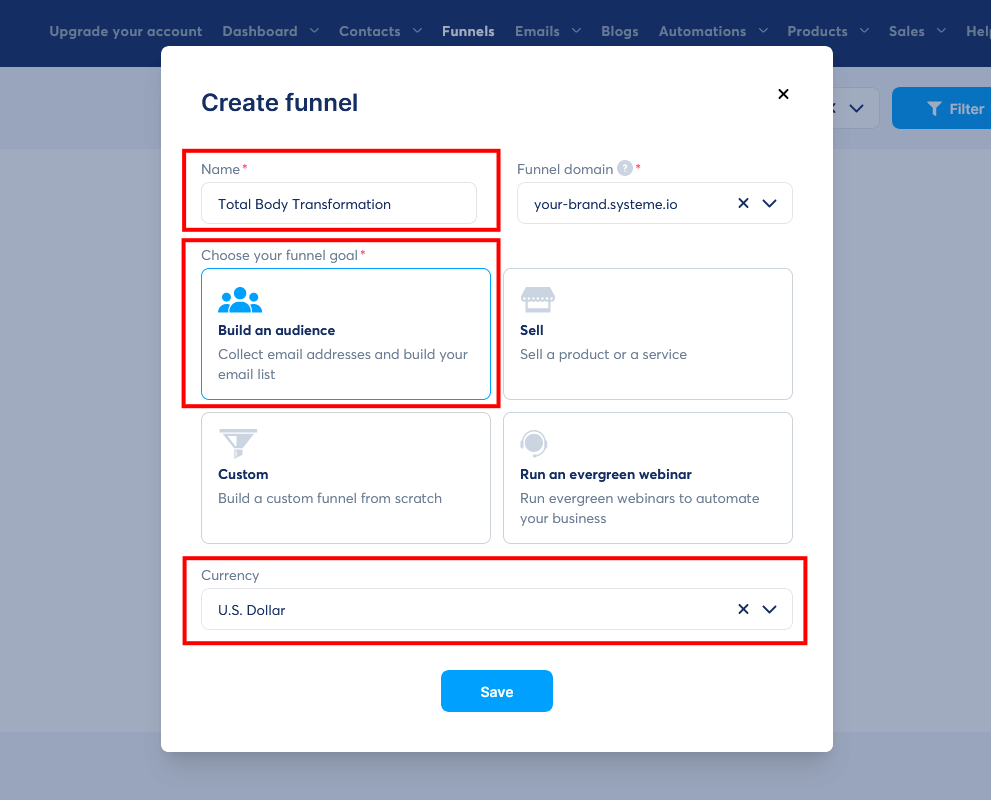
- Name your funnel: Give your funnel a name (e.g., “Total Body Transformation Funnel”) and click “Create.” This will take you to the funnel editor.
- Choose your currency: Select the currency you’ll be using to sell your products and services (e.g. “U.S. Dollar”)
- Choose your funnel goal: Select the “Building an audience” option. This will include both a landing page (also called a ‘squeeze page’) and a thank you page. Once you have completed all the fields, click “Save”. You will now see you have one sales funnel created in your funnel dashboard.
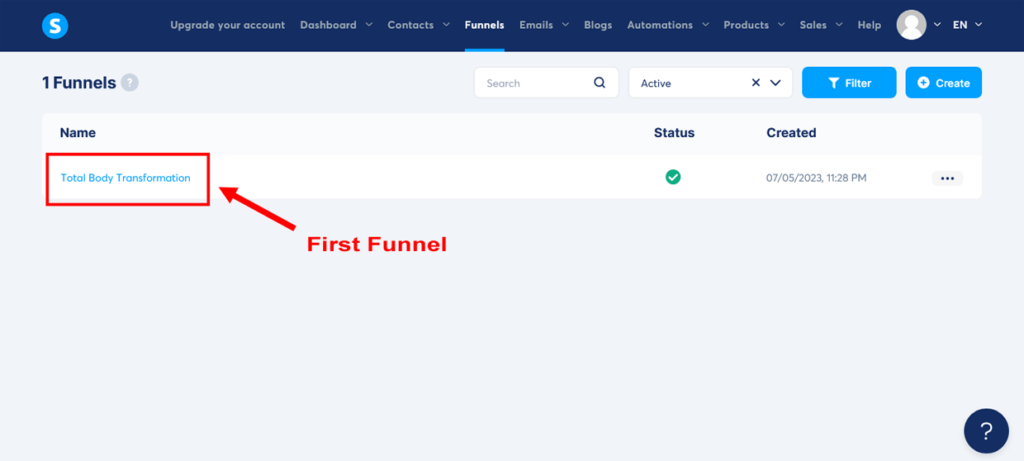
- Open your funnel: Click on the name of your funnel to open the funnel editor. You’ll see two sales funnel stages on the left – your ‘Squeeze Page’ followed by your ‘Thank You’ page. And on the right, you see a ton of landing page templates.
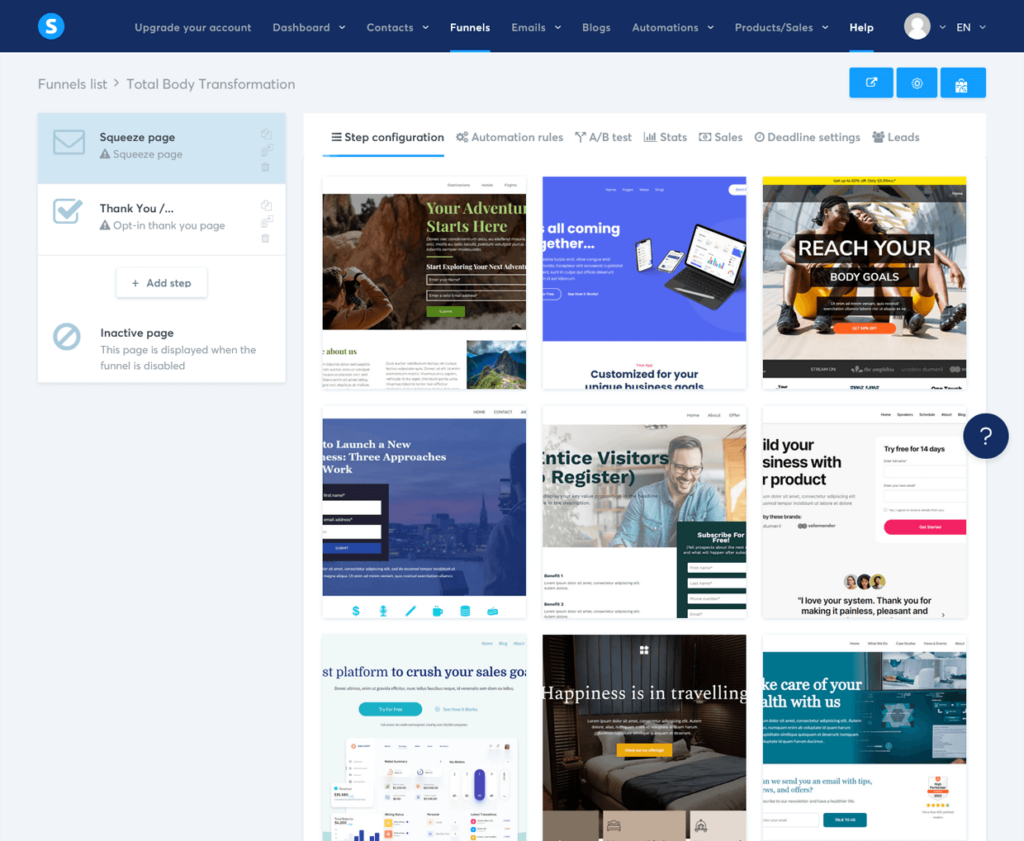
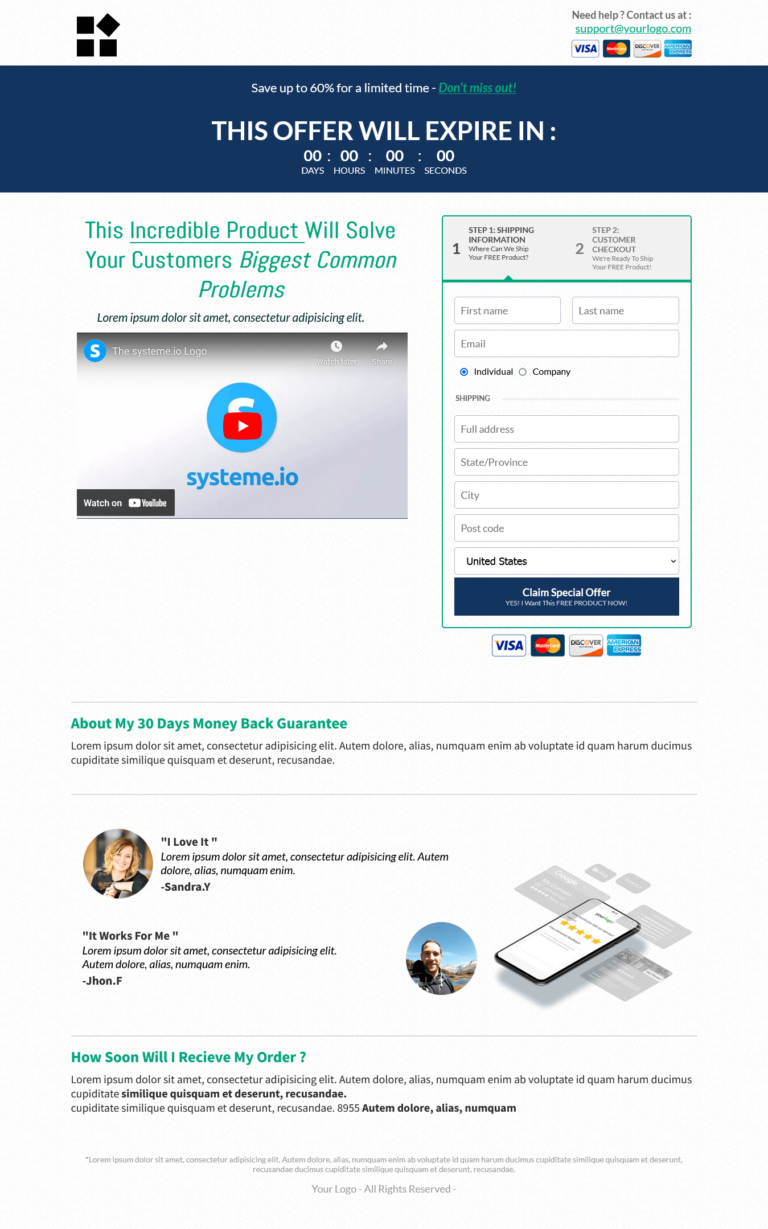
- Choose a landing page template: Systeme.io offers a variety of pre-built sales funnel landing page templates to help you get started. For each template, if you hover over each template, you’ll see “Select” and “Preview” buttons. Clicking on “Preview” opens the template in a new window so you can view it full. Browse through the available options and select one that already has a form on it. This will make it easier to collect your visitors’ contact information. When you’re happy with a template, close the additional window. Then click on “Select” to choose the template to proceed.
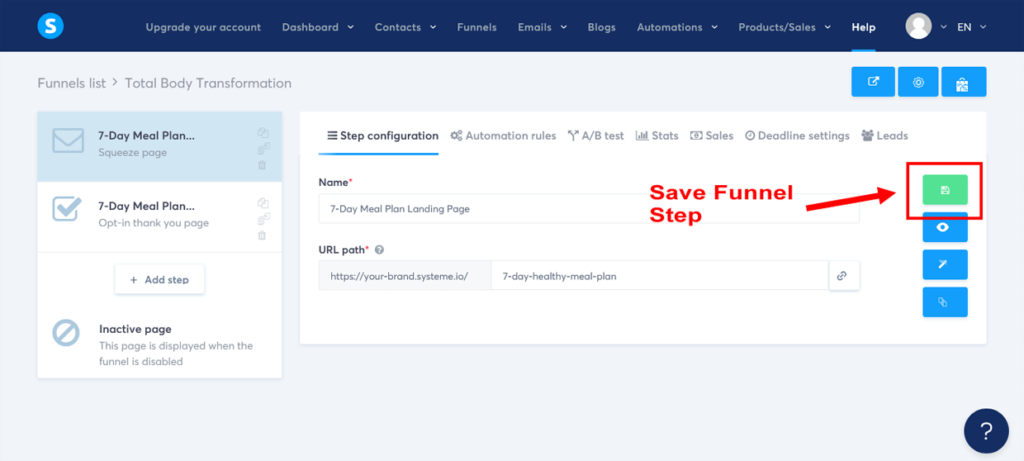
- Name your funnel step: In the ‘Step configuration’ settings, create a name for your landing page/squeeze page. For our example, we’ll be calling our landing page “7-Day Meal Plan Landing Page”.
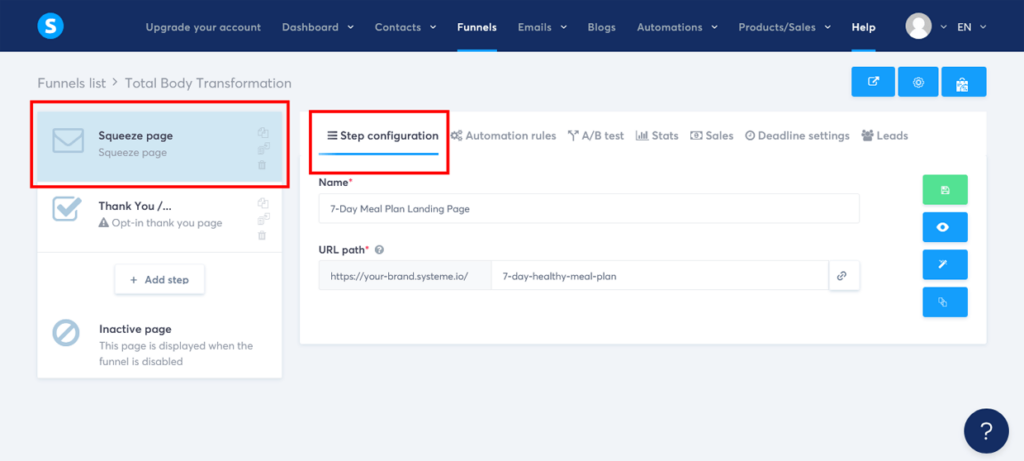
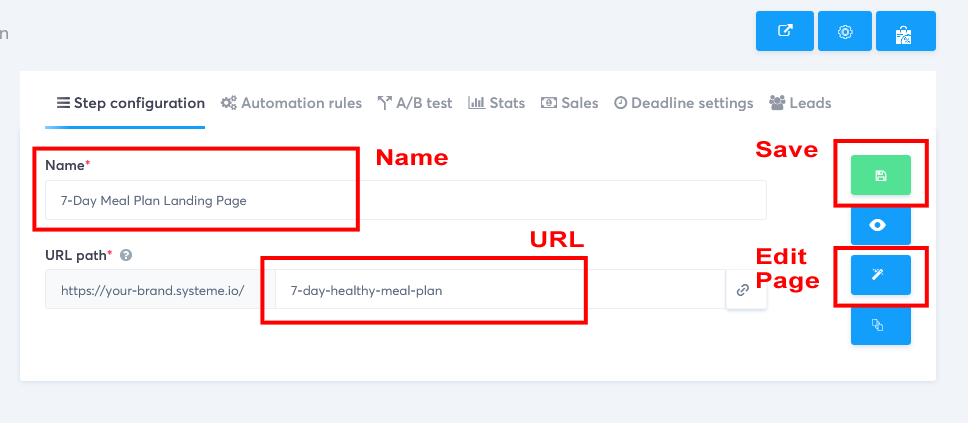
- Customize your landing page URL path name: Below the name in the ‘Step configuration’ settings, change the ‘URL path’ name to something short and simple that closely resembles your lead magnet name, using dashes between words. For example, “7-day-healthy-meal-plan.”. This will make your landing page link look more professional for your subscribers.
- Save your changes: Once you’ve named your funnel step and customized your URL path, click on the green ‘Save funnel step’ button on the right-hand side to save your changes.
- Edit your landing page: Now, click on the middle blue ‘Edit page’ button on the right-hand side to open Systeme’s drag-and-drop sales funnel editor. Here, you’ll see a visual representation of your landing page. To customize the page, click on any element you’d like to edit (such as text, images, or buttons). This will open the element’s settings in the left-hand panel, where you can make changes as needed.
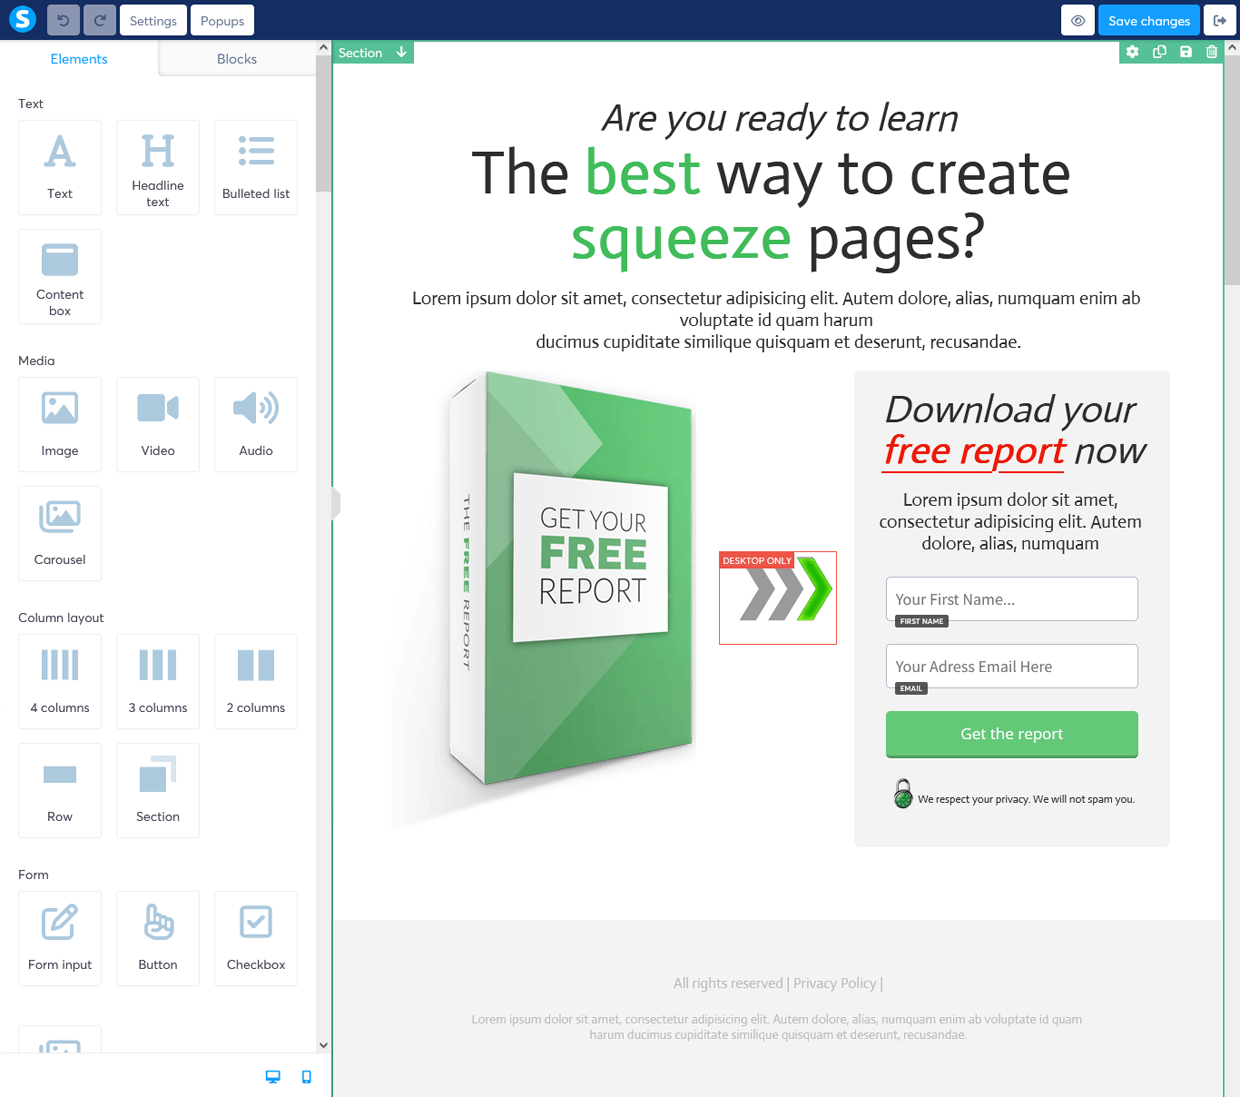
Okay, as you’ll be creating your sales funnel pages using templates and the Systeme.io’s drag-and-drop editor, let’s take a moment to familiarize you with the basics. Fear not my friend, no coding is required!
Creating Your Sales Funnel Pages in the Drag-and-drop Editor
Systeme.io’s drag-and-drop editor makes it easy to customize templates for your sales funnels, email campaigns, and online courses. You can add, edit, and delete elements with just a few clicks, creating stunning pages that reflect your brand and engage your audience.
Familiarize yourself with the editor’s interface
The drag-and-drop editor has a simple interface with the following key components:
- Elements: Located on the left side, elements are the building blocks of your page. You can drag and drop elements such as text, images, buttons, and forms onto each sales funnel page.
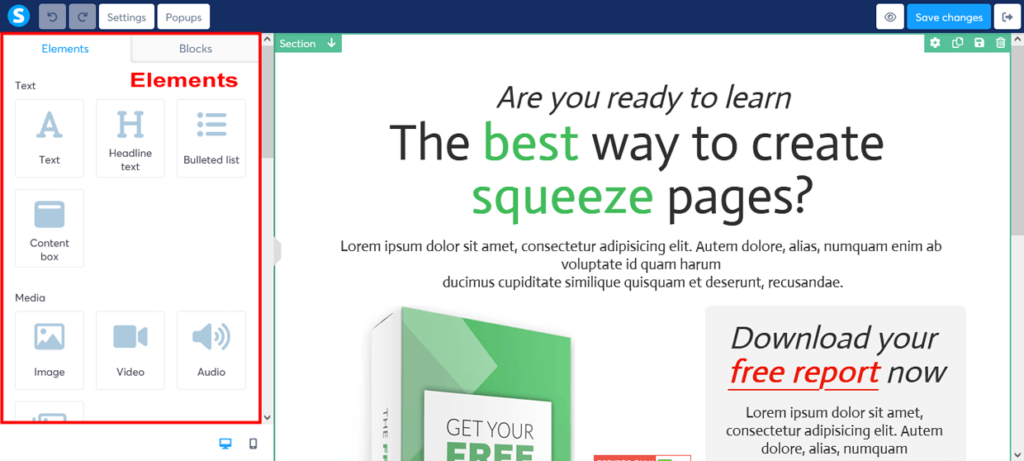
- Row Blocks: Also located on the left side, row blocks are pre-designed sections containing multiple elements. You can drag and drop these blocks onto your template to quickly create a professional-looking layout.
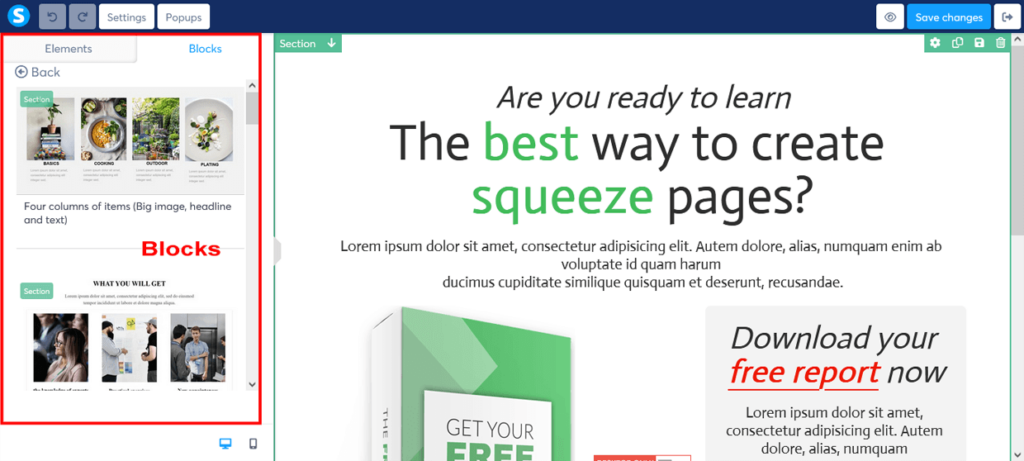
- Sections: Within the ‘Column Layout’ elements on the left of the editor, you will find the Section element. A section is a basic building block in Systeme.io, in which you then place your row blocks. As such, the hierarchy for building out your page elements is typically ‘Section’ then ‘Row Block’ then ‘Individual Element’. Once you play around in the drag-and-drop editor, you will quickly see this.
- Canvas: The central area of the editor where you can see your sales funnel template and make changes in real-time.
- Settings: Also located on the left side once you click on an element, the settings panel allows you to customize the properties of the selected element or the overall page.
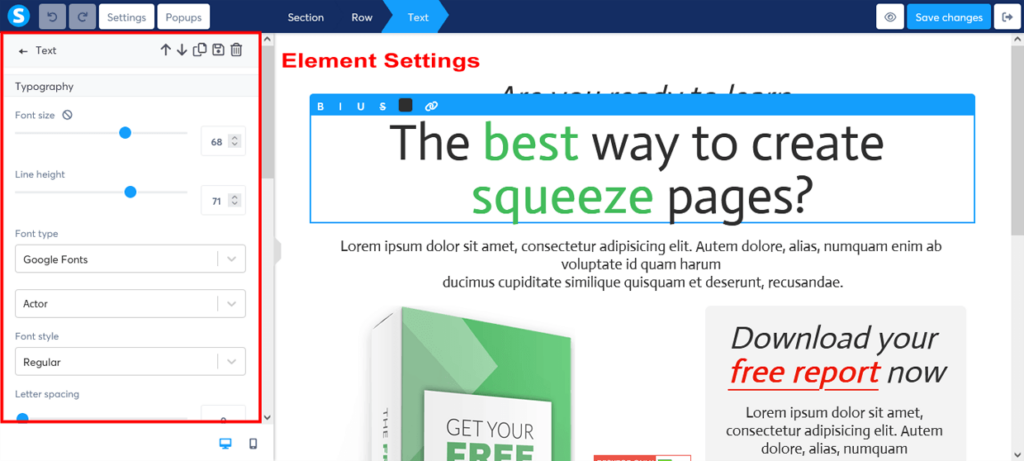
Customize your sales funnel template using drag-and-drop elements and row blocks
To customize your sales funnel template, simply drag and drop elements or row blocks from the left side onto the canvas. You can rearrange the elements by clicking and dragging them to the desired position.
For each element you can change the spacing around it by adjusting its padding and margin.
Inserting your own images and videos
To swap out template images or videos with your own files, simply click on the image (or video) in the template to open its settings on the left. Then replace the image (or video) file with your own file buy clicking on the grey cloud icon to the right of the file name.
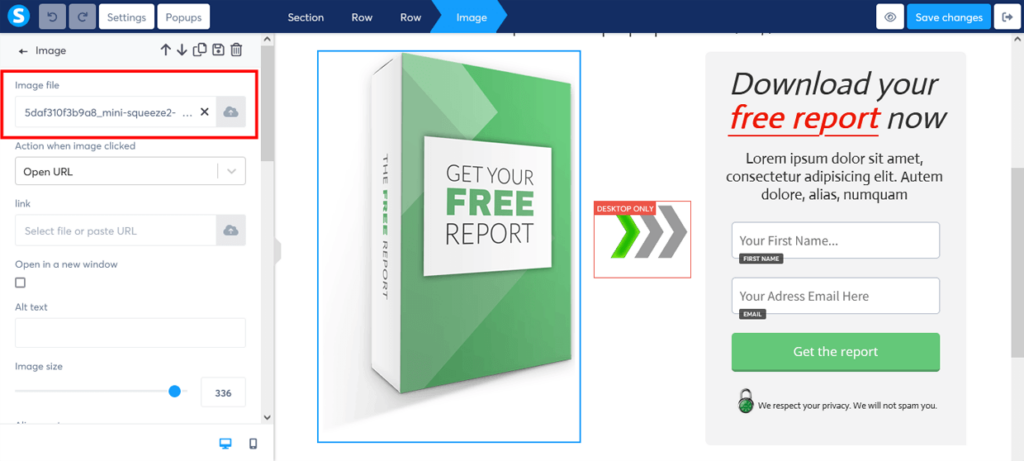
This opens a file upload box. You can drag and drop your file to the selected area. Or you can click on “Select file” to open up your ‘File Upload’ window from your computer.
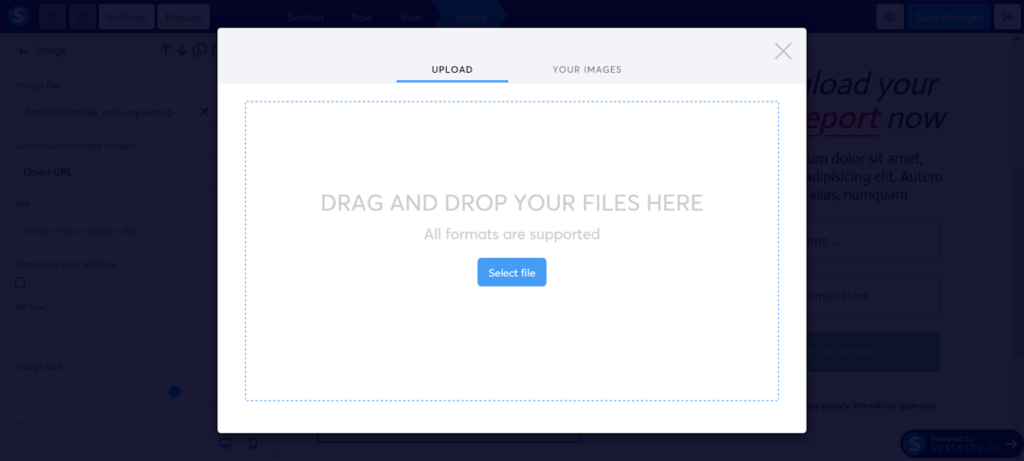
Once you have uploaded your file, Systeme.io lets you access all your files from the ‘Your images’ tab of the file upload popup.
Delete any unwanted elements
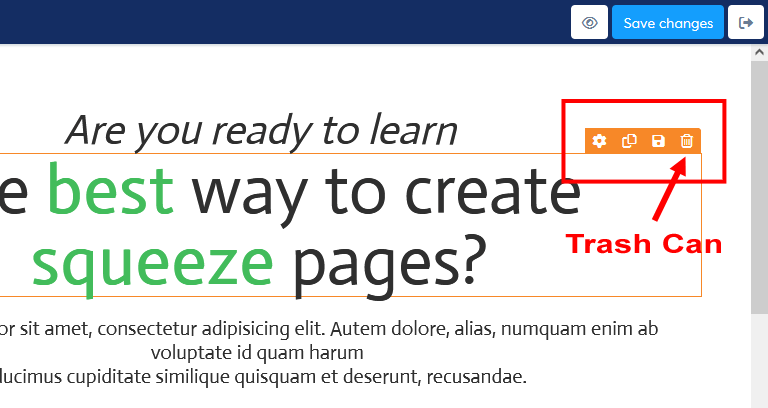
If there are elements in each sales funnel template that you want to remove, simply click on the element to select it, and then click on the trash bin icon that appears in the top right corner of the selected element. This will delete the element from your template.
Customize the overall page design
In addition to customizing individual elements and row blocks, you can also edit the overall design of your sales funnel page. To access the page settings, click on the ‘Settings’ button in the top left corner of the editor.
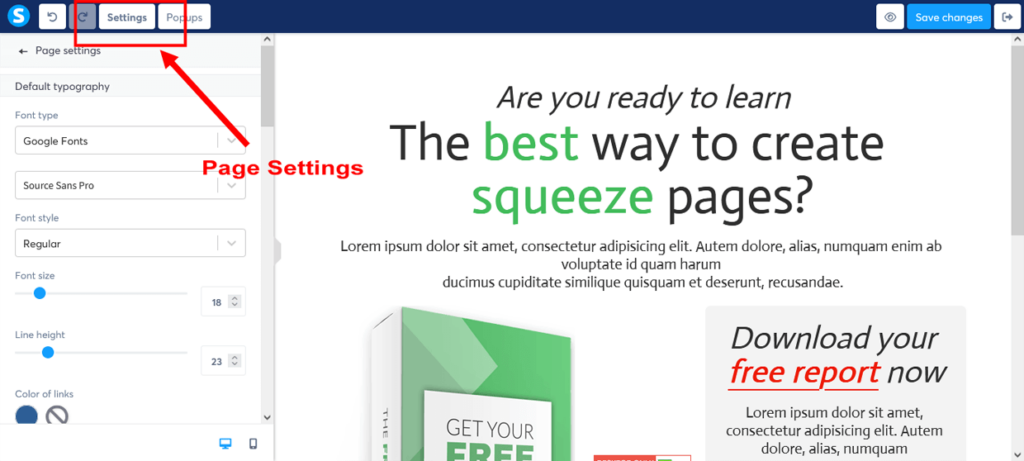
Here, you can customize the following:
- Default typography: Choose the font type and style for your sales funnel page.
- Page background: Change the background color or upload a background image.
- Link color: Select your chosen color for all of your links.
- Search engine optimization (SEO): Enter your page title, description, keywords, and author details to improve your search engine optimization for each page. You can also check a box to hide your page from search engines too.
Saving and previewing your changes
As you make changes, the editor will automatically save your progress. However, it’s a good idea to click on the “Save changes” button in the top-right corner periodically to ensure your changes are saved.
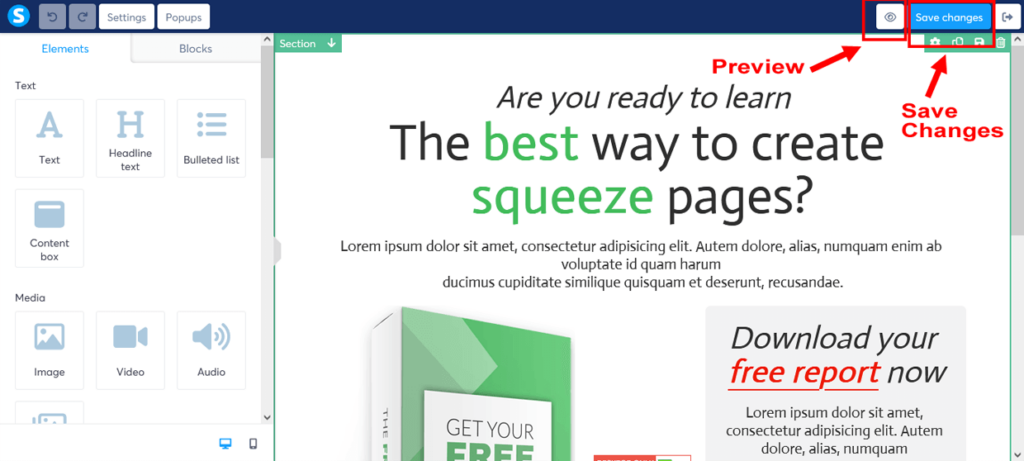
To preview each sales funnel page, click on the “Preview” button in the top-right corner. This will open a new window where you can see how your page will look on a desktop without the editor.
To preview how each page will look on mobile devices, you can stay in the editor click on the mobile icon at the bottom of the elements panel. Once you are in mobile view, you can click on any element in the editor and adjust it for mobile only via the element settings in left panel.
Once you have made your adjustments for mobile view, you can click on the desktop icon at the bottom of the elements panel to return to the desktop only editor.
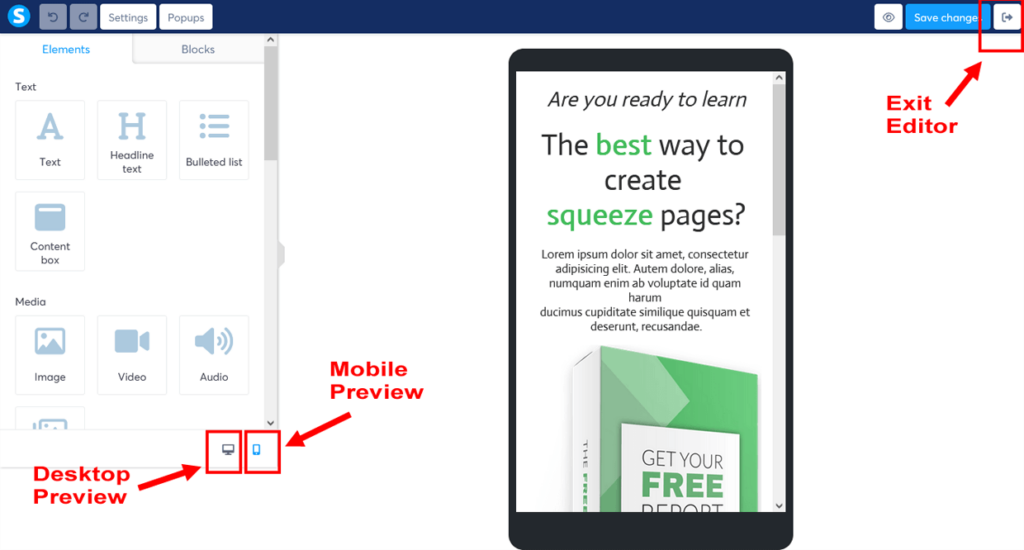
When you’re finished editing your page, click on the “Exit” button in the top-right corner to return to your sales funnel stages editor.
Congratulations, you’ve just mastered the intuitive drag-and-drop editor. This will bring your sales funnel vision to life with ease and precision!
Now, let’s dive back into the instructions and continue building your high-converting sales funnel landing page.
- Customize your landing page: Use the drag-and-drop editor to add, remove, or rearrange elements on your landing page. You can also change the font, colors, and other design elements like the sales funnel logo to match your branding. Make sure your landing page includes a clear headline, compelling copy that highlights the benefits, and a strong call-to-action (CTA) to encourage visitors to sign up for your lead magnet.
If you’re new to sales funnel copywriting, consider using proven copywriting frameworks like the AIDA model (Attention, Interest, Desire, and Action) to create engaging sales copy.
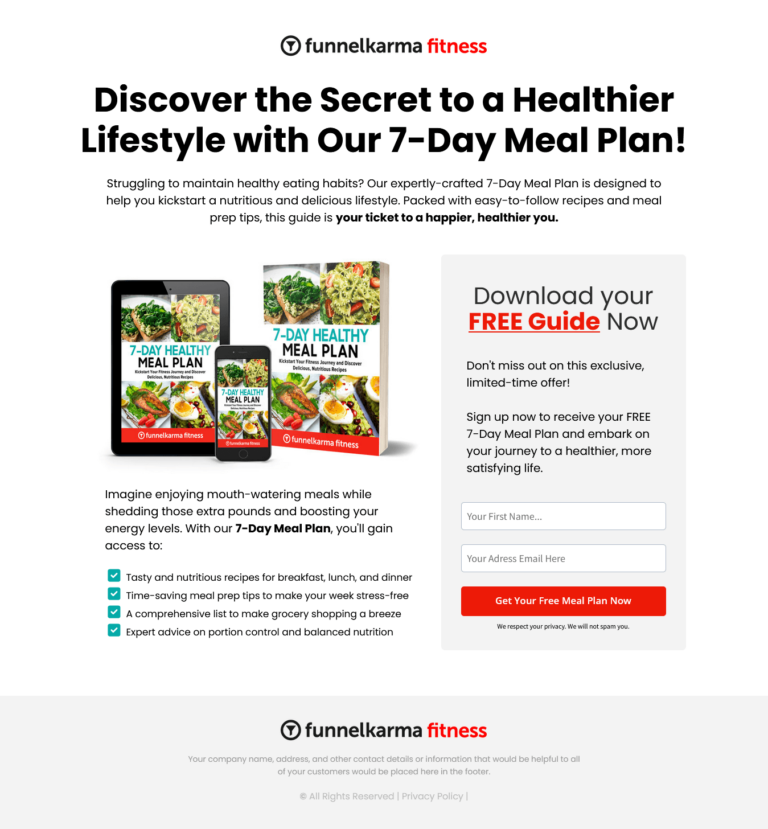
Here’s some suggested sales copy using the AIDA framework for your landing page and lead magnet:
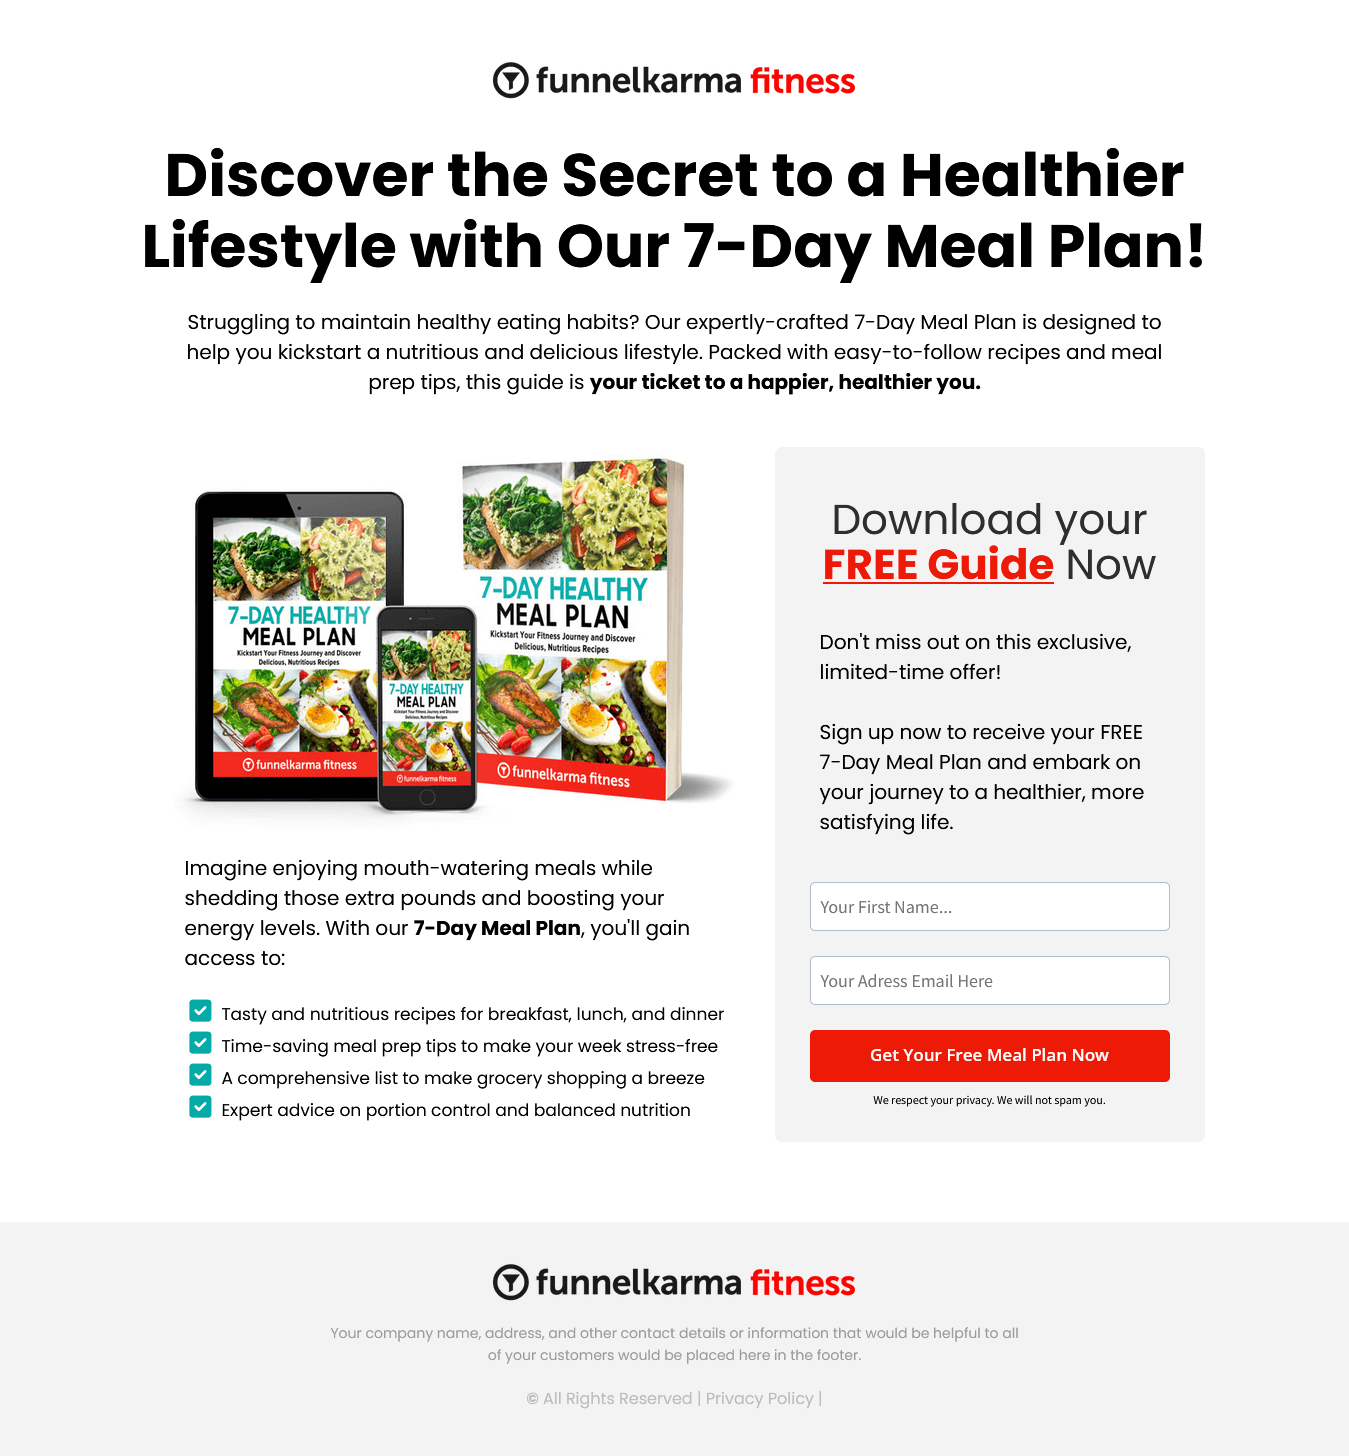
Attention: “Discover the Secret to a Healthier Lifestyle with Our 7-Day Meal Plan!”
Interest: “Struggling to maintain healthy eating habits? Our expertly-crafted 7-Day Meal Plan is designed to help you kickstart a nutritious and delicious lifestyle. Packed with easy-to-follow recipes and meal prep tips, this guide is your ticket to a happier, healthier you.”
Desire: “Imagine enjoying mouth-watering meals while shedding those extra pounds and boosting your energy levels. With our 7-Day Meal Plan, you’ll gain access to:
- A variety of tasty and nutritious recipes for breakfast, lunch, and dinner
- Time-saving meal prep tips to make your week stress-free
- A comprehensive shopping list to make grocery shopping a breeze
- Expert advice on portion control and balanced nutrition
Action: “Don’t miss out on this exclusive, limited-time offer! Sign up now to receive your FREE 7-Day Meal Plan and embark on your journey to a healthier, more satisfying life.”
Powerful, isn’t it? Can you resist the allure of scrumptious, healthy meals that promise a happier, more energized you?
Crafting persuasive sales funnel copy and using proven copywriting frameworks, like the one demonstrated above, is the secret sauce for connecting with your target audience’s deepest desires, fears, and aspirations.
When you master this art, you’ll create an irresistible sales funnel that keeps your audience captivated and coming back for more.
- Customize your form: Finally, in the form settings, ensure that you’re collecting the necessary information, such as first name and email address.
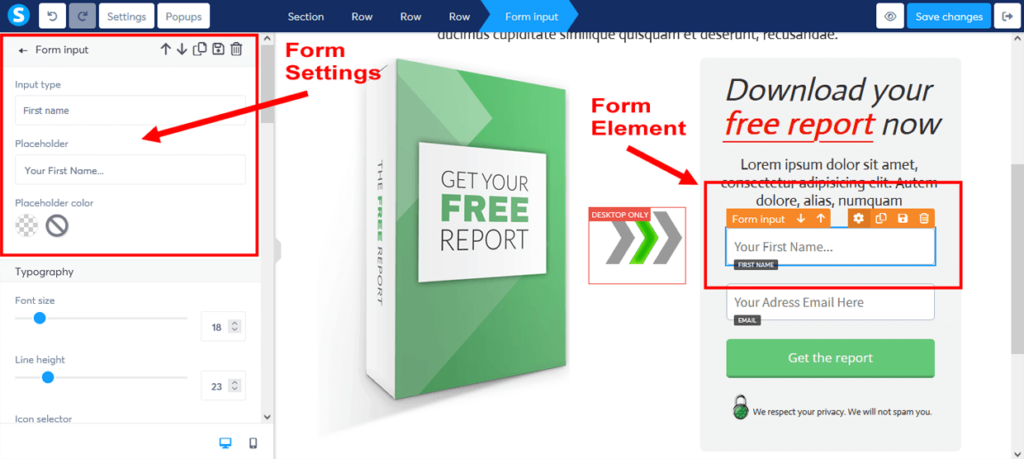
- Save your landing page: Once you’re satisfied with your landing page, click the “Save changes” button in the top-right corner of the editor to save your changes. Click the “Exit” button to return to your sales funnel stage editor.
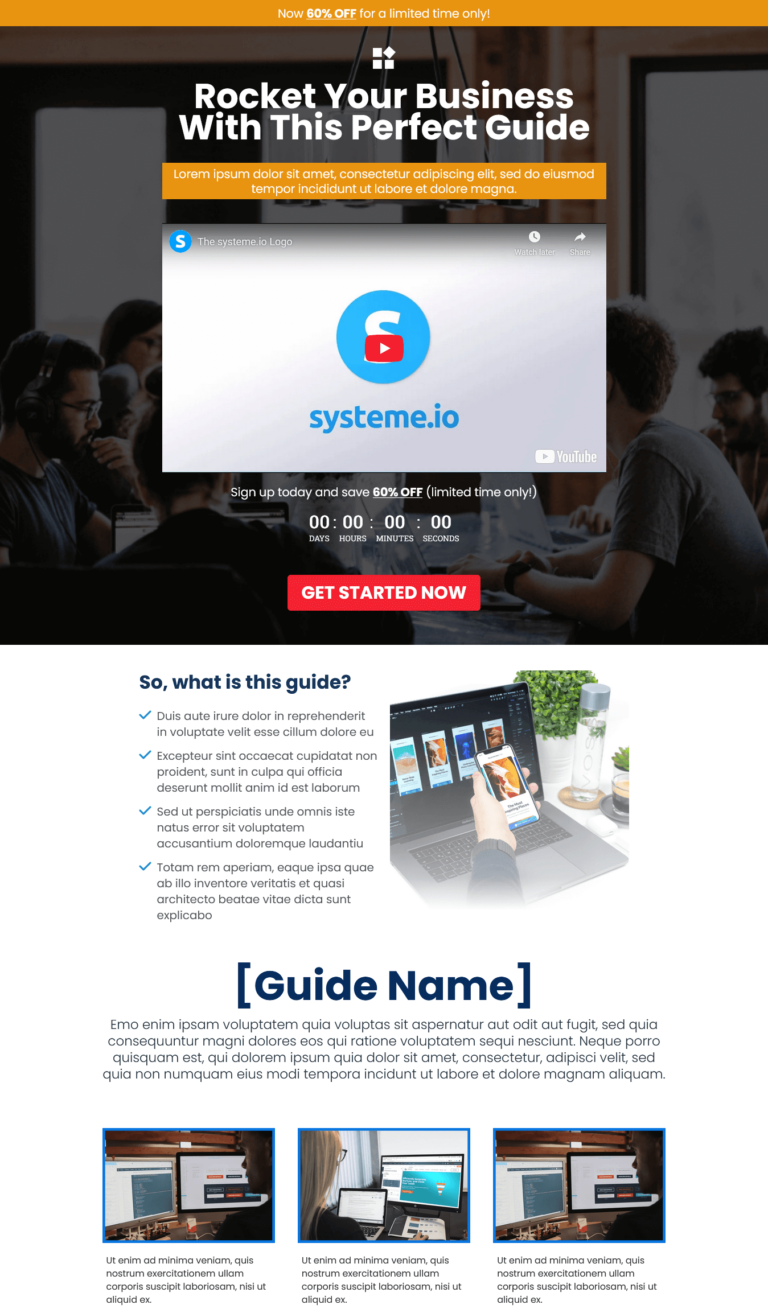
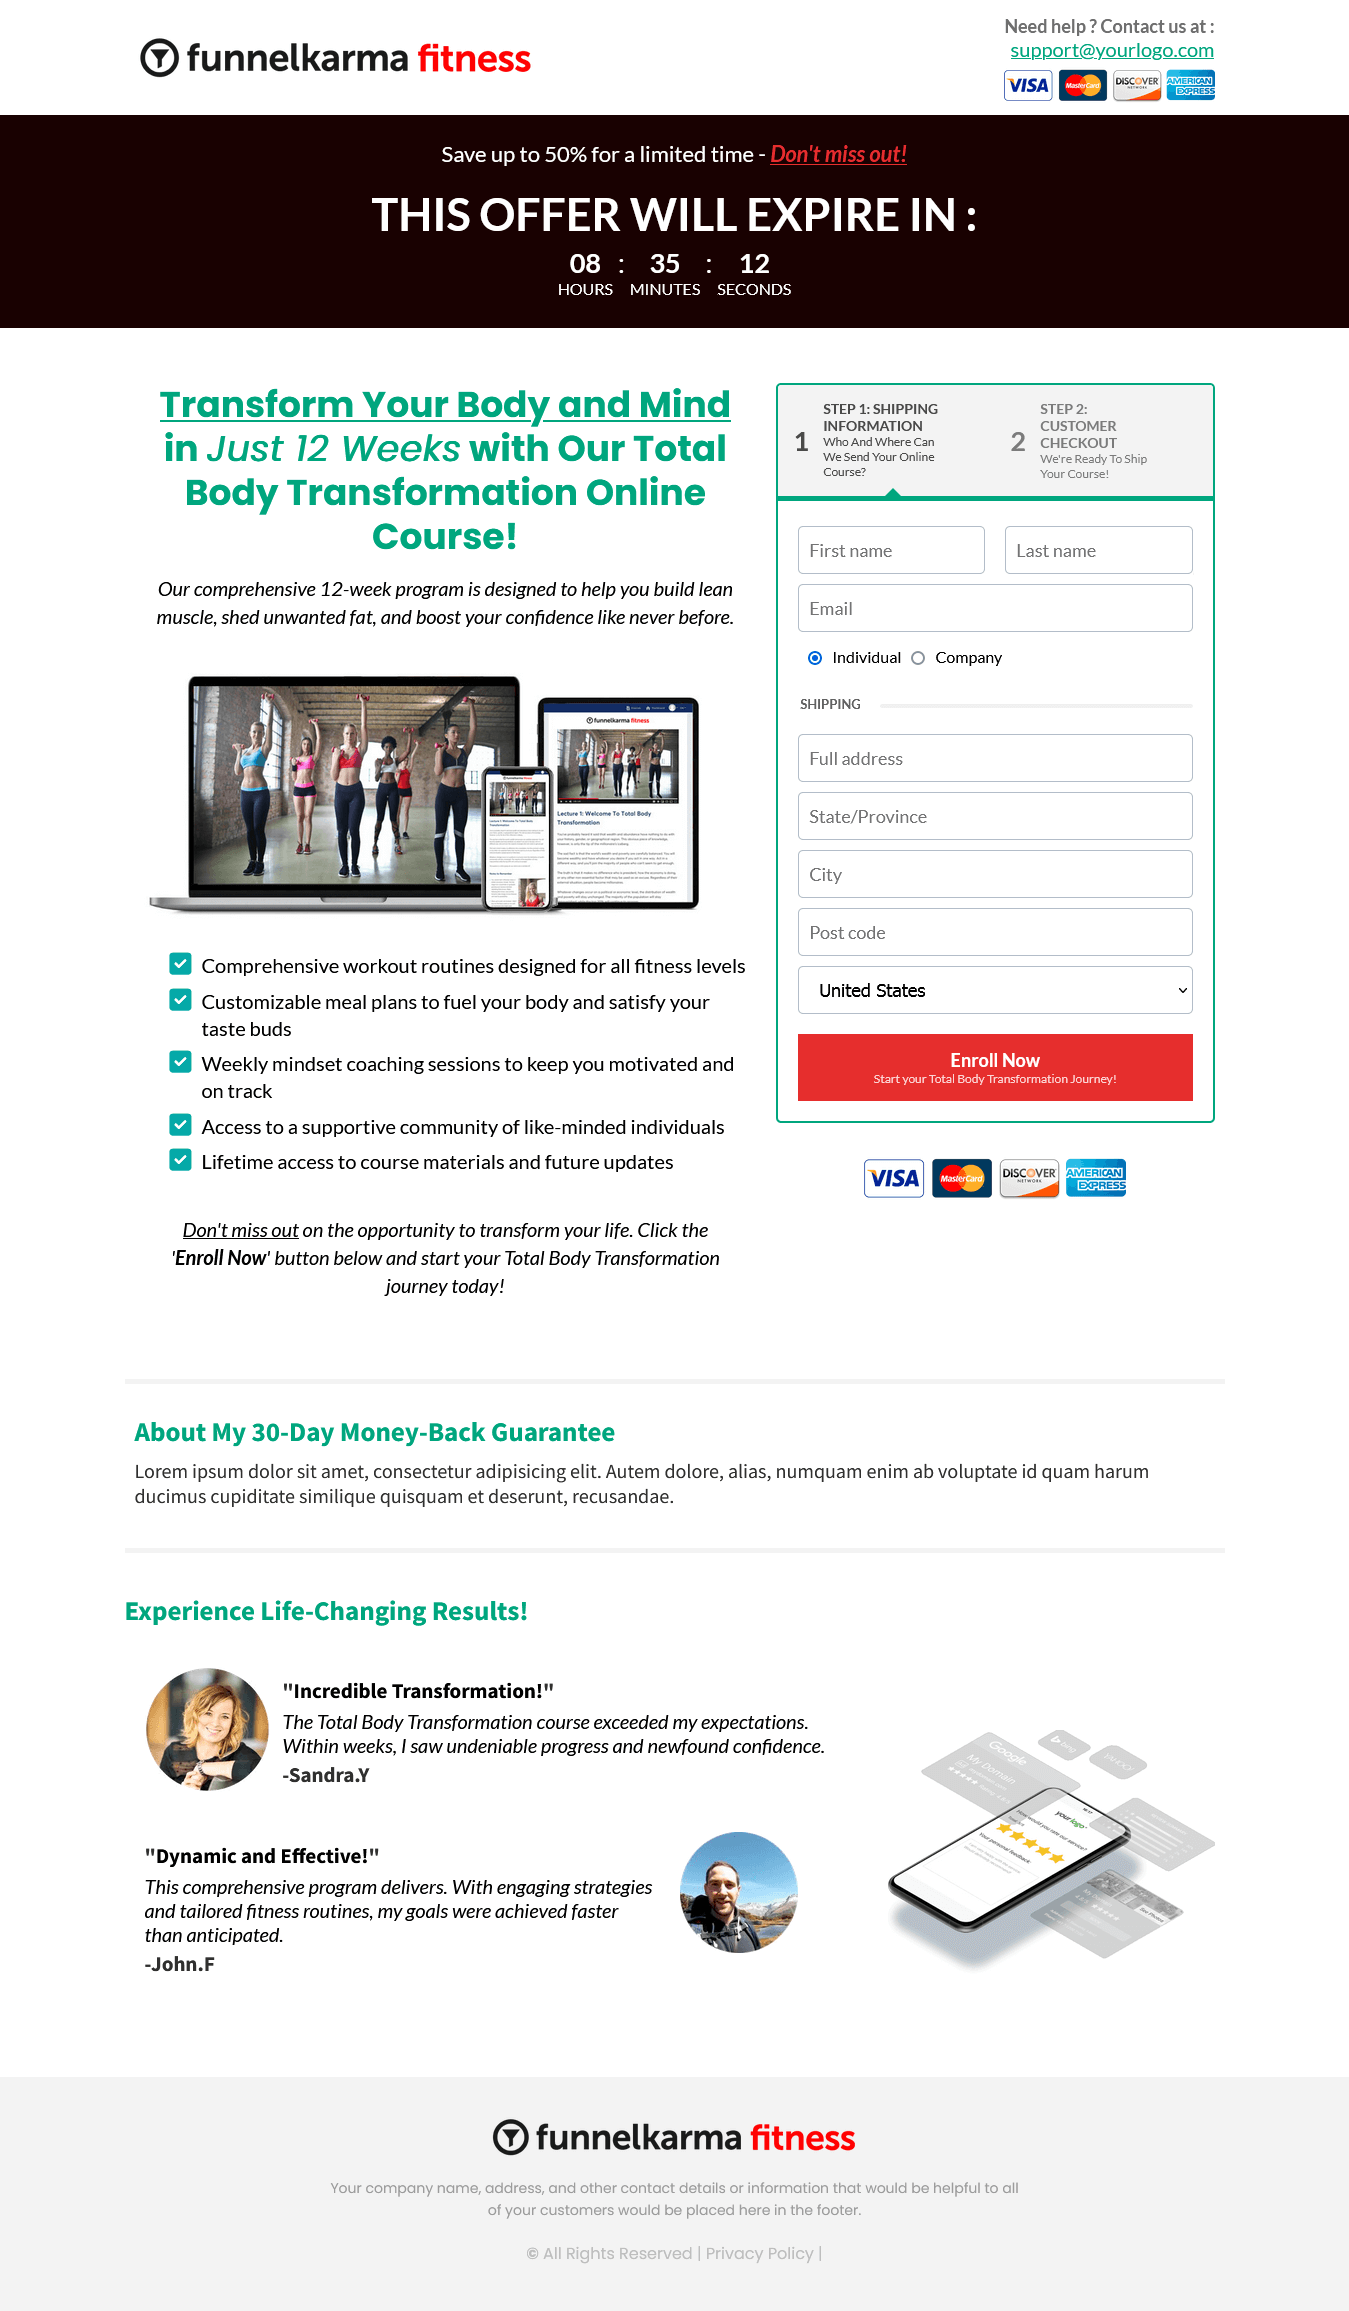
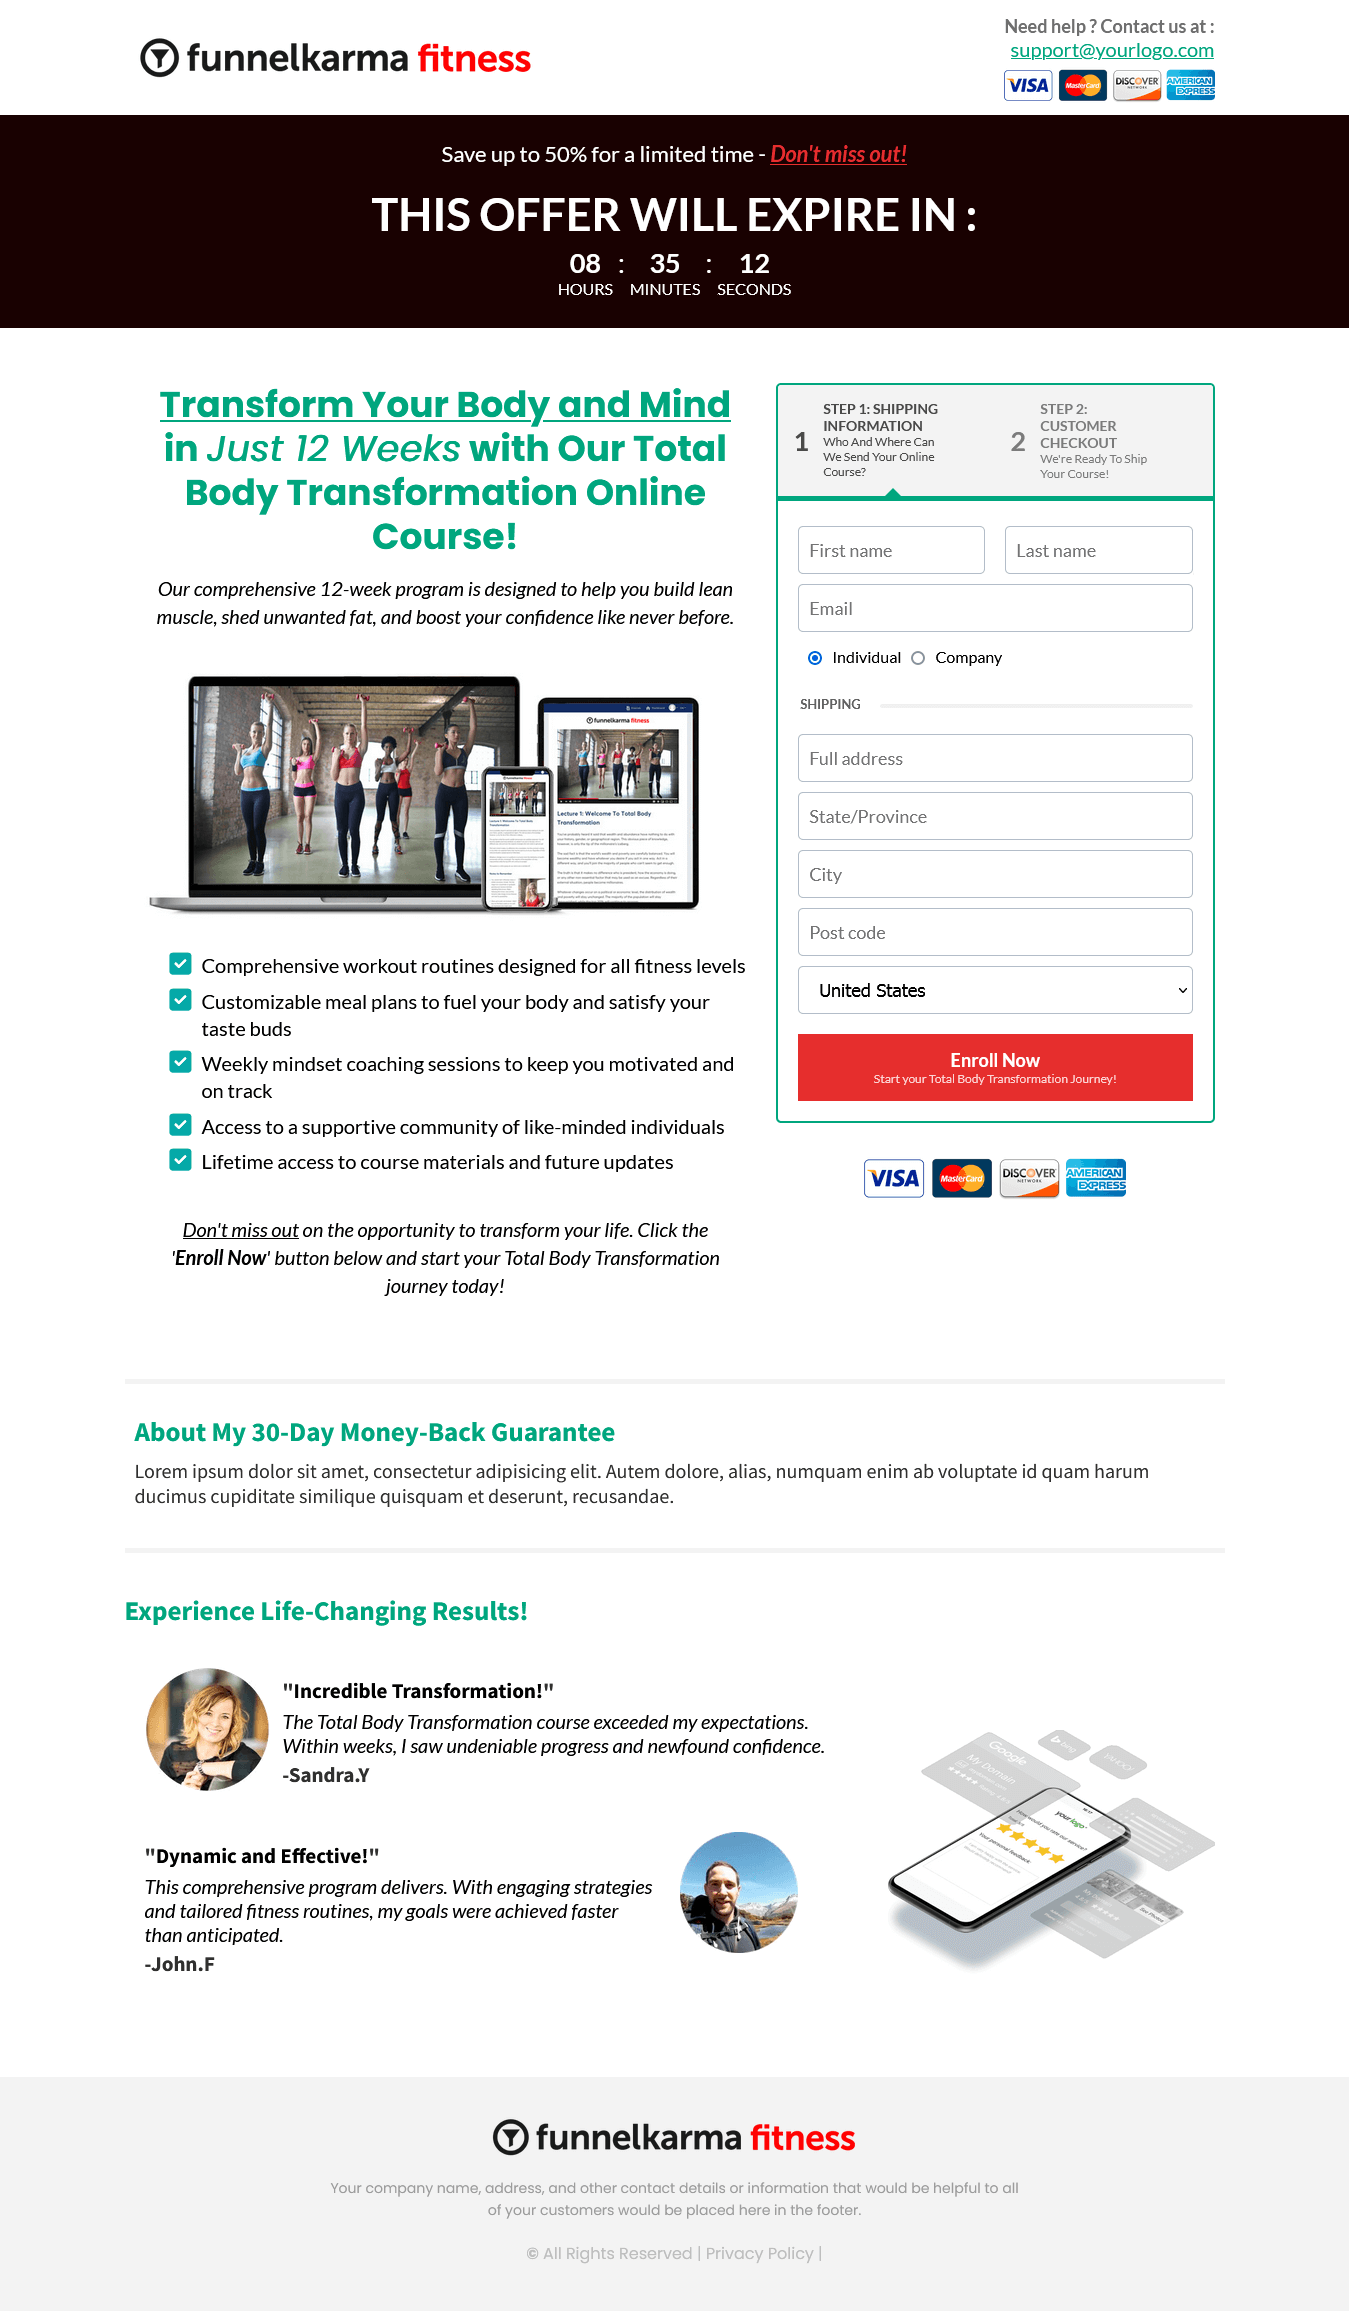
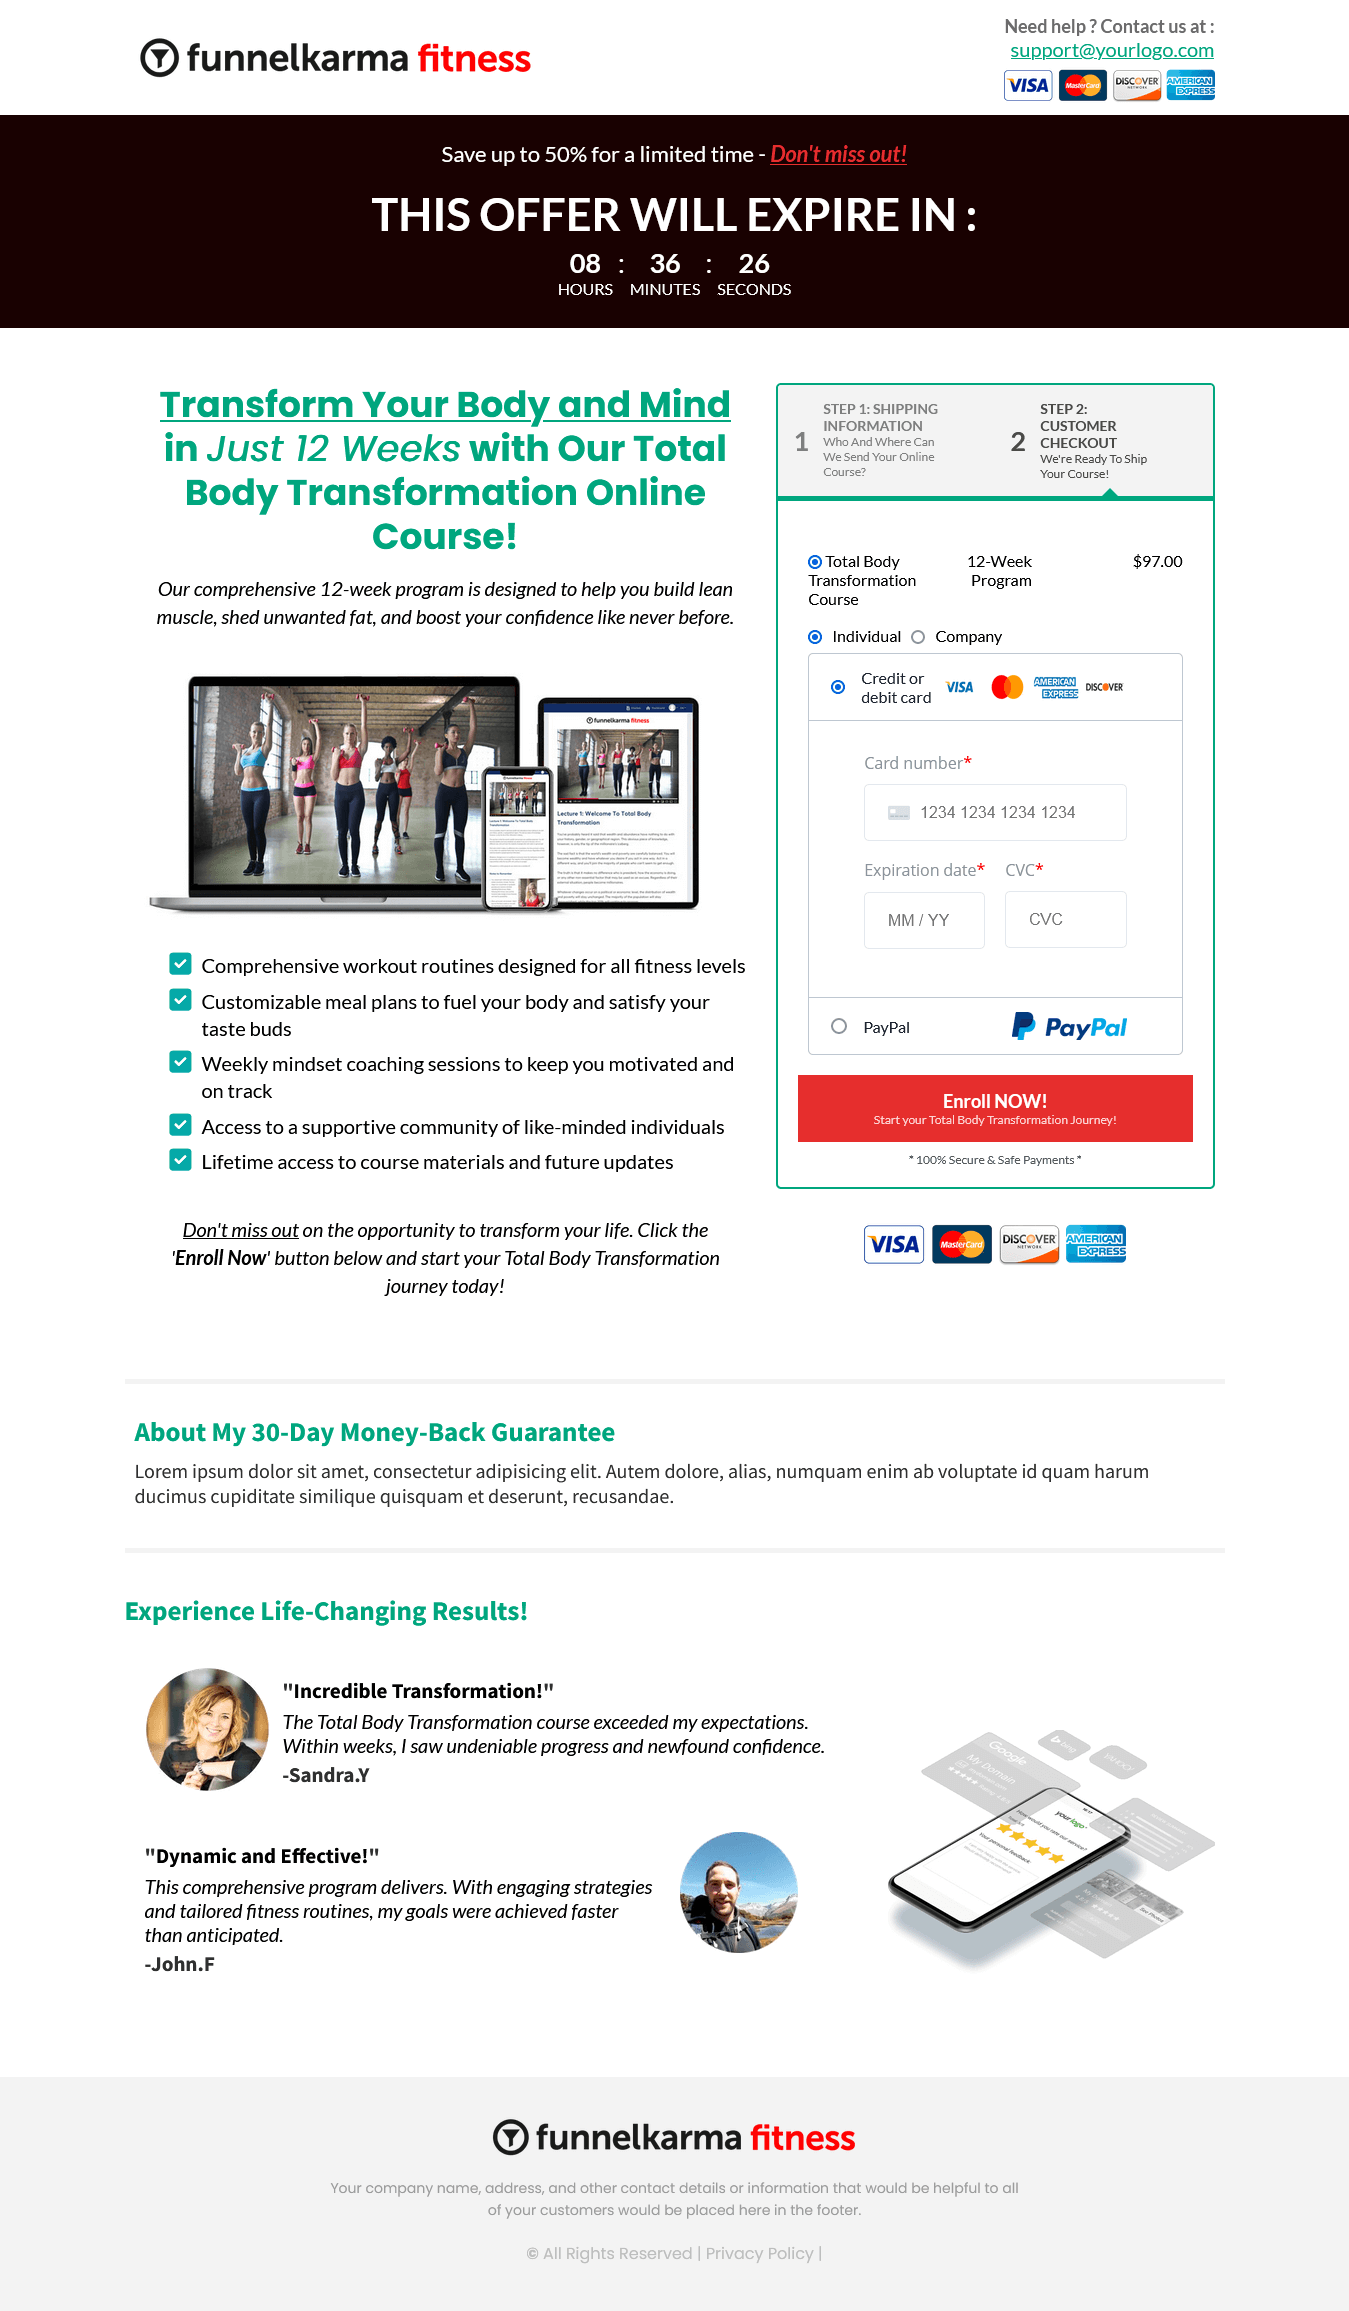
Here’s how we took one of Systeme.io’s landing page templates and simply edited it to create our FunnelKarma Fitness sales funnel example.
Click on each landing page image above to enlarge and view in a full lightbox
To view and scroll through the final edited landing page in full, click on the blue button below.
With your sales funnel landing page looking polished and ready to convert, it’s time to shift gears and focus on crafting the perfect thank you page to express your gratitude and keep your new subscribers engaged.
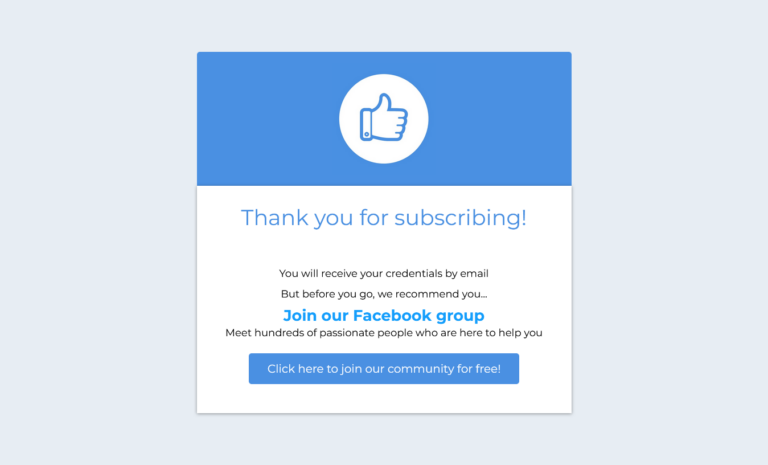
Setting up a opt-in thank you page
- Navigate to your funnel: If you’re not already in your sales funnel stages dashboard, click on “Funnels” in the main header menu. Then select the funnel you created earlier (e.g., “Total Body Transformation Funnel”) and click on it to open the funnel stage editor.
- Choose your funnel step: Click on the ‘Thank You’ step of your sales funnel to select it.
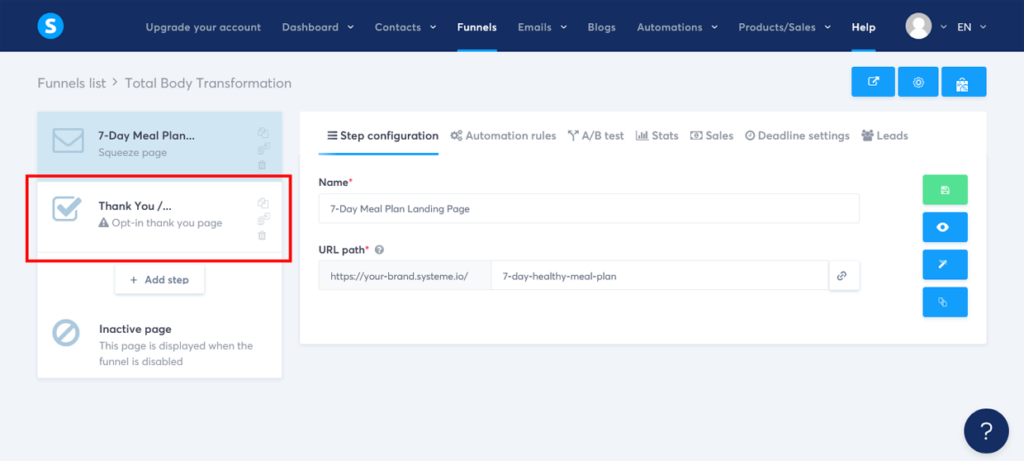
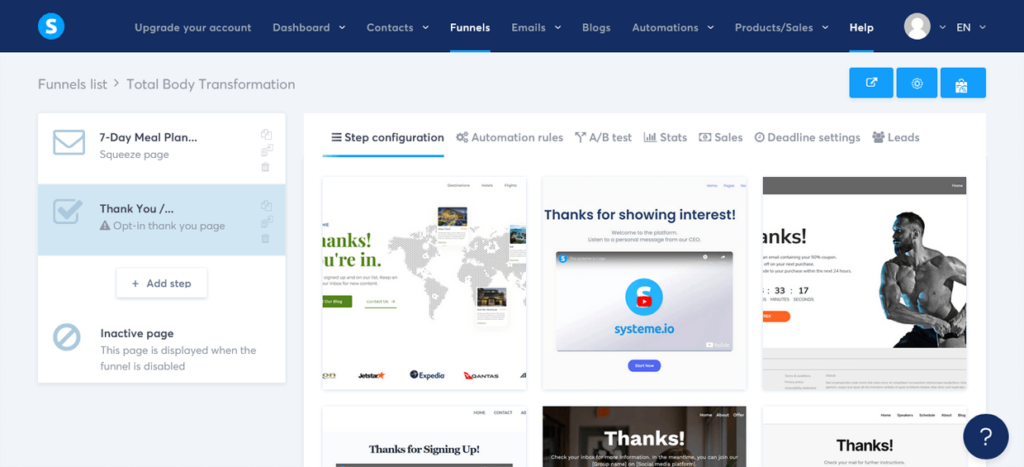
- Choose an opt-in thank you page template: Browse through the available opt-in thank you page options and select one that best fits your needs. When you’re happy with a template, close the preview window. Then click on “Select” to choose the template to proceed.
- Name your funnel step: In the ‘Step configuration’ settings, create a name for your thank you page. For our example, we’ll be calling our thank you page “7-Day Meal Plan Thank You Page”.
- Customize your opt-in thank you page URL path name: Below the name in the ‘Step configuration’ settings, change the ‘URL path’ name to something short and simple that closely resembles your lead magnet name and thank you, using dashes between words. For example, “7-day-healthy-meal-plan-thank-you.”. This will make your thank you link look more professional for your subscribers.
- Save your changes: Once you’ve named your funnel step and customized your URL path, click on the green ‘Save funnel step’ button on the right-hand side to save your changes.
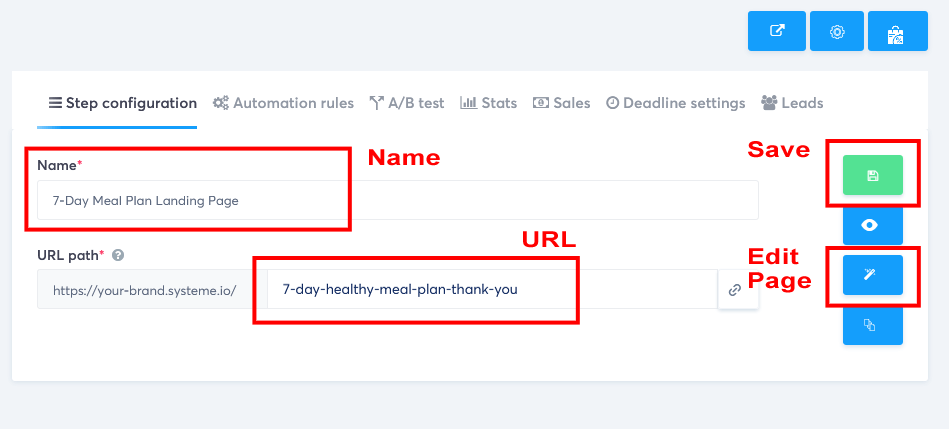
- Edit your opt-in thank you page: Now, click on the middle blue ‘Edit page’ button on the right-hand side to open the funnel editor.
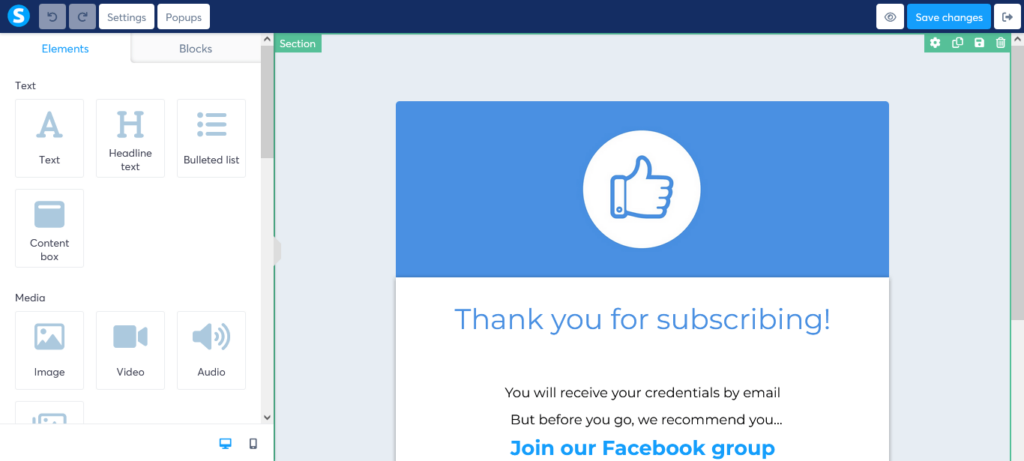
- Customize your opt-in thank you page: Use the drag-and-drop editor to add, remove, or rearrange elements on your thank you page. Add a message of gratitude and any additional information you’d like to share with your new leads.
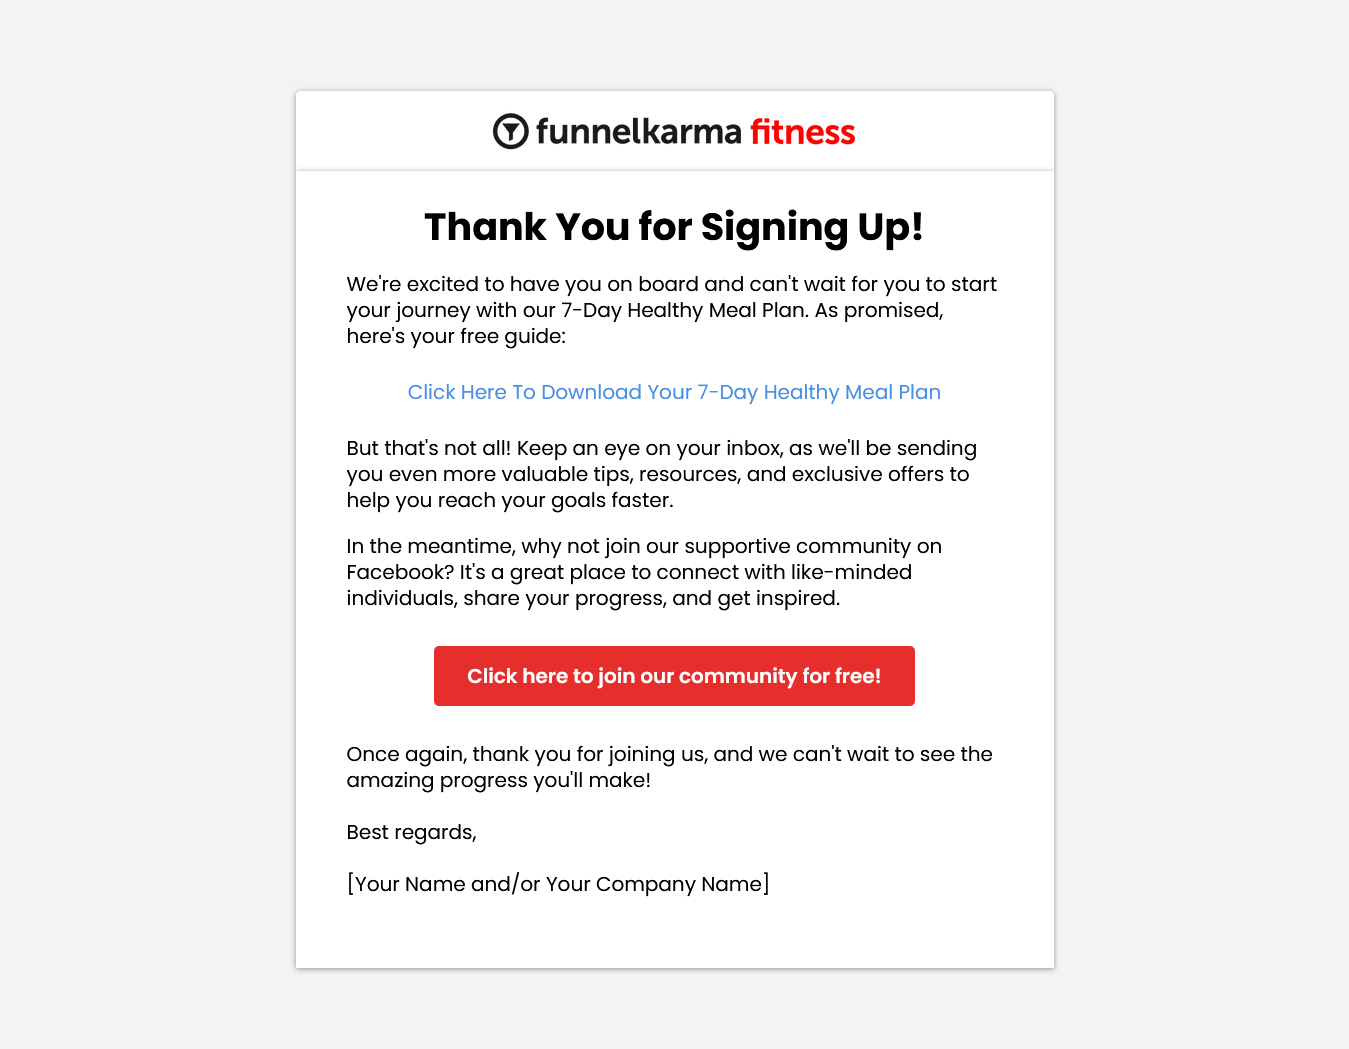
For example, here’s some simple copy for your opt-in thank you page, featuring the “7-Day Healthy Meal Plan” lead magnet:
“Thank You for Signing Up!
We’re excited to have you on board and can’t wait for you to start your journey with our 7-Day Healthy Meal Plan. As promised, here’s your free guide:
[Button or Link to Download 7-Day Healthy Meal Plan]
But that’s not all! Keep an eye on your inbox, as we’ll be sending you even more valuable tips, resources, and exclusive offers to help you reach your goals faster.
In the meantime, why not join our supportive community on [Facebook/Instagram/etc.]? It’s a great place to connect with like-minded individuals, share your progress, and get inspired.
[Button or Link to Social Media Group or Page]
Once again, thank you for joining us, and we can’t wait to see the amazing progress you’ll make!
Best regards,
[Your Name and/or Your Company Name]”
This sales funnel thank you page copy is designed to express gratitude, provide access to the lead magnet, and encourage further engagement through email and social media. Don’t forget to replace the placeholders (e.g., [Button or Link to Download 7-Day Healthy Meal Plan]) with the appropriate elements using the drag-and-drop editor.
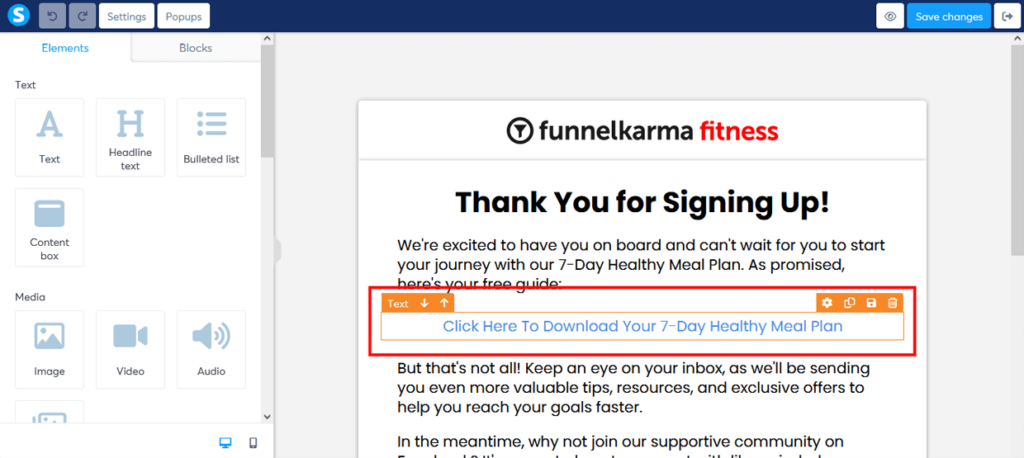
- Add a text link for your lead magnet: Use the drag-and-drop editor to add a ‘Text Block’ within your gratitude message. Edit the text to read something like “Click Here To Download Your 7-Day Healthy Meal Plan”.
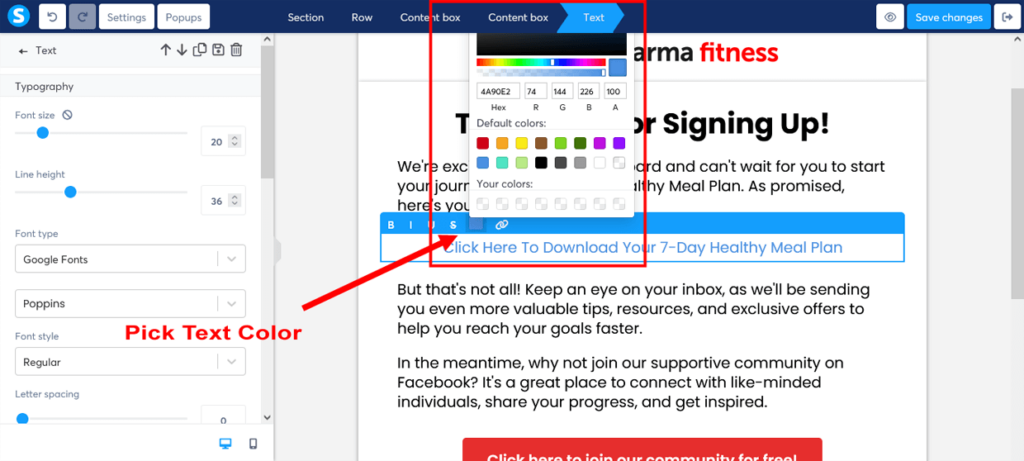
- Change the link text color: Make the link text color blue by highlighting it. Then click on the color icon above the text and choose a blue color.
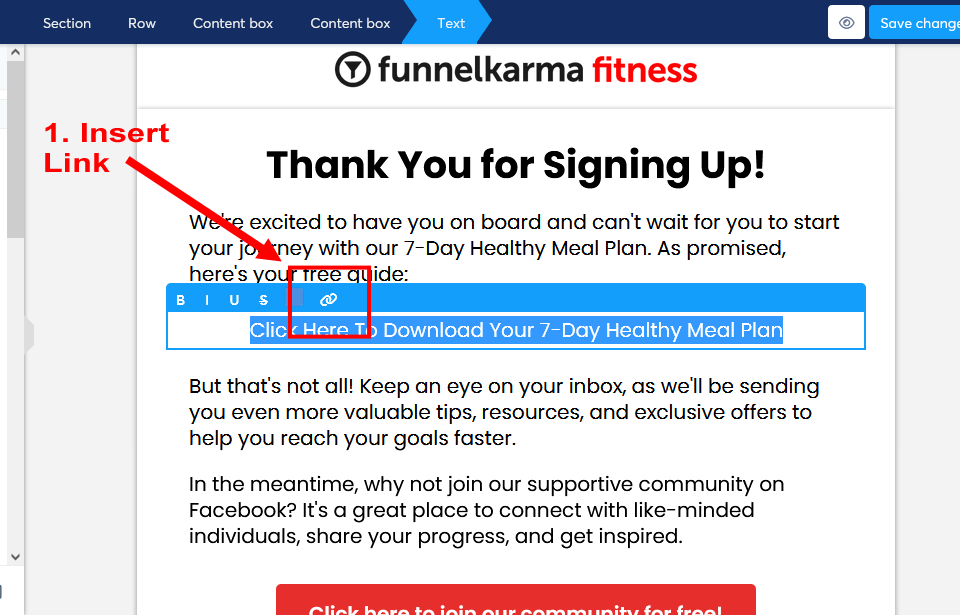
- Select and highlight the link text: In the text box you just created, highlight the text for your link, and click on the small chain link button above the text. This will create a new ‘Link to a file ‘button above the text.
- Link the text to your PDF file: Now click on the “Link to a file” button that is above your highlighted text. This will open a file upload popup box.
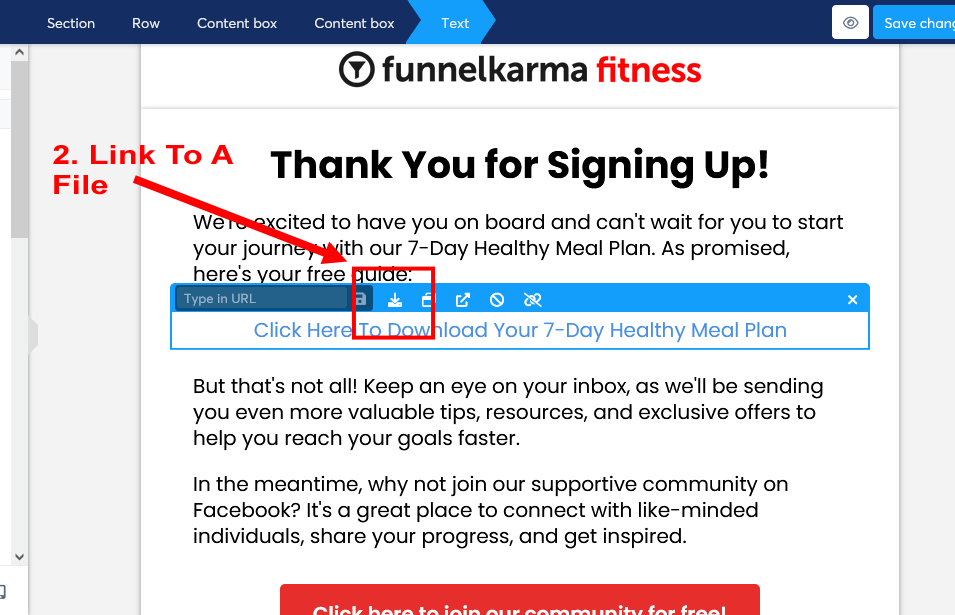
- Upload your PDF file: From the file upload popup box, select your PDF file from your computer to upload it to Systeme.io.
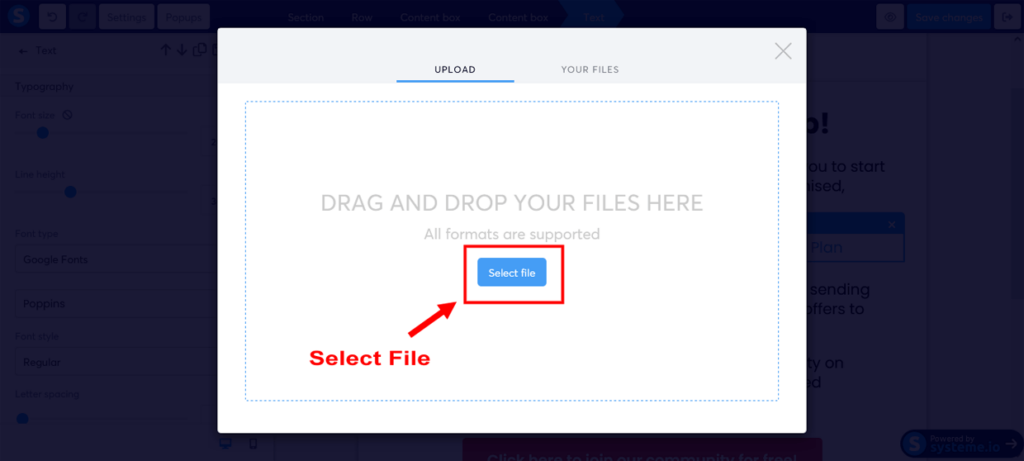
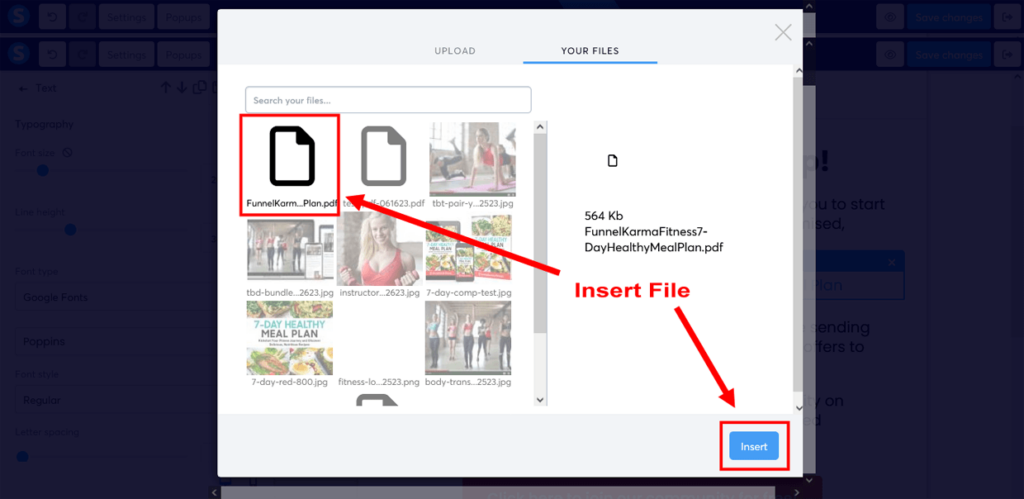
- Insert your PDF file: Once you have uploaded your PDF file, click on the “YOUR FILES” tab of the file upload popup box to view your file. Click on your file to select it. Then click on “Insert” to attach your file to the highlighted text on your Thank You Page.
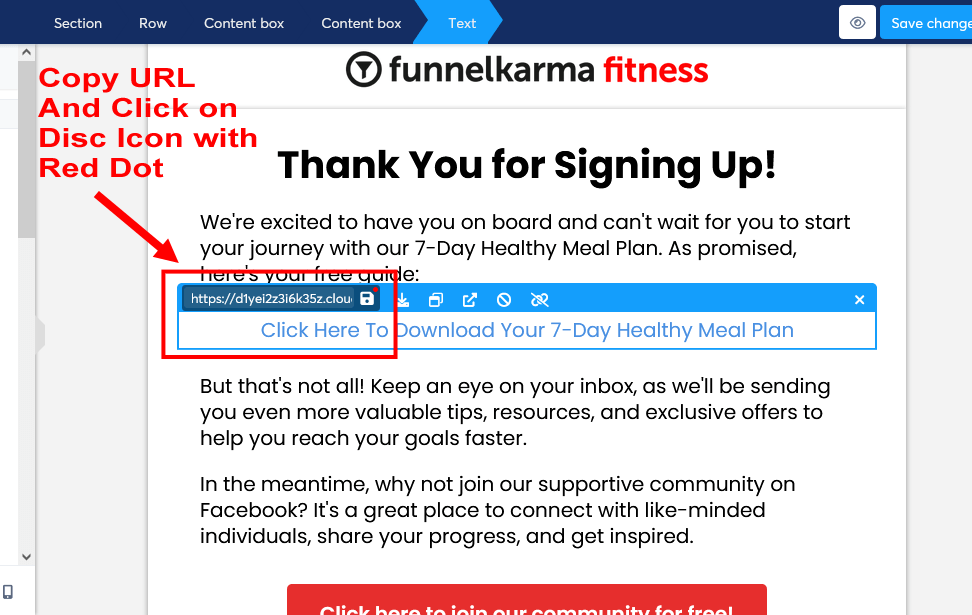
- [IMPORTANT] Make a copy of your PDF URL link: In the text editor, copy the PDF URL link by double clicking on the URL link to select it. Then copy the link by right clicking with your mouse while hovering over the highlighted URL and select “Copy” from your mouse right-click menu. Once copied, then paste the PDF URL into Notepad or an equivalent text editor (a Google or Word doc will work too), as we will be using it again in the upcoming Step 7.
- Confirm your uploaded link: Once you’ve copied this URL link, now confirm this link in Systeme.io by clicking on the ‘disk icon with the red dot’ above the highlighted text. This will attach your lead magnet to the link on your thank you page.
- Save your opt-in thank you page: Once you’re satisfied with your opt-in thank you page, click the “Save changes” button in the top-right corner of the editor to save your changes. Click the “Exit” button to return to your sales funnel stage editor.
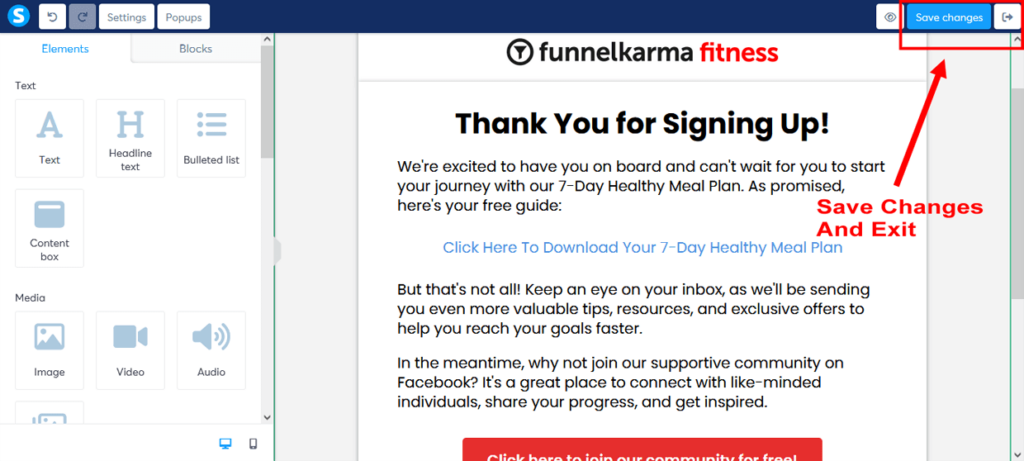
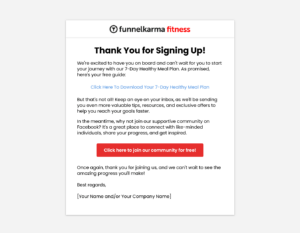
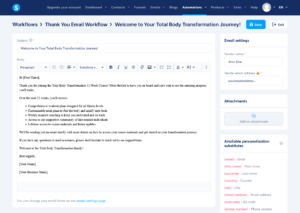
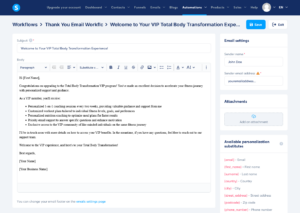
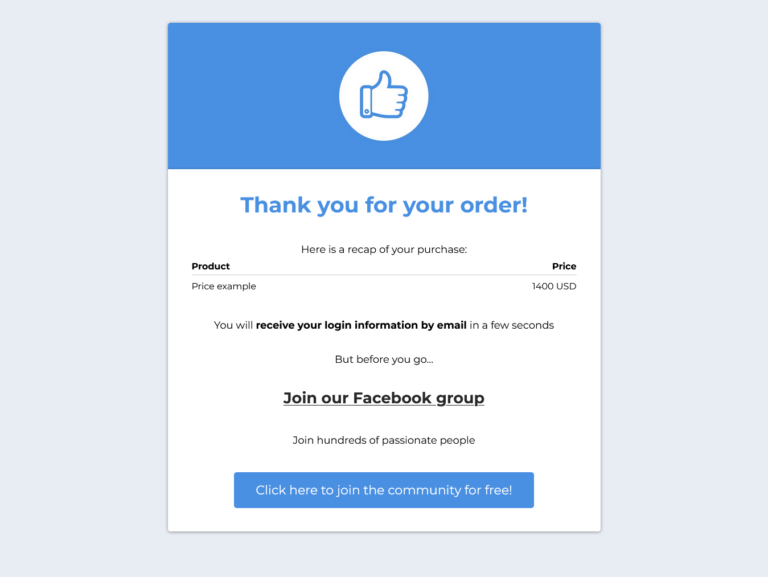
Here’s how we took one of Systeme.io’s opt-in thank you page templates and simply edited it to create our FunnelKarma Fitness sales funnel example.
Click on each opt-in thank you page image above to enlarge and view in a full lightbox
And just like that, you’ve successfully created a captivating sales funnel landing page and an appreciative opt-in thank you page using Systeme.io’s templates and editor.
Give yourself a pat on the back for a job well done!
With your landing page and opt-in thank you page in place, you’re all set to start attracting leads and guiding them through your sales funnel.
In the upcoming step, we’ll dive into creating a sales funnel email sequence to nurture those valuable leads, while also delivering an additional copy of your lead magnet straight to their inbox.
Step 7: Set Up Your Email Marketing Campaign
A well-crafted email marketing campaign is the key to nurturing your leads and guiding them seamlessly through your sales funnel.
In this step, we’ll begin by creating an automated “Thank You” email, which will be delivered promptly after a user signs up for your lead magnet.
As we progress through this tutorial, we’ll revisit this email marketing campaign and expand it by adding more emails designed to nurture your subscribers, inform them about your main offer, and introduce your upsell.
Ready to create some email magic with Systeme.io? Let’s get started!
Creating your email campaign in Systeme.io
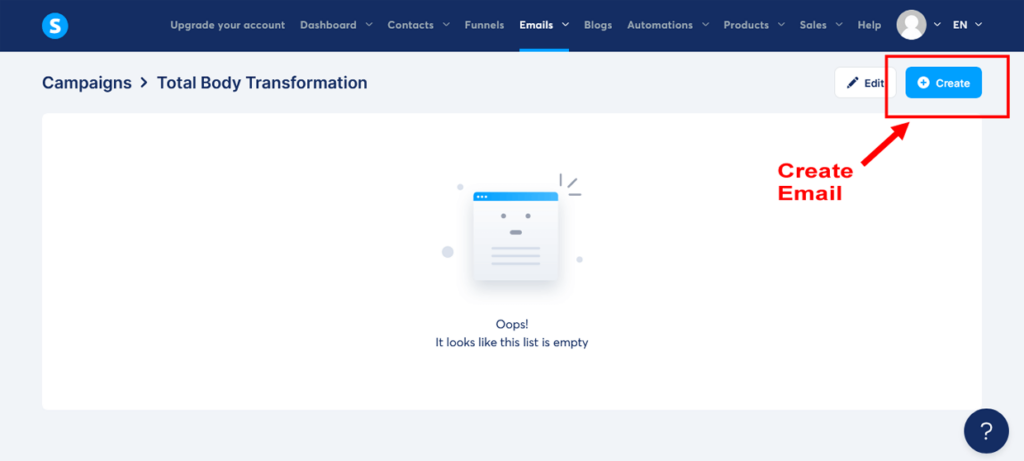
- Navigate to the Campaigns section: In the main Systeme.io dashboard, click on “Emails” in the main header menu. And then click on “Campaigns” in the drop-down menu.
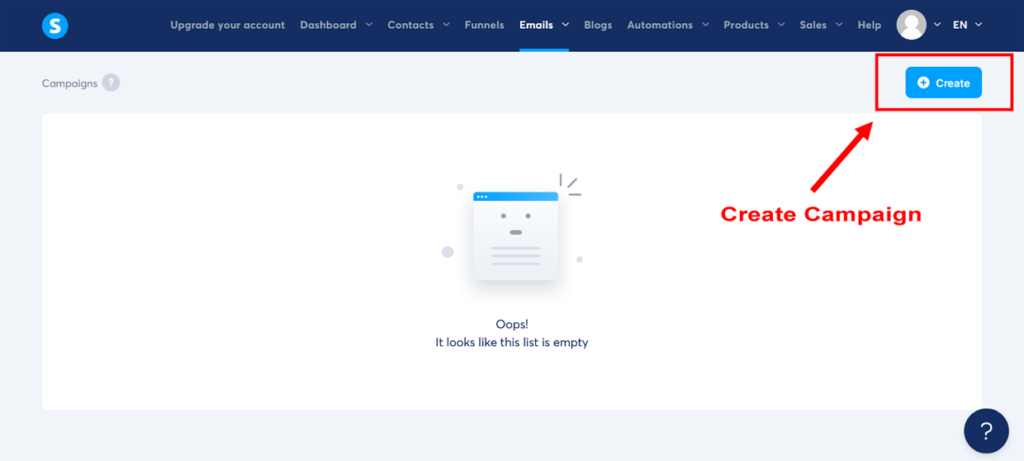
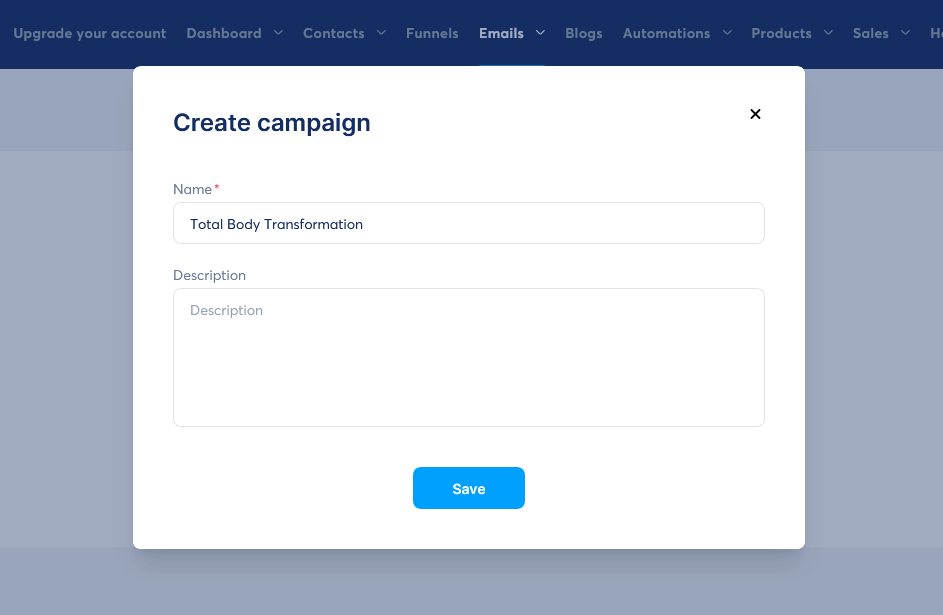
- Create a new email campaign: Next, click on the “Create” button on the top-right side. Give your campaign a name, for example “Total Body Transformation”. This will take you to your Campaigns dashboard.
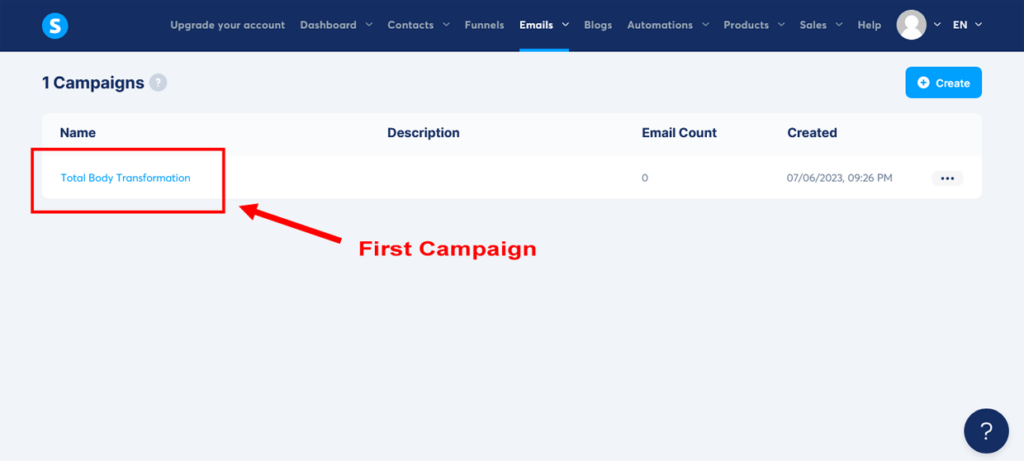
- Open your email campaign: Click on the email campaign you just created to open your first email campaign.
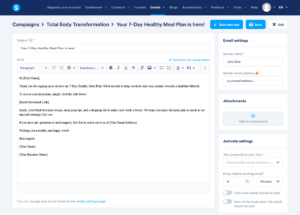
- Create your first email: Click on “Create” to start your first automated email. In the ‘Create campaign step’ popup add the ‘Subject’. Make sure to write an attention-grabbing subject line that clearly states the purpose of the email (e.g., “Your 7-Day Healthy Meal Plan is here!”). Check your ‘Sender name’ and ‘Sender email’ address. And then click ‘Save’ to open the email editor.
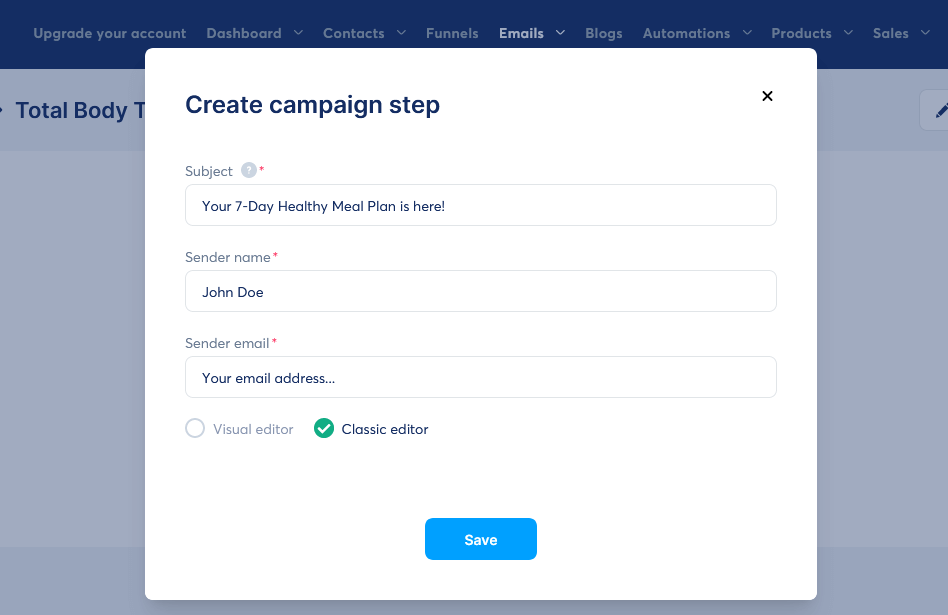
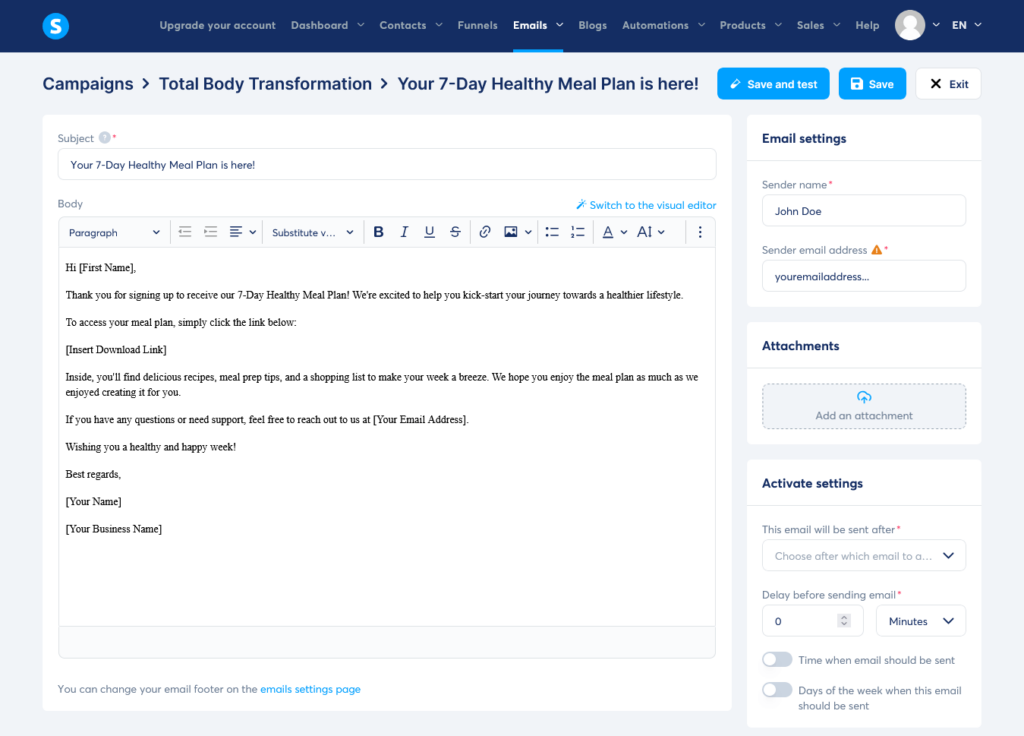
- Write the email body: In the email editor, now write the body of your email. Make sure to welcome your subscribers, express your gratitude for their interest in your lead magnet, and provide clear instructions on how to access it.
Here’s one of our opt-in sales funnel email templates you can use to get started:
Subject: Your 7-Day Healthy Meal Plan is here!
“Hi [First Name],
Thank you for signing up to receive our 7-Day Healthy Meal Plan! We’re excited to help you kick-start your journey towards a healthier lifestyle.
To access your meal plan, simply click the link below:
[Insert Download Link]
Inside, you’ll find delicious recipes, meal prep tips, and a shopping list to make your week a breeze. We hope you enjoy the meal plan as much as we enjoyed creating it for you.
If you have any questions or need support, feel free to reach out to us at [Your Email Address].
Wishing you a healthy and happy week!
Best regards,
[Your Name]
[Your Business Name]”
Remember, a short, friendly, and clear email helps you connect with your subscribers and keeps them engaged with your content.
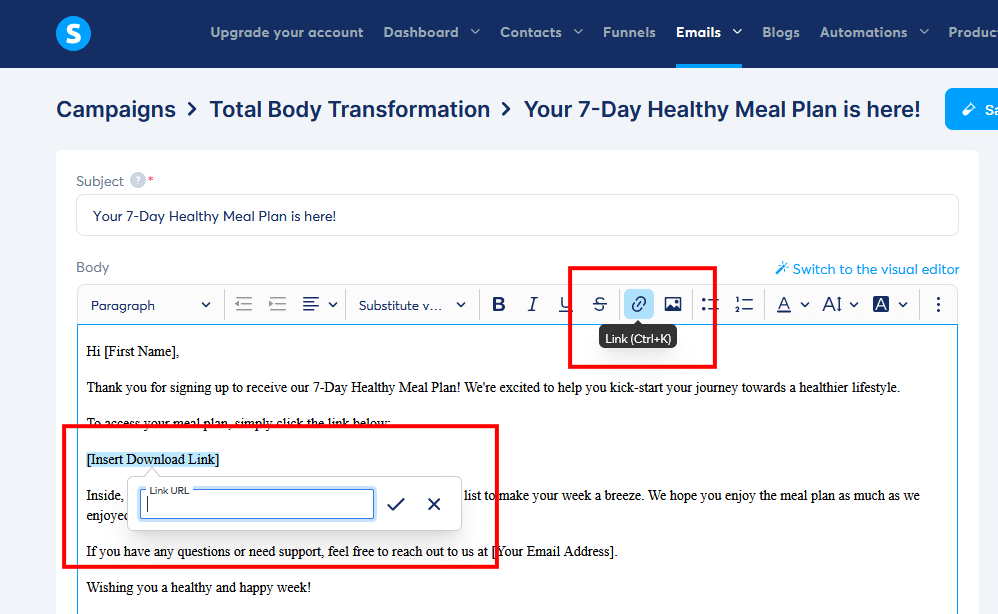
- Insert the download link: Insert the link to your PDF lead magnet by highlighting the text you want to link, clicking on the chain “Link” button in the email editor toolbar, and then pasting the file PDF URL link you copied in Step 6 into the “URL” field in the “Link” dialog box.
- Save your email: Once your satisfied with your email content, click on “Save and Publish”.
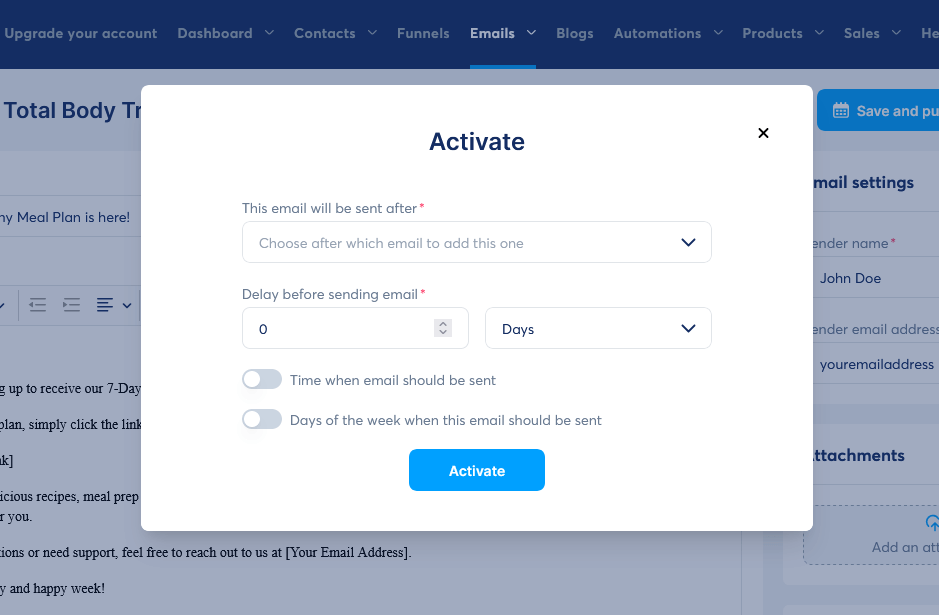
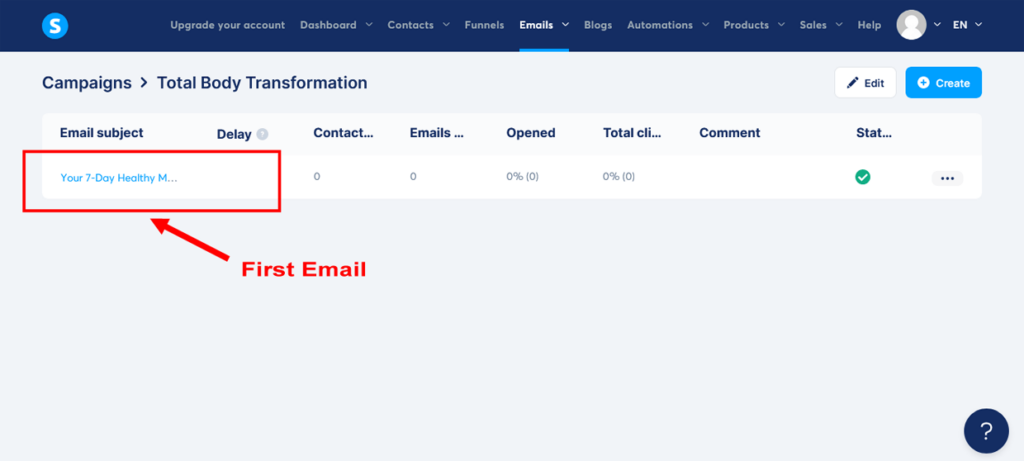
- Set up your sending delay: After you click “Save and Publish”, you will see a popup appear regarding the sending delay of the email. Set ‘Delay before sending email’ to “0” (zero). This means it will be sent as soon as someone signs up. Then click “Activate”. Then click “Exit” to return to your Campaigns Dashboard, where you will see your first email ready to go.
Creating your email automation rule in Systeme.io
- Navigate to your funnel: Now go back to your funnel by clicking on “Funnels” in the main header menu. Then select the funnel you created earlier (e.g., “Total Body Transformation Funnel”) and click on it to open the sales funnel stage editor.
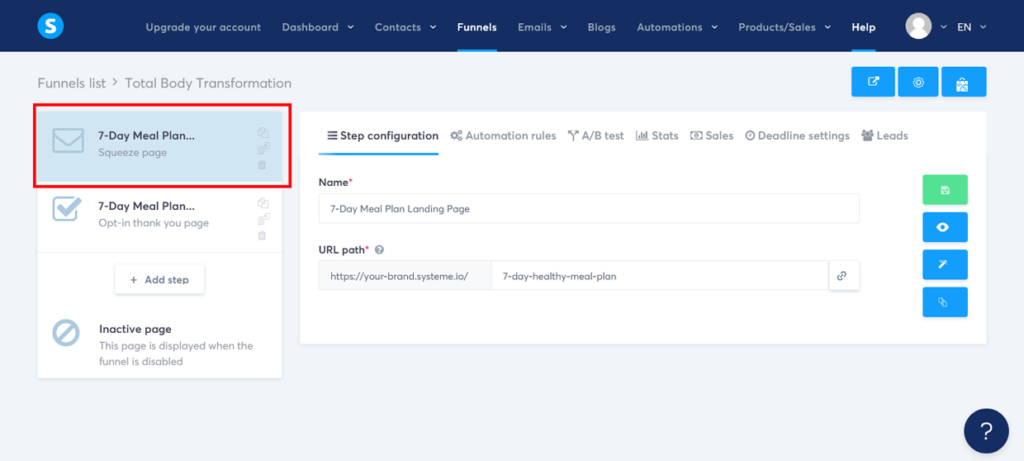
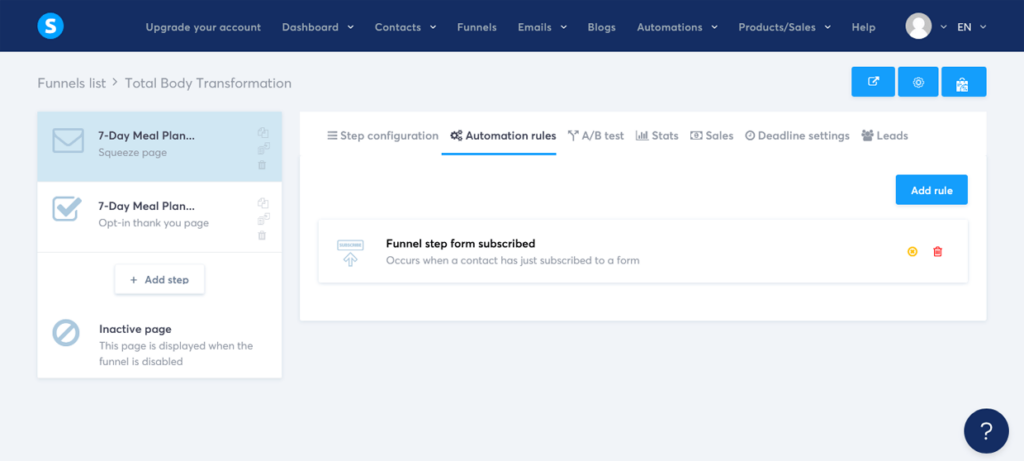
- Select your landing page: In the funnel stage editor, click on your landing page to select it. Then click on “Automation Rules”.
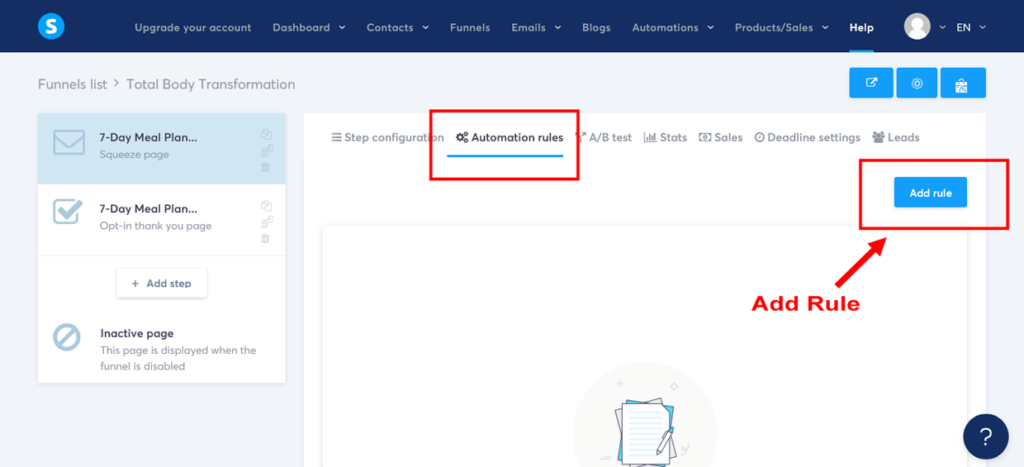
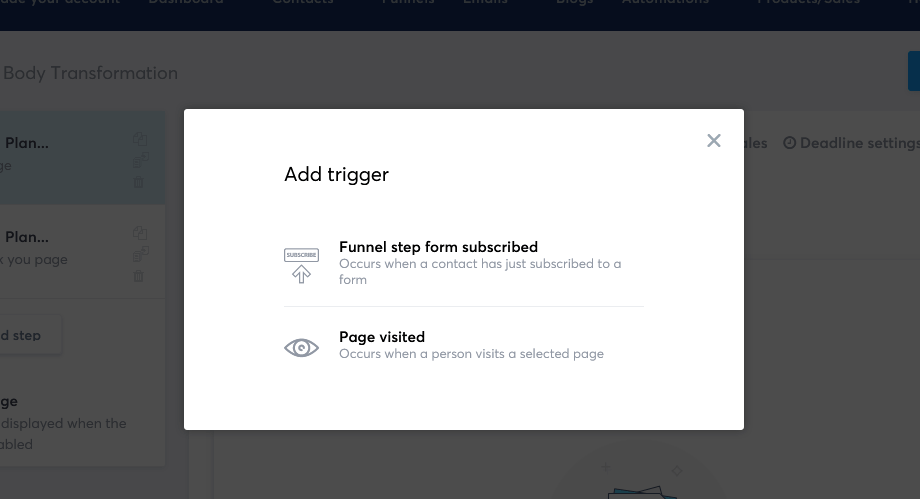
- Add an automation rule: Now, we need to set up an automation rule to add subscribers to your email campaign when they subscribe to your lead magnet. So, click on “Add Rule”. In the ‘Add trigger’ popup, click on ‘Funnel Step Form Subscribed’.
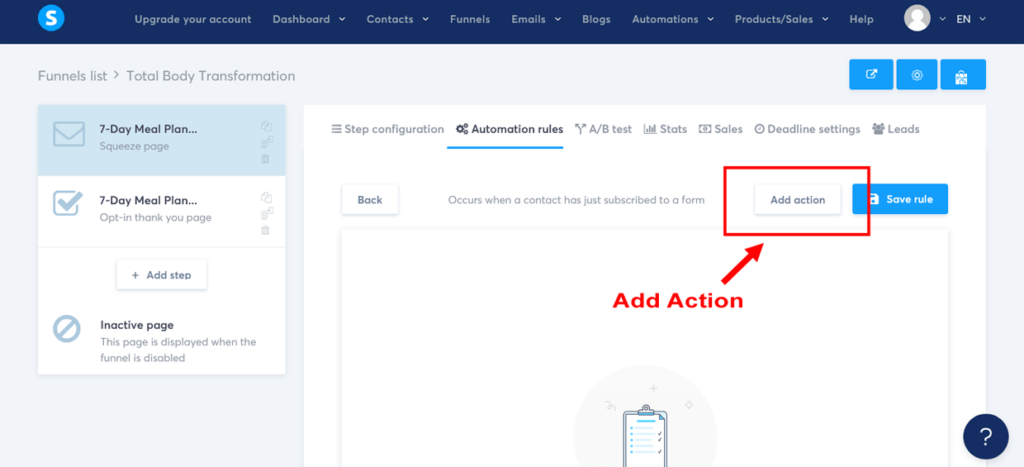
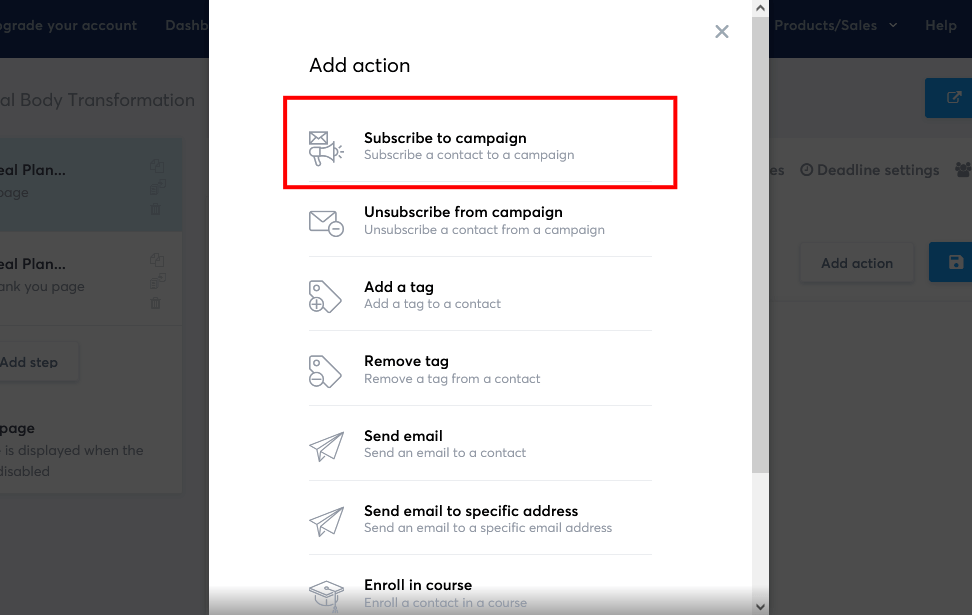
- Add an action: Click on “Add Action” and select ‘Subscribe to campaign’. In the campaign dropdown menu, choose the campaign that you set up earlier (e.g. ” Total Body Transformation”).
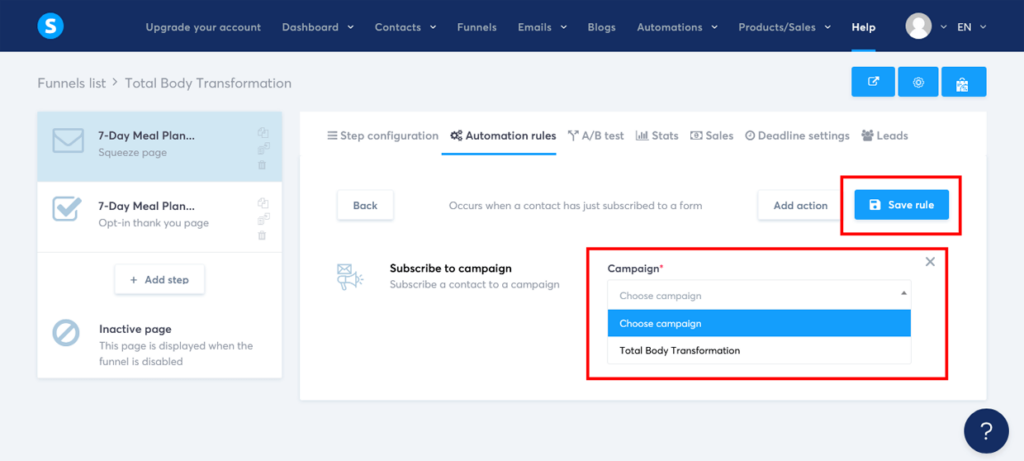
- Save your rule: To save the automation rule, click on “Save Rule”. This will ensure that the “Thank You” email is sent automatically when a new subscriber signs up for your lead magnet.
- Save your landing page: Click back on to the “Step configuration” tab and then click “Save” in the top-right hand corner to save your landing page changes.
Congratulations! You’ve successfully set up an email campaign using Systeme.io’s built-in tools. This will help you build a strong relationship with your subscribers and guide them effectively along your sales funnel customer journey.
Remember, this is just the beginning of your email marketing campaign.
Later in this tutorial, we will return to this sales funnel email sequence and add more emails to nurture your leads, inform them about your main offer, and present your upsell.
Step 8: Create Your Product
You’ve set up your lead magnet and email marketing campaign – now it’s time to bring your product to life! While creating a product for your sales funnel might seem like a daunting task, with Systeme.io by your side, it’s a breeze.
In this step, we’ll guide you through crafting an online course as your main offer, transforming your sales funnel into a revenue-generating machine and laying the foundation for a thriving online business.
For this guide, we’ll create an online course called “Total Body Transformation: A 12-Week Online Fitness and Nutrition Program to Help You Get Fit, Lose Weight, and Feel Great.” using the user-friendly tools of Systeme.io.
Ready to see how easy this is? Let’s do this!
Creating your online course in Systeme.io
- Navigate to the Products section: On the main Systeme.io dashboard, click on “Products” in the header menu. Then click on “Courses’ in the drop-down menu. This will take you to the Courses dashboard.
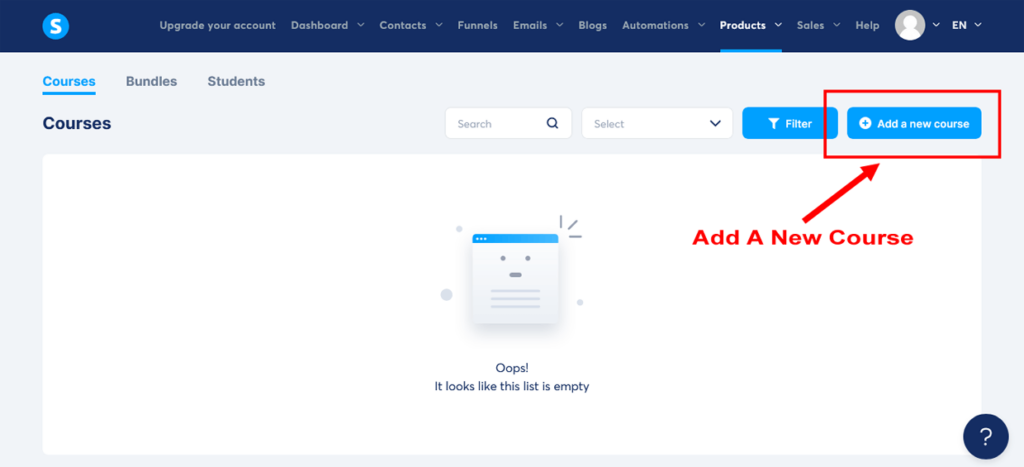
- Create a new course: Click on “Add a new course” and give your course a name, such as “Total Body Transformation”.
- Describe your course: Write a brief description of your course, highlighting its key features and benefits. This will help your subscribers understand what they are purchasing.
- Customize your course page URL path name: Change the ‘URL path’ name to something short and simple that closely resembles your course name, using dashes between words. For example, “total-body-transformation”. This will make your thank you course link look more professional for your subscribes and students.
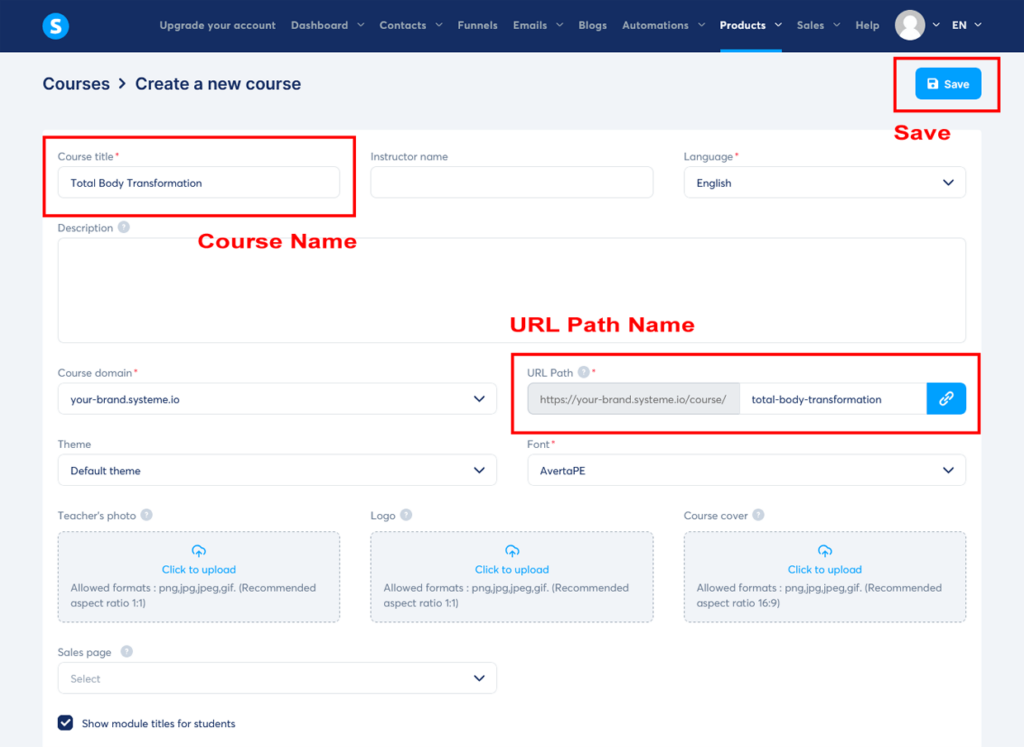
- Upload a course image: Similar to what we did with the PDF lead magnet, upload course images for your ‘Teacher’s photo’, ‘Logo’, and ‘Course cover’. Choose an image that represents your course well and is visually appealing. This image will be displayed on your course sales page that’ll we create in Step 9. Don’t worry if you don’t have any images ready for this tutorial. You can skip the image upload and come back to this when you’re ready.
- Save your course: Click on “Save” to create your course. You’ll now see your first course in your Courses Dashboard.
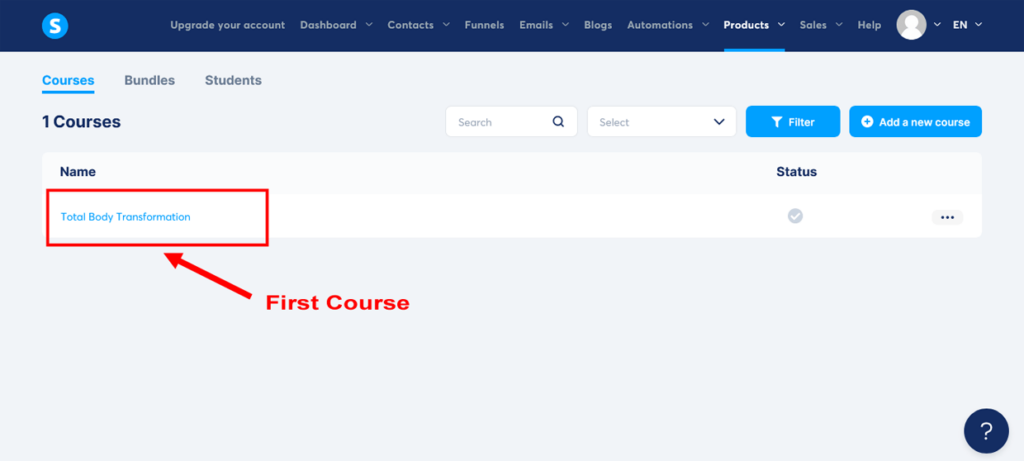
Adding a module and lecture to your course
For the purpose of this sales funnel guide, we will only create one module with one lecture. But, you can easily create more modules with multiple lectures by repeating these steps.
- Create a course module: From your Courses dashboard, click on the course you just created. Then, click on “Add module”.
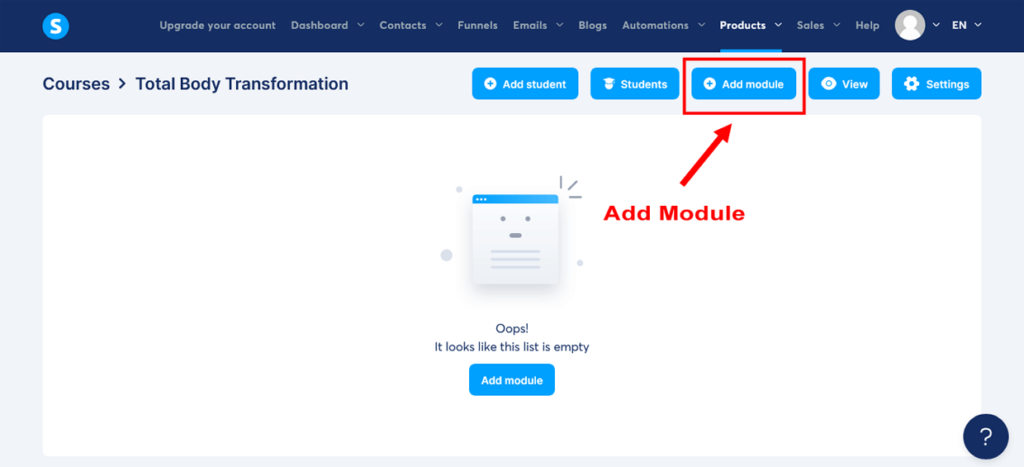
- Name your module: Give your module a name, such as “Module 1: Introduction to Total Body Transformation”.
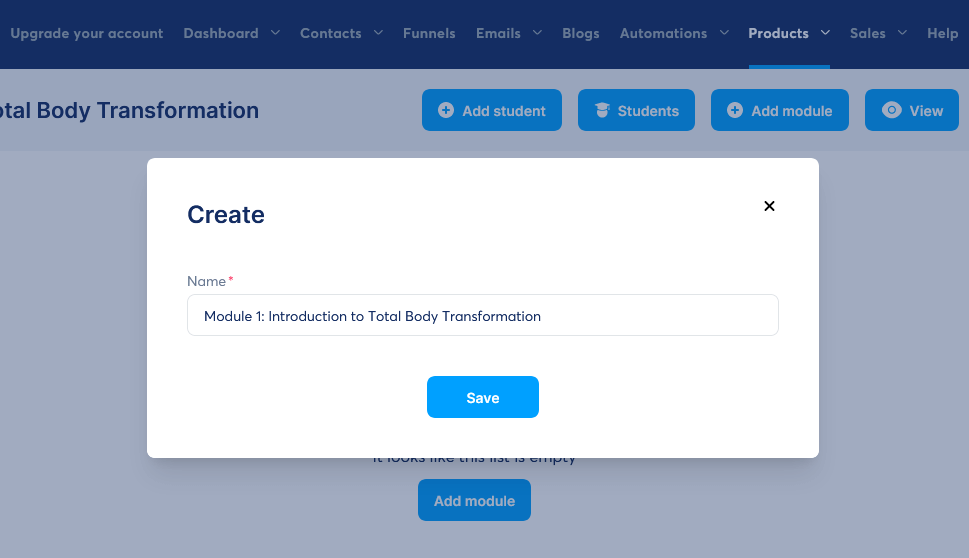
- Save your module: Click on “Save” to create your module.
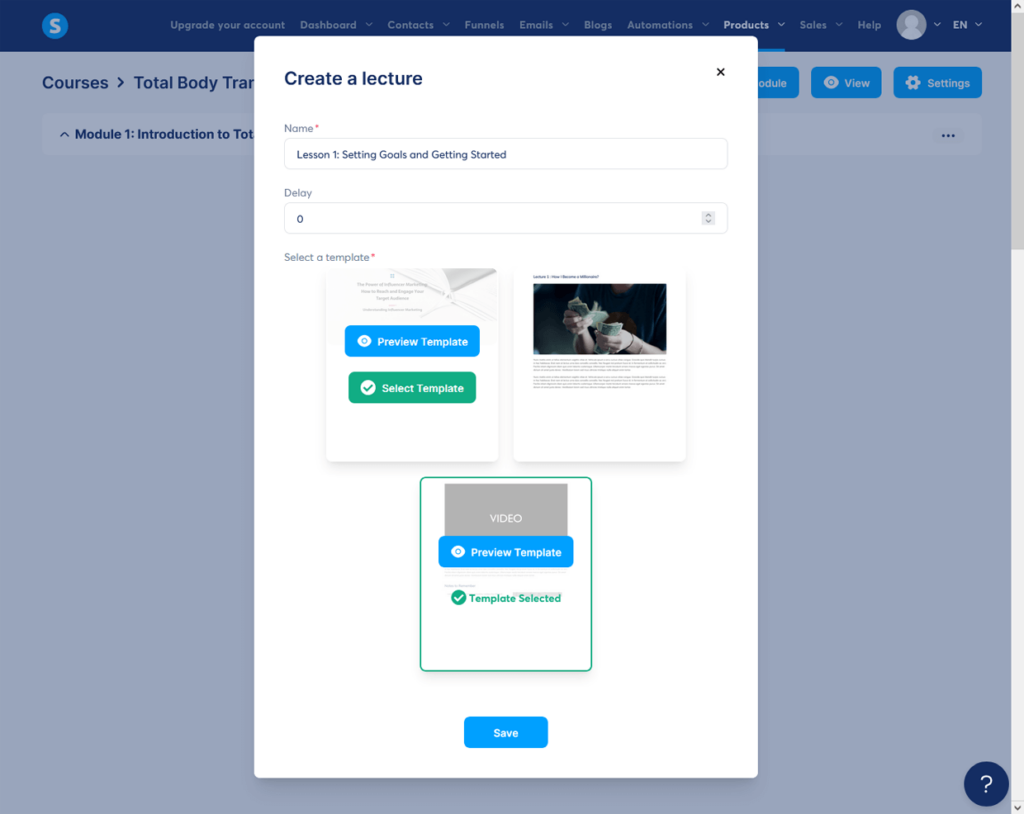
- Create a lecture: Click on your new module, and then click on “Add lecture” to open up the ‘Create a lecture’ popup.
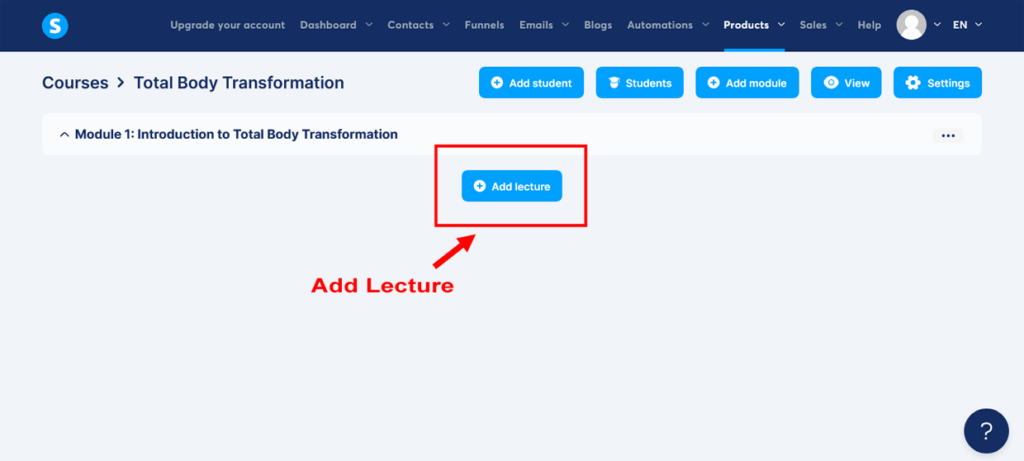
- Name your lecture: Give your lecture a name, such as “Lesson 1: Setting Goals and Getting Started”.
- Set the Delay: You want your customers to have immediate access to the first lecture so set the ‘Delay’ to ‘0’.
- Choose a lecture template: Systeme.io offers three pre-built course templates to help you get started. Clicking on “Preview” opens the template in a new window so you can view it full. Browse through the available options and select one that best fits your needs. When you’re happy with a template, close the additional window. Then click on “Select” to choose the template, and then click “Save” to proceed.
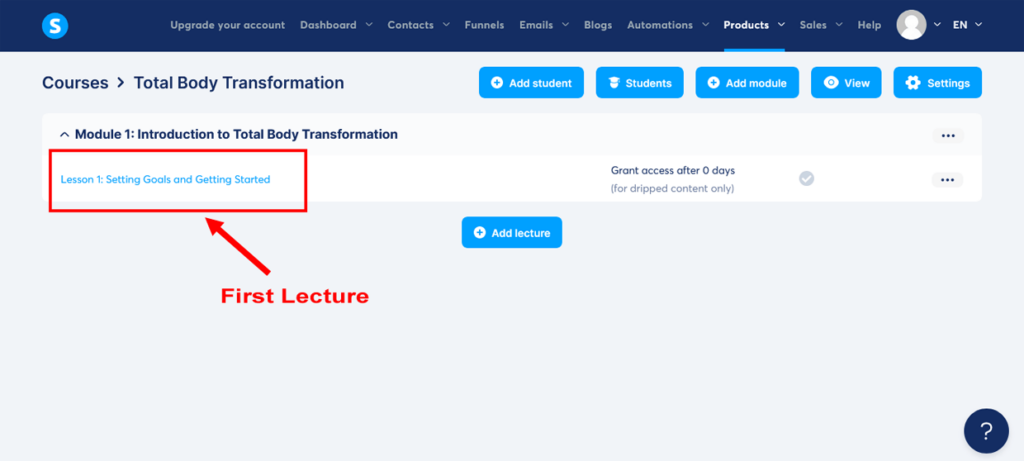
- Customize your lecture: Click on your new lecture to open up Systeme.io’s drag-and-drop editor. This is the same editor that you used for your sales funnel landing page and thank you page, so by now you’re already a pro! Use the drag-and-drop editor to add, remove, or rearrange elements on your lecture page.
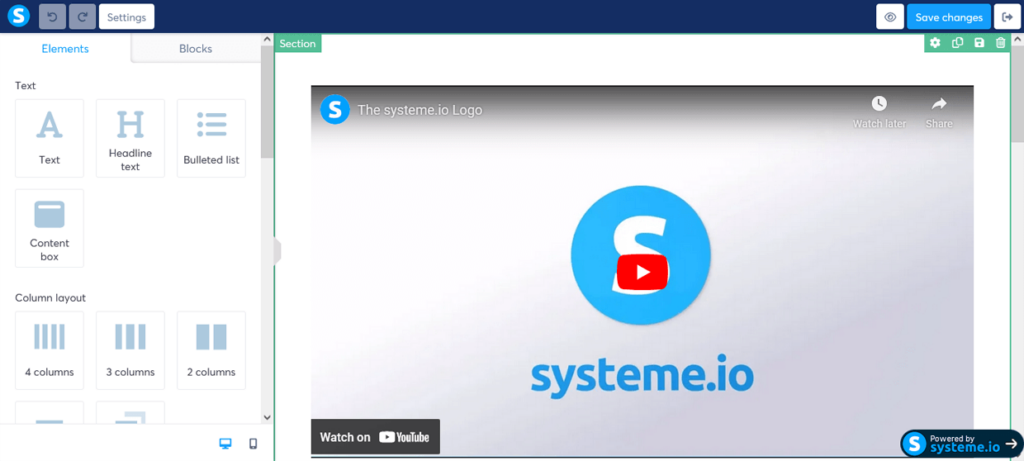
- Upload your video: Upload your lesson video or provide a link to your video hosted on a platform like YouTube or Vimeo. For newbies, you can easily create a video for free using YouTube. As you won’t want to show paid course content on YouTube, you can choose to delist it, but still use the hosting link by pasting it into Systeme.io for your course.
- Add your course content: Simply swap out the template body content with your course content. Then, swap out the links to the ‘Recommended References’ or ‘Chapter Downloads’ with links to your reading references or your chapter PDF files respectively. For your files, simply repeat the process that you did for your lead magnet link on your Thank You page in Step 6.
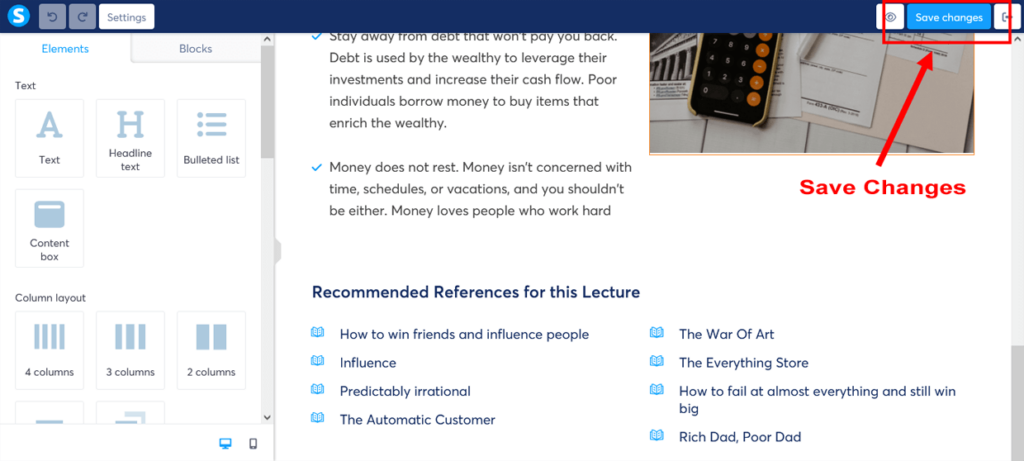
- Save your lesson: Once you’re satisfied with your lesson, click the “Save changes” button in the top-right corner of the editor to save your changes. Click the “Exit” button to return to your Courses dashboard.
- Create more modules and lessons: Repeat steps 1 to 10 to create more modules with multiple lectures. Remember to save you changes each time!
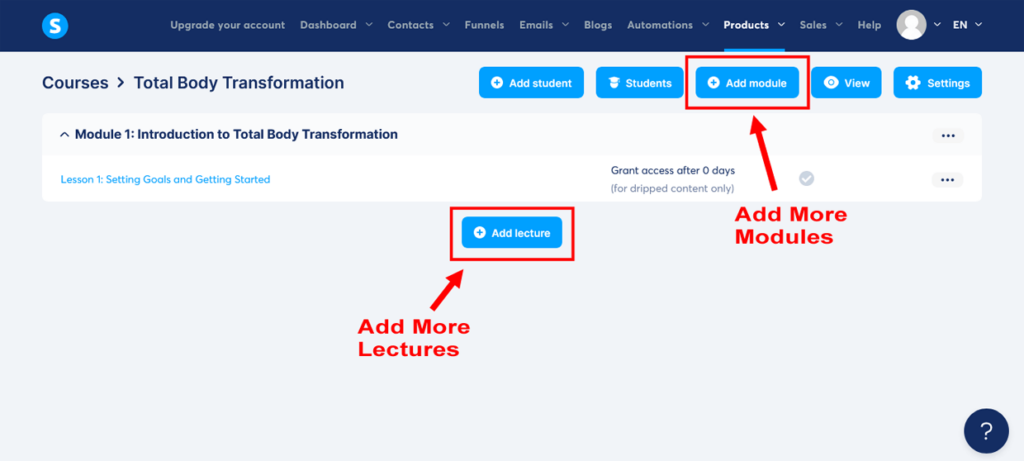
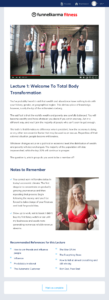
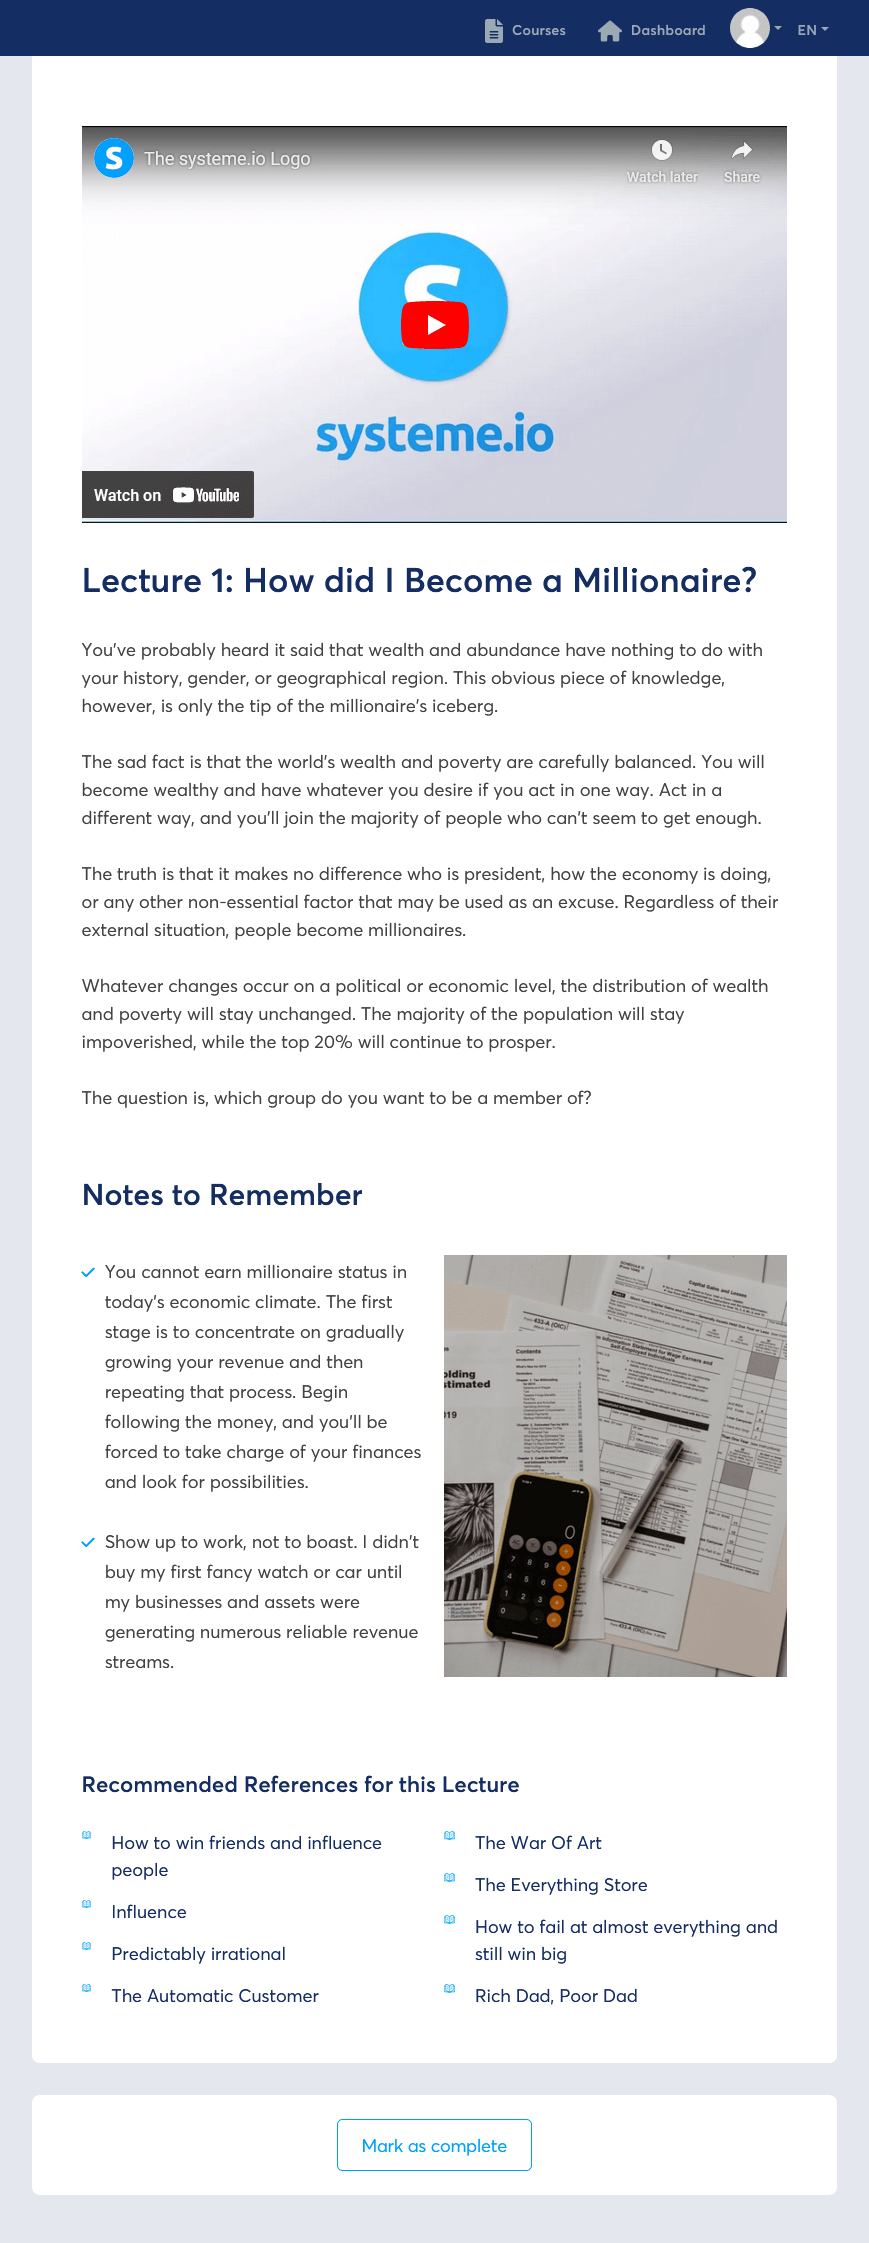
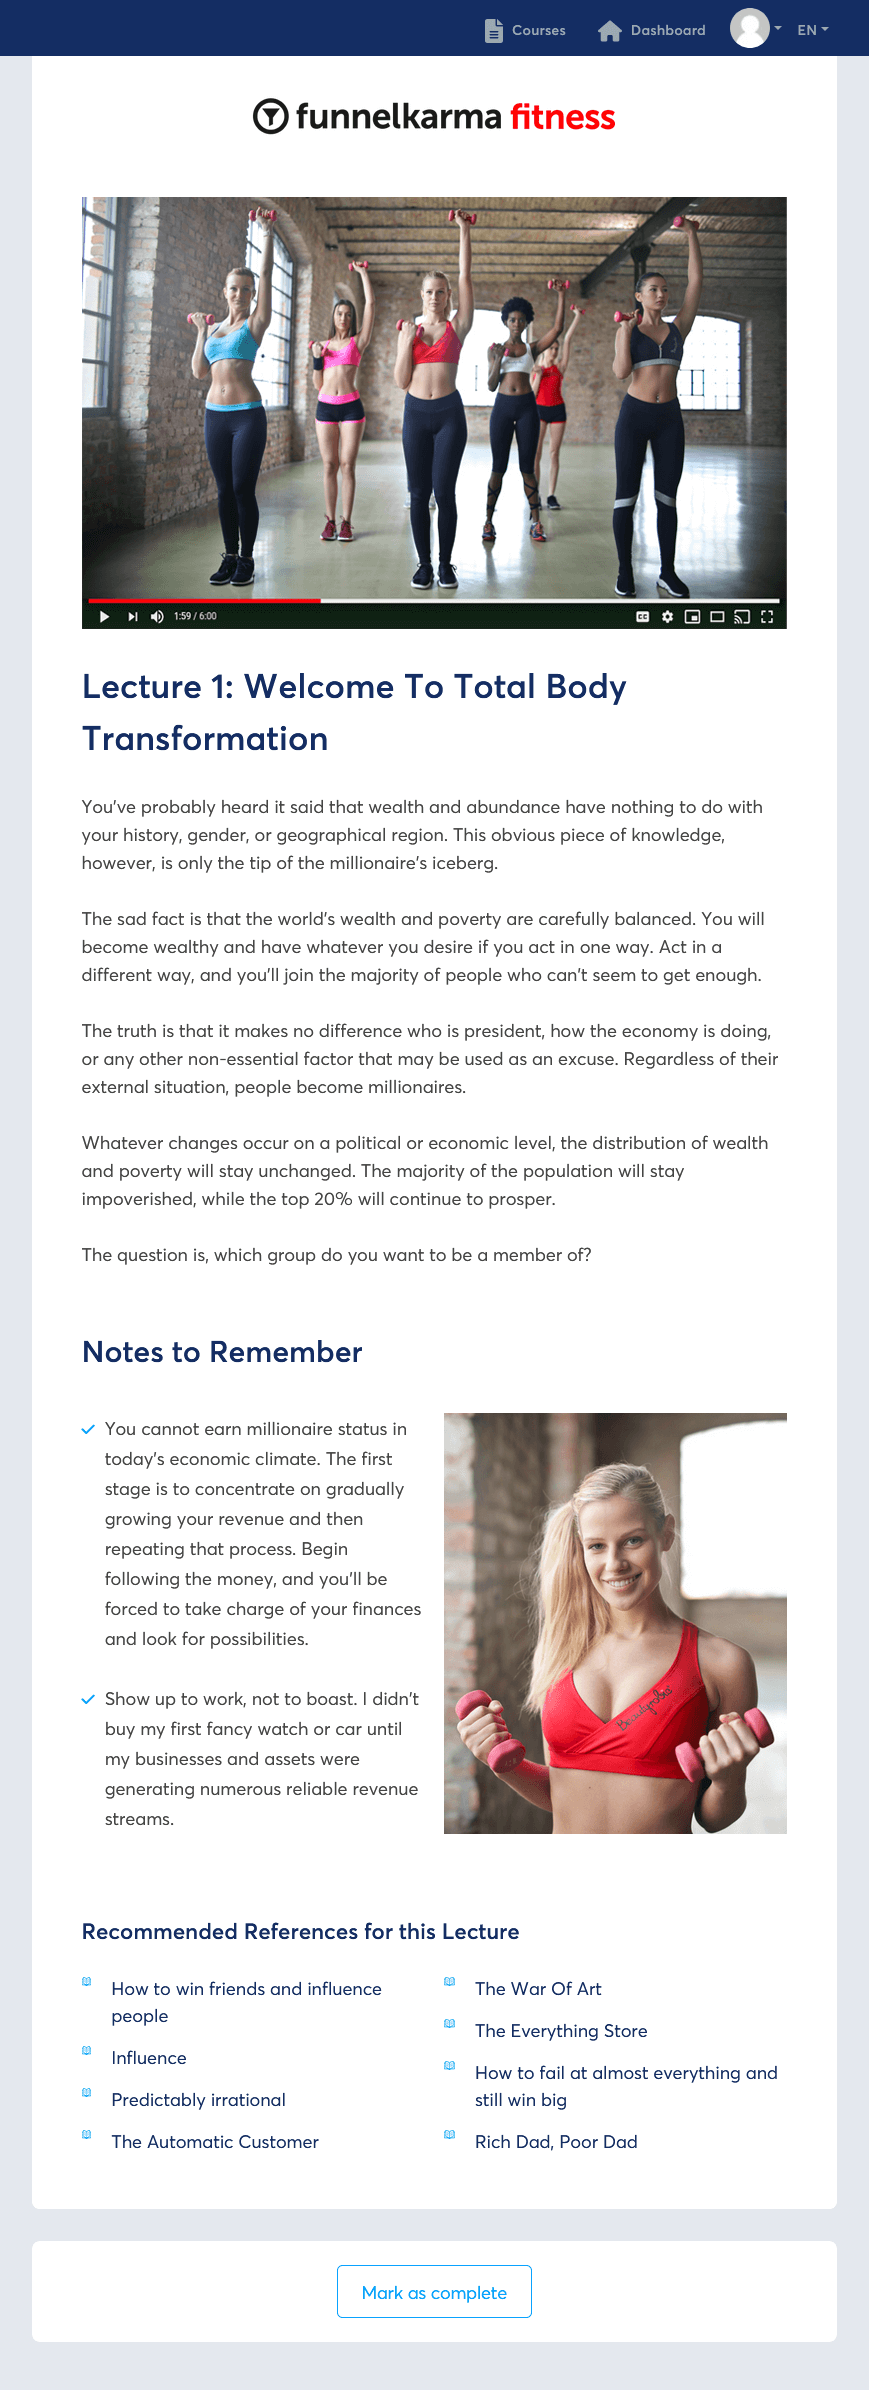
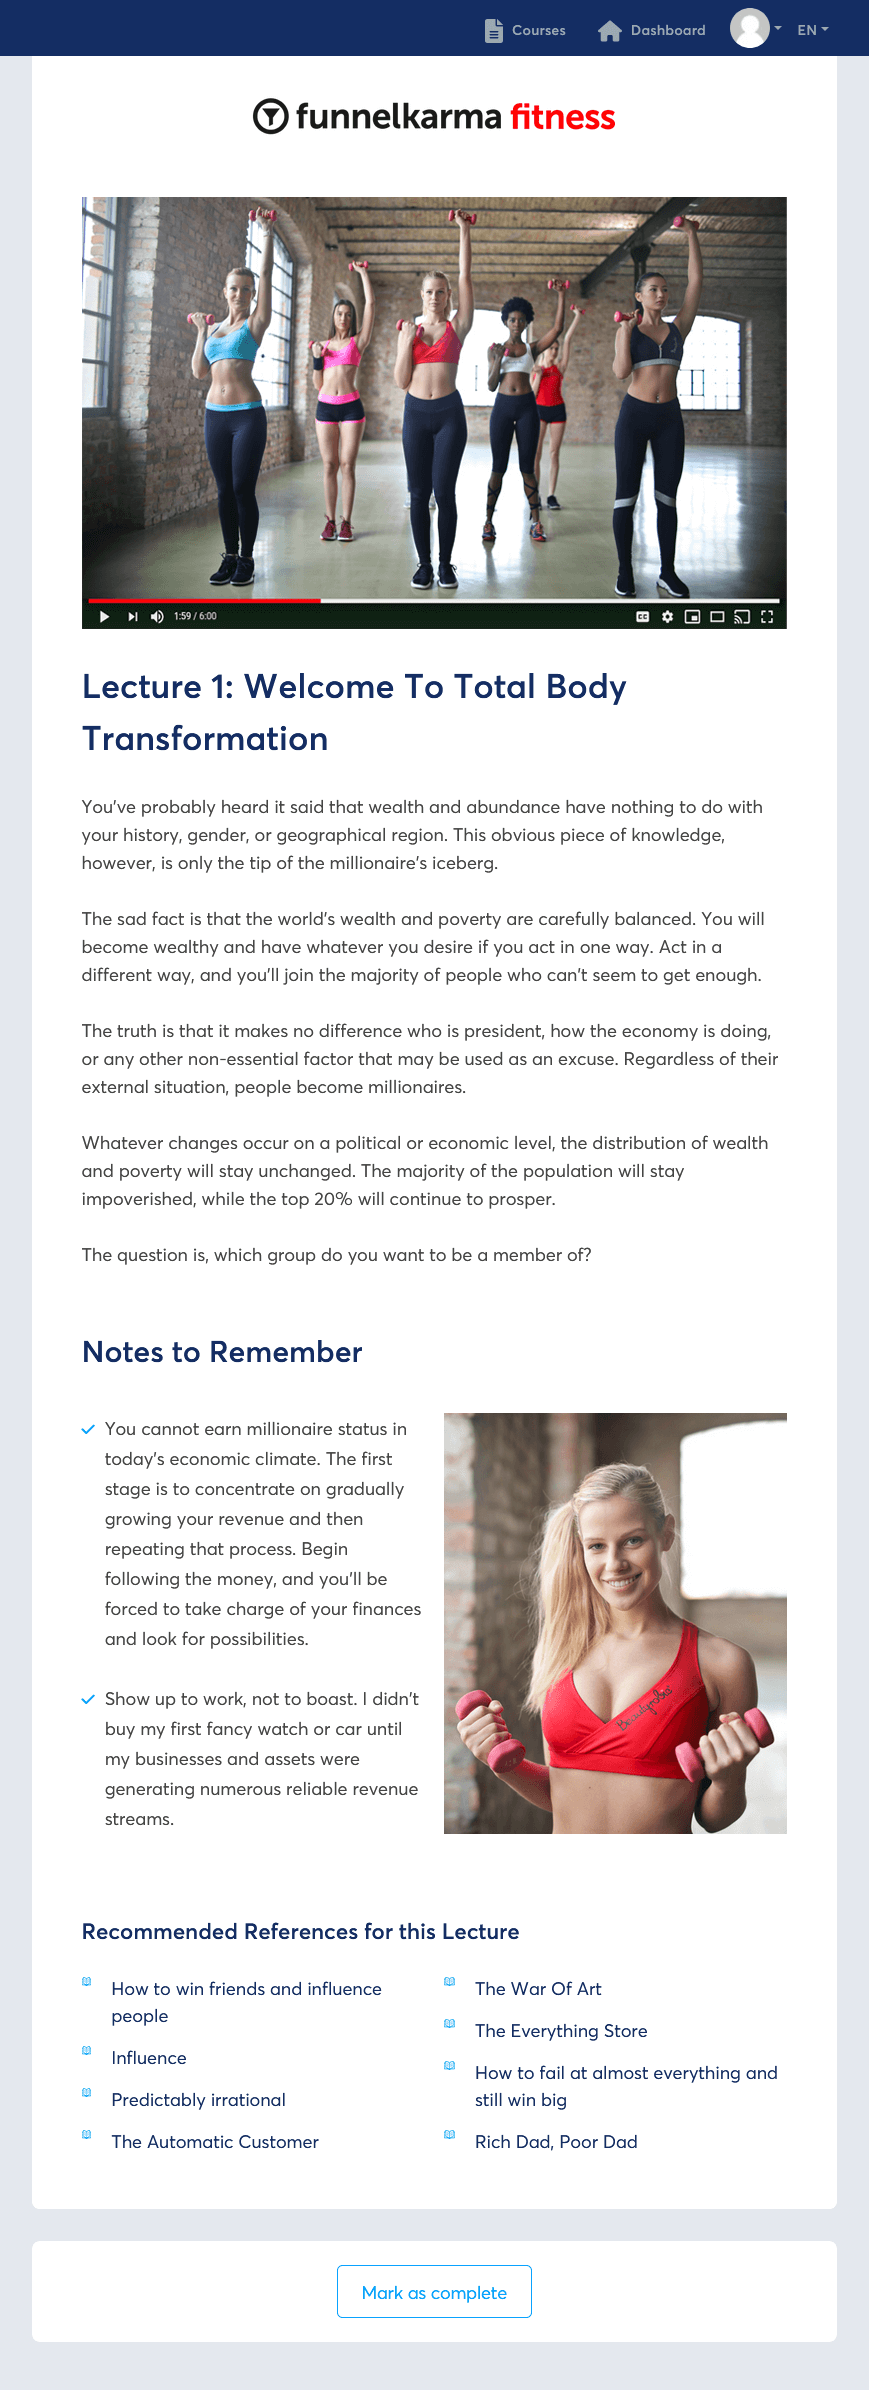
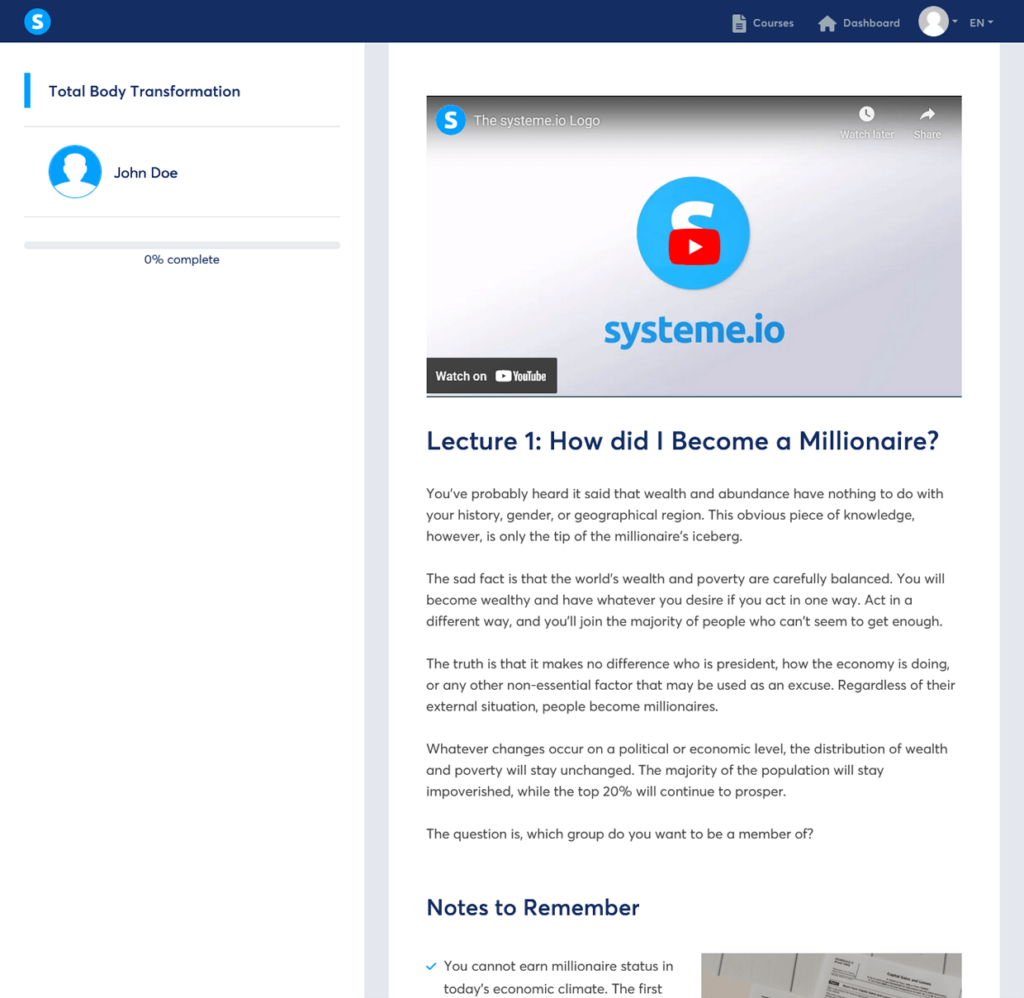
Here’s how we took one of Systeme.io’s course lecture templates and simply edited it to create our FunnelKarma Fitness sales funnel example.
Note: the course body text under the main heading is from the default Systeme.io template, and not from our content.
Click on each course lecture page image above to enlarge and view in a full lightbox
To view and scroll through the final edited course lecture page in full, click on the blue button below.
Fantastic work! With your online course created, you can now integrate it into your sales funnel. This will allow you to sell your course to your subscribers so you can start making money from your online business.
In the next step, you will learn how to create a sales page and incorporate your product (course) into your sales funnel, bringing you closer to a complete and successful sales funnel.
Step 9: Create a Sales Page
With your online course in place, it’s time to craft a compelling sales page – a vital element of your sales funnel. This is where you’ll showcase your product and entice potential customers to buy.
In this step, we’ll walk you through adding a sales page for your “Total Body Transformation: 12-Week Fitness…” online course to your existing funnel.
Let’s jump in and make your sales page irresistible using Systeme.io’s intuitive tools!
Ready? You’ve got this, my friend!
Adding a sales page to your existing funnel in Systeme.io
- Navigate to the Funnels section: From the main Systeme.io dashboard, click on “Funnels” to access your Funnels dashboard.
- Select your funnel: Locate the existing funnel you created earlier (e.g., “Total Body Transformation Funnel”) and click on it to open the funnel stage editor.
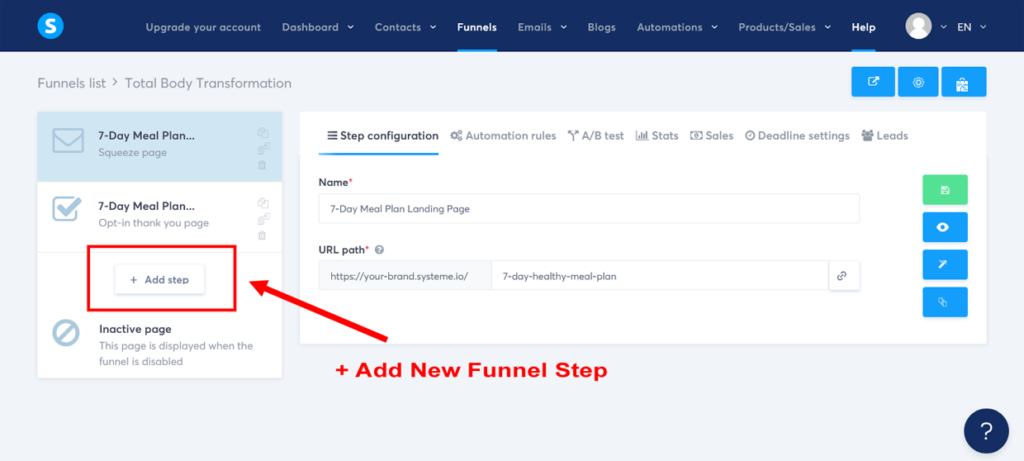
- Add a new step: Click on “+ Add step” below your Thank You Page to open the ‘Add new step’ popup.
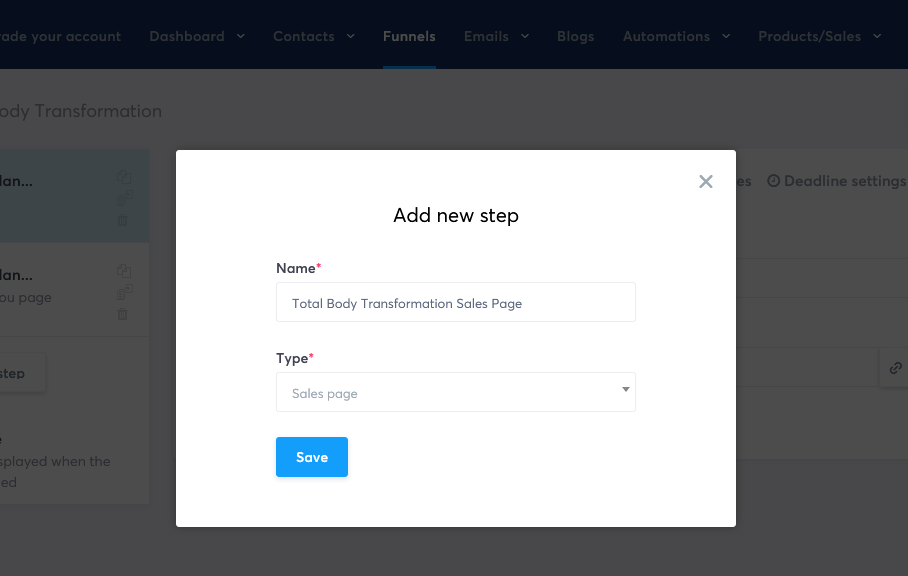
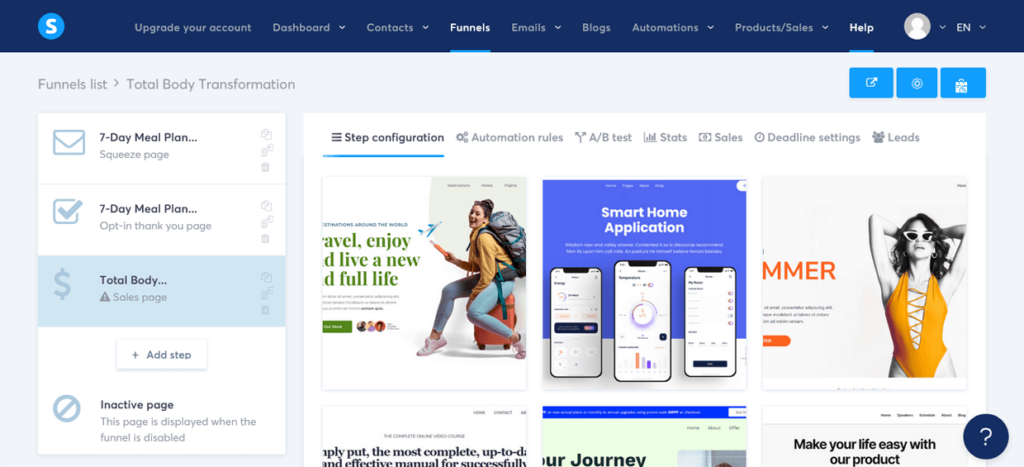
- Name your step: Give your new step a name, such as “Total Body Transformation Sales Page”. In the ‘Type’ dropdown menu, select “Sales page” from the ‘Sales’ section, and then click “Save”. This will add a sales page step to your funnel.
- Choose a template: Browse through the available sales page templates and select one that best fits your needs. Then click on “Select” to choose the template to proceed.
- Customize your sales page URL path name: Below the name in the ‘Step configuration’ settings, change the ‘URL path’ name to something short and simple that closely resembles your main product’s name, using dashes between words. For example, “total-body-transformation”. This will make your sales page link look more professional for your subscribers.
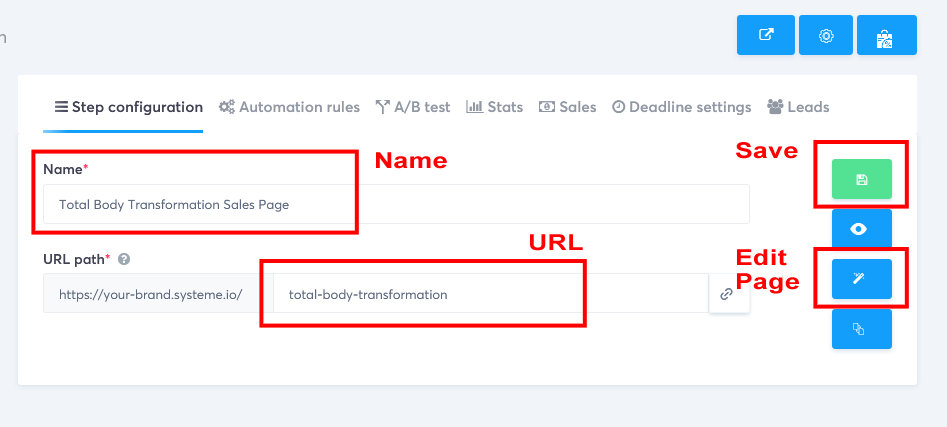
- Save your changes: Once you’ve customized your URL path, click on the green ‘Save funnel step’ button on the right-hand side to save your changes.
Customizing your sales page
- Edit your sales page: Now, click on the middle blue ‘Edit page’ button on the right-hand side to open the funnel editor.
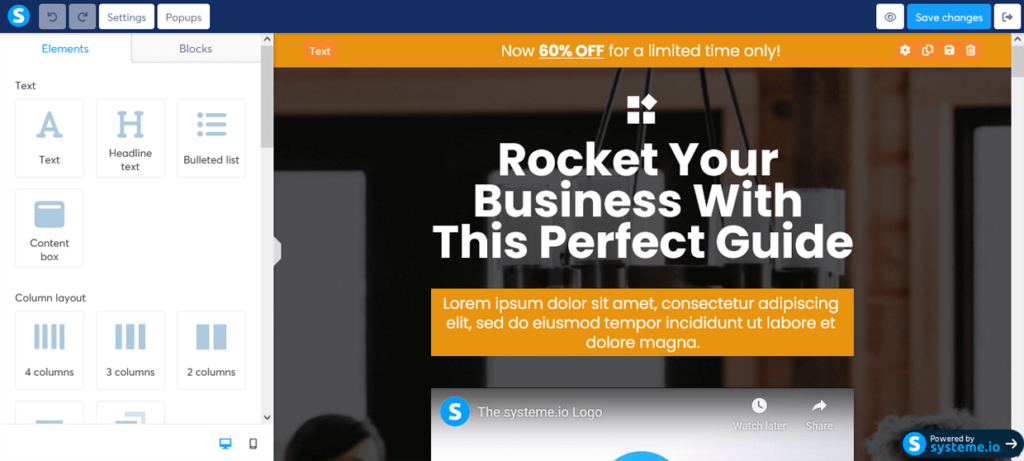
- Customize your sales page: Use the drag-and-drop editor to customize the content on your sales page to showcase your online course. Change the colors, fonts, and images to match your brand and make your page visually appealing. Make sure to include the following elements:
- A compelling headline that grabs the reader’s attention and communicates the main benefit of your course.
- A subheadline that provides additional information about your course and its benefits.
- A brief introduction to your course, using persuasive copy, explaining what it is and who it’s for.
- A list of key features and benefits of your course, presented in bullet points or short paragraphs.
- Testimonials from satisfied customers, if available, to build trust and credibility. [Don’t worry if you don’t have any yet – you can always add some as they come in!]
- A clear call-to-action (CTA) button that encourages visitors to purchase your course.
For your sales copy, we again recommend using the AIDA framework (Attention, Interest, Desire, and Action) to guide your readers through the buying process.
Here’s an example of how you might structure your sales copy using the AIDA framework:
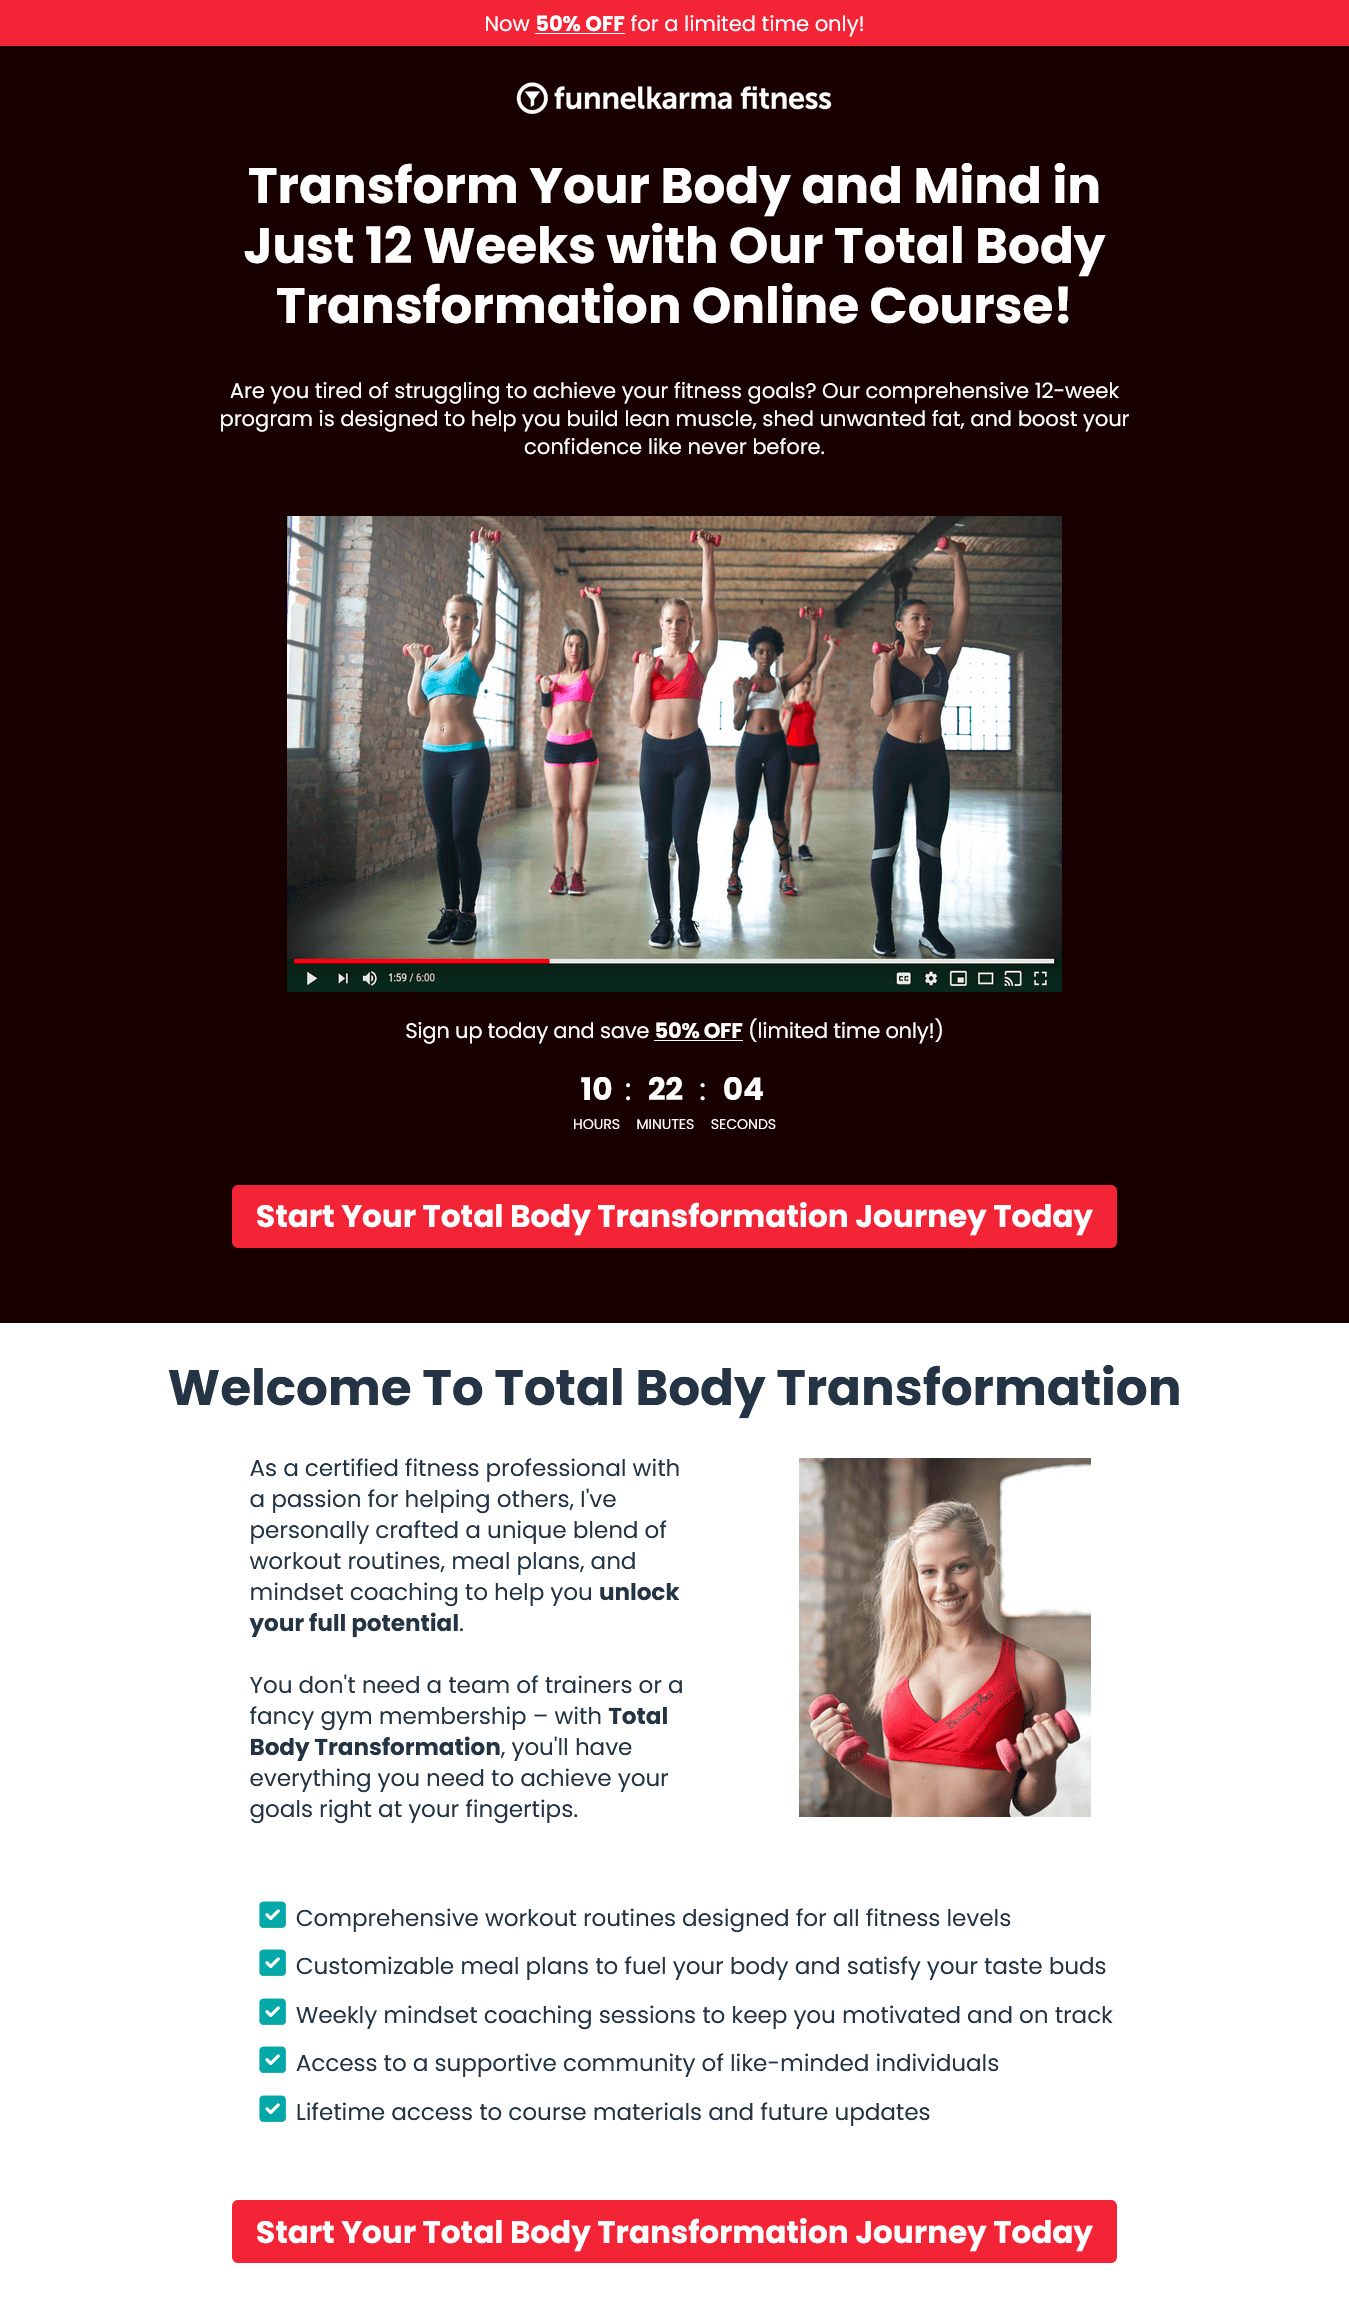
Attention: “Transform Your Body and Mind in Just 12 Weeks with Our Total Body Transformation Online Course!”
Interest: “Are you tired of struggling to achieve your fitness goals? Our comprehensive 12-week program is designed to help you build lean muscle, shed unwanted fat, and boost your confidence like never before.”
Desire: “As a certified fitness professional with a passion for helping others, I’ve personally crafted a unique blend of workout routines, meal plans, and mindset coaching to help you unlock your full potential. You don’t need a team of trainers or a fancy gym membership – with Total Body Transformation, you’ll have everything you need to achieve your goals right at your fingertips.”
Key features and benefits:
- Comprehensive workout routines designed for all fitness levels
- Customizable meal plans to fuel your body and satisfy your taste buds
- Weekly mindset coaching sessions to keep you motivated and on track
- Access to a supportive community of like-minded individuals
- Lifetime access to course materials, including any future updates
Testimonials: (Insert testimonials from satisfied customers)
Action: “Don’t miss out on the opportunity to transform your life. Click the ‘Enroll Now’ button below and start your Total Body Transformation journey today!”
By using the AIDA framework, you can create a persuasive sales copy that captures your readers’ attention, piques their interest, builds a strong desire for your course, and ultimately, encourages them to take action and purchase your online course.
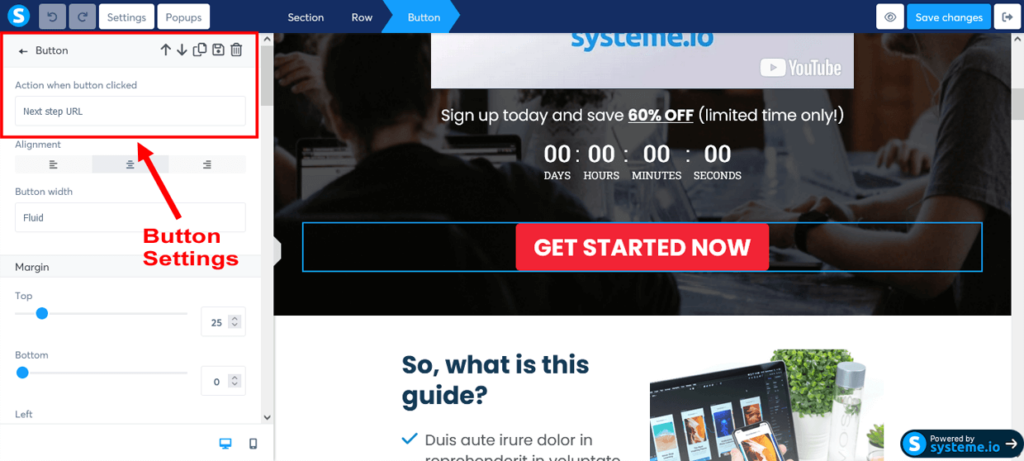
- Select your buy button: Locate the “Get Started Now” or “Enroll Now” button on your sales page.
- Edit button settings: Click on the button to edit its settings. The button settings will open up on the left-hand side.
- Choose an action: Under ‘Action when button clicked’ choose “Next step URL” from the dropdown menu. This ensures that your sales page is connected to your checkout page to create a seamless flow for your customers as they move through your sales funnel.
- Save your sales page: Once you’re satisfied with your sales page, click the “Save changes” button in the top-right corner of the editor. Then click the “Exit” button to return to your sales funnel stage editor.
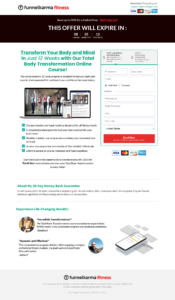
Here’s how we took one of Systeme.io’s sales page templates and simply edited it to create our FunnelKarma Fitness sales funnel example.
Click on each sales page image above to enlarge and view in a full lightbox
To view and scroll through the final edited sales page in full, click on the blue button below.
There you have it – you’ve just crafted an irresistible sales page for your funnel. Fantastic job!
With your sales page integrated into your existing funnel, you’re well on your way to turning curious visitors (and now sales funnel leads) into satisfied customers.
Next up, we’ll take your sales funnel to new heights by creating a seamless and user-friendly checkout page, ensuring a smooth purchasing experience for your customers. Let’s keep that momentum going!
Step 10: Create a Checkout Page
Alright, so you’ve got a killer sales page that speaks to your audience’s desires and needs, and it’s ready to reel in those potential customers. But wait, there’s one more crucial piece of the sales funnel creation puzzle: the checkout page.
This is where the magic happens – where your customers complete their purchase and become part of your tribe. So, let’s make sure it’s as smooth and user-friendly as possible, shall we?
Adding a checkout page to your existing funnel in Systeme.io
- Navigate to the Funnels section: If you’re not still in your Funnels dashboard, click on “Funnels” in the main header menu.
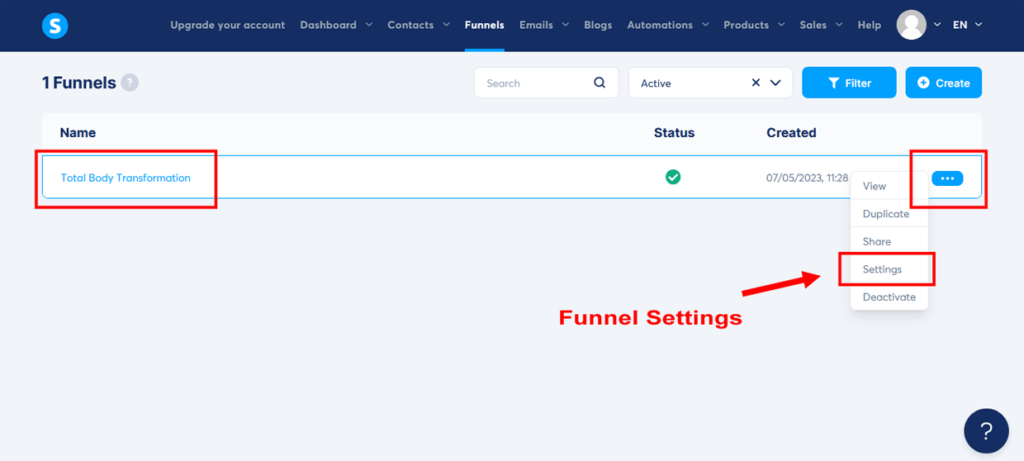
- Select your funnel: Locate the existing funnel you created earlier (e.g., “Total Body Transformation Funnel”) but this time, don’t open it just yet! Instead, we need to edit the payment settings.
- Edit your funnel settings to accept payments: In your funnel dashboard click on the three dots to the right of your funnel. Then click on “Settings”. This will open an ‘Edit funnel’ popup.
- Check your accepted payment methods: In order for your checkout page to allow payment method entry, you must have payment gateways setup (see Step 2: Systeme.io Account Housekeeping at the beginning of this guide). Once you have set your payment method(s), you will see an empty check box next to each one. Check the box(es) for all your preferred gateways and then click “Save”.
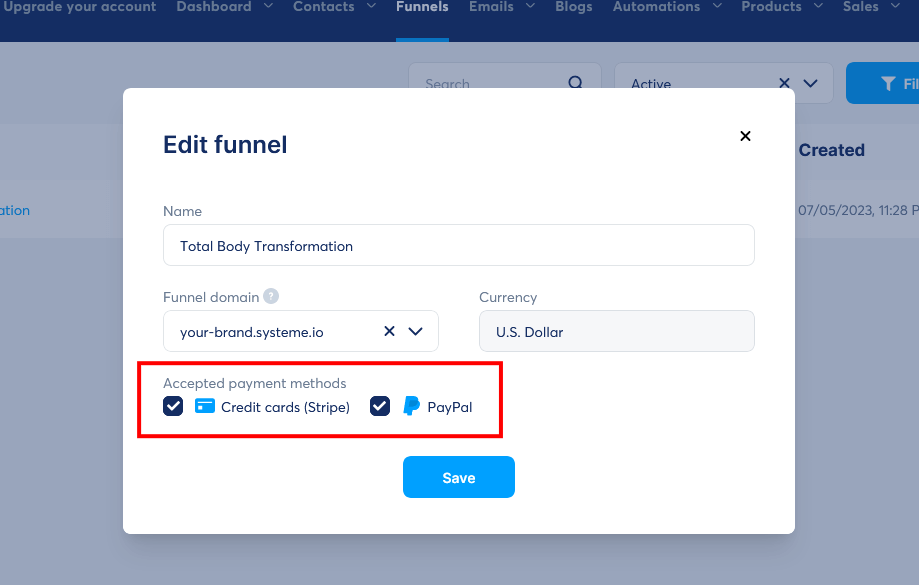
Important: If you do not see these ‘Accepted payment methods’ options, go to your account settings and set up your payment gateways. Then return to this step.
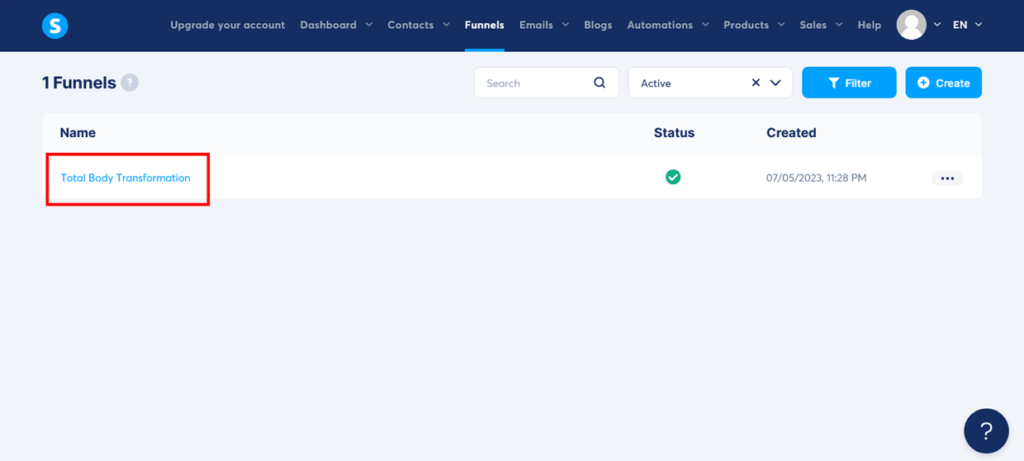
- Select your funnel: Now that you have your accepted payment methods set up, click on your funnel to open the funnel stage editor.
- Add a new step: Click on “+ Add step” below your Sales Page to open the ‘Add new step’ popup.
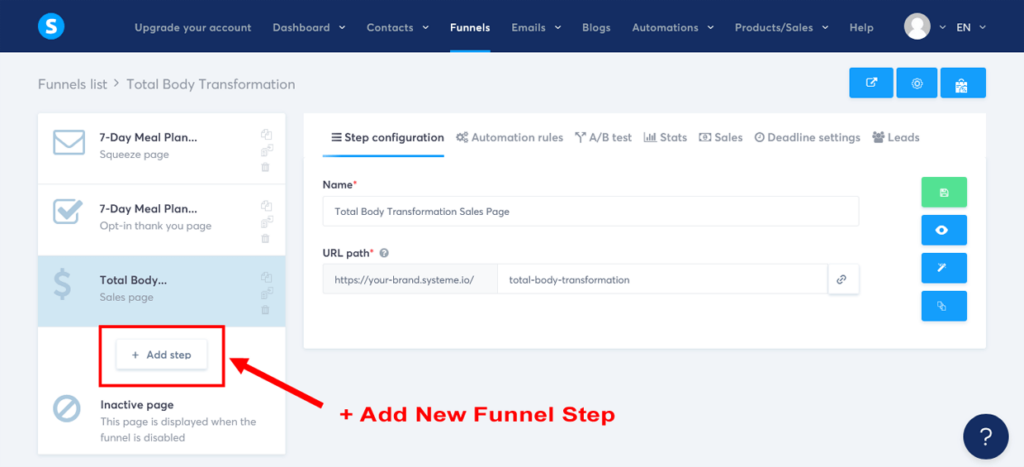
- Name your step: Give your new step a name, such as “Total Body Transformation Checkout Page”. In the ‘Type’ dropdown menu, select “Order form” from the ‘Sales’ section, and then click “Save”. This will add the checkout page step to your funnel (Systeme.io calls these pages ‘Order Forms’).
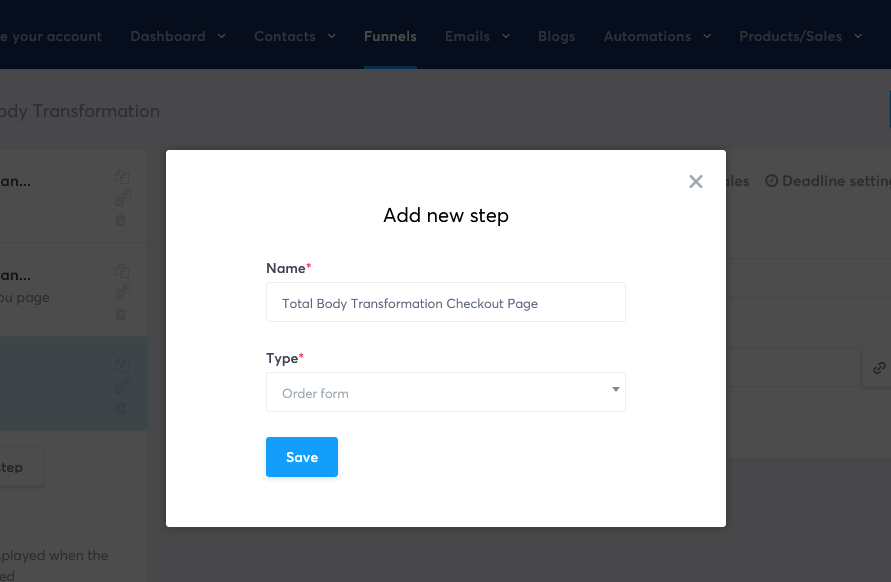
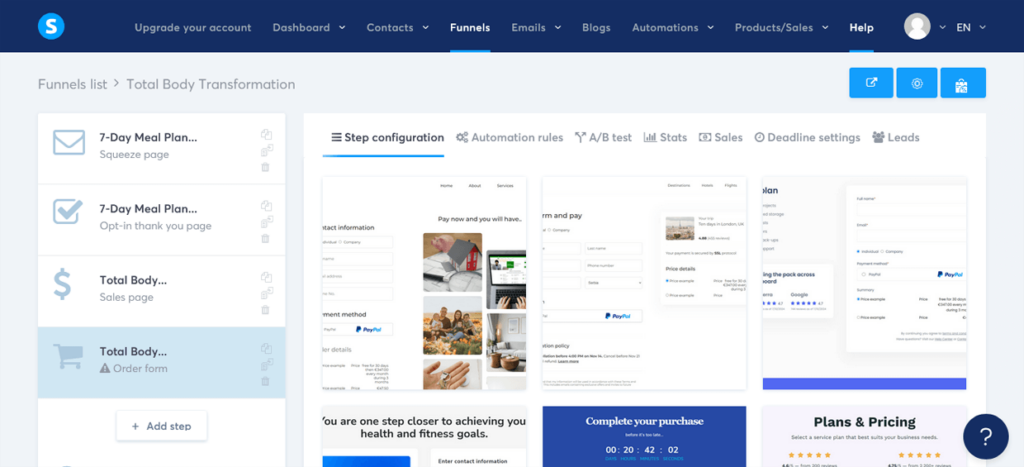
- Choose a template: Browse through the available order form page templates and select one that best fits your needs. Then click on “Select” to choose the template to proceed.
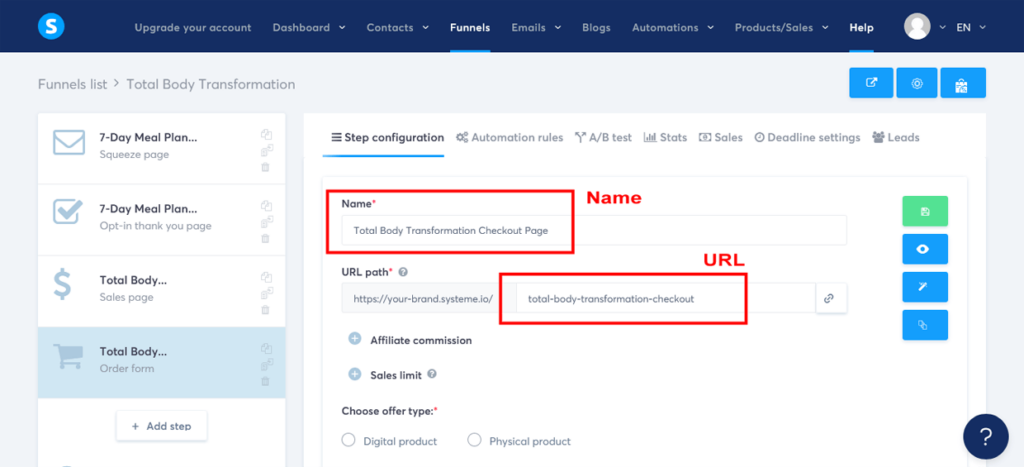
- Customize your checkout page URL path name: Below the name in the ‘Step configuration’ settings, change the ‘URL path’ name to something short and simple that closely resembles your main product’s name, using dashes between words. For example, “total-body-transformation-checkout”. This will make your checkout page link look more professional for your subscribers.
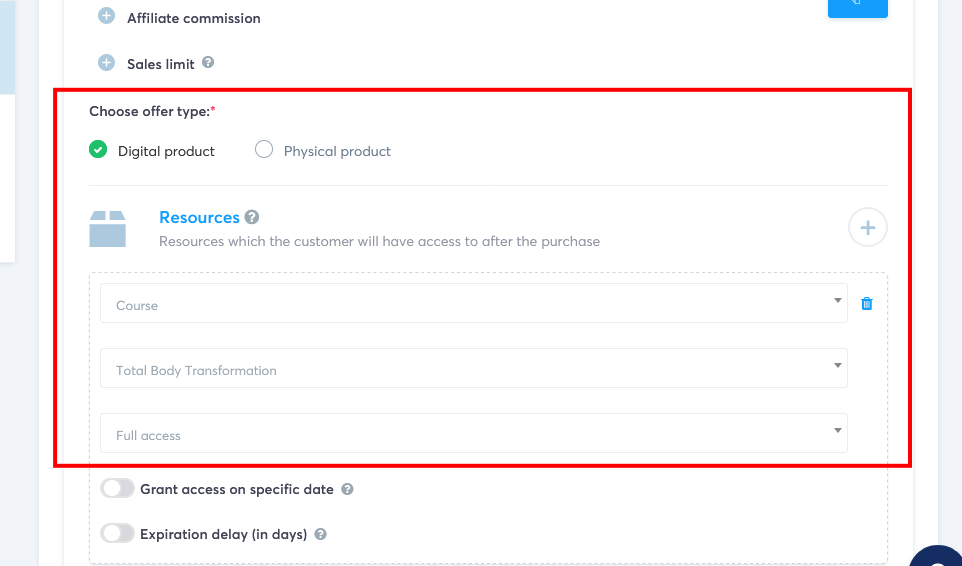
- Choose your offer type: Select “Digital product” from the ‘Choose offer type’ options. This will open a drop-down menu to the page.
- Select your resource: Click on the large “+” button to the right of ‘Resources’. This opens a new drop-down menu to ‘Select a resource’. Click on the drop-down arrow and select “Course”. Then click on the drop-down arrow to ‘Choose course’ and select your course. For the ‘Choose course access type’, select “Full access”.
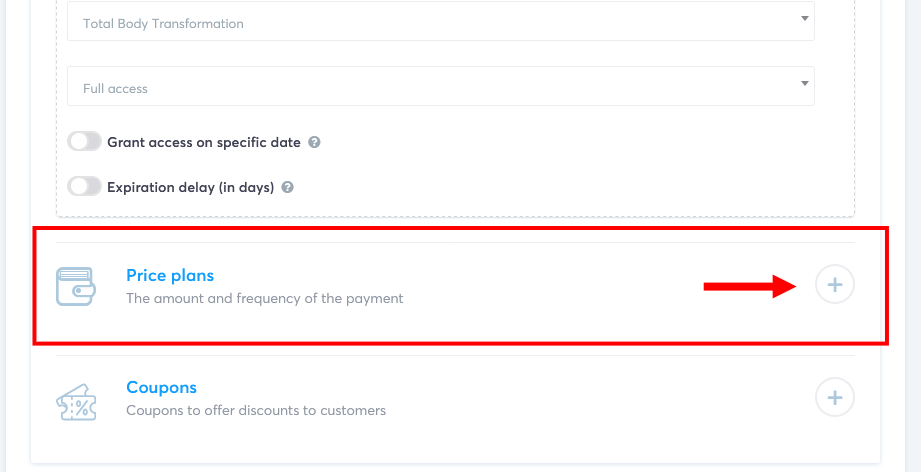
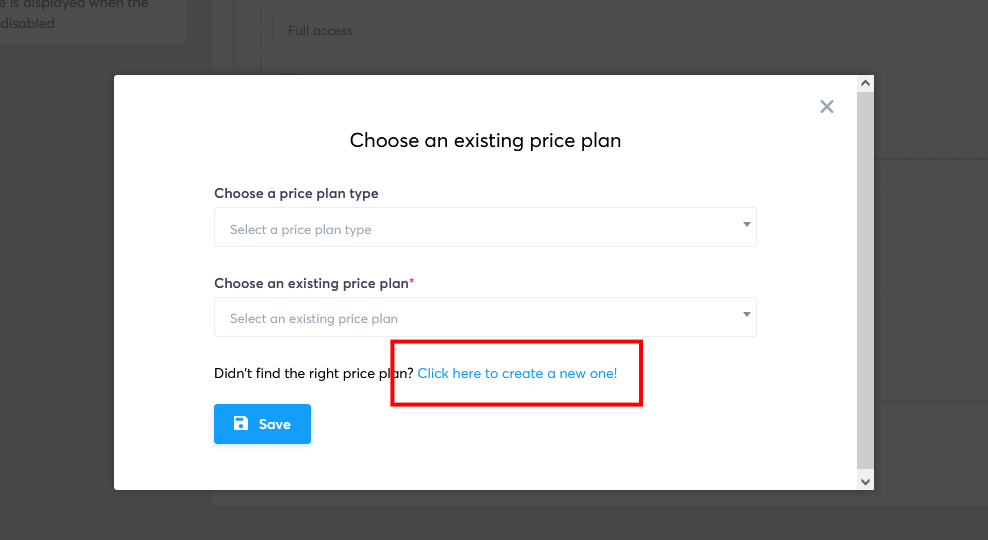
- Select your price plan: Click on the large “+” button to the right of ‘Price plans’. This opens a new popup to ‘Choose an existing price plan’. Click on “Create a new one”. Now complete the ‘New price plan details’ for your course.
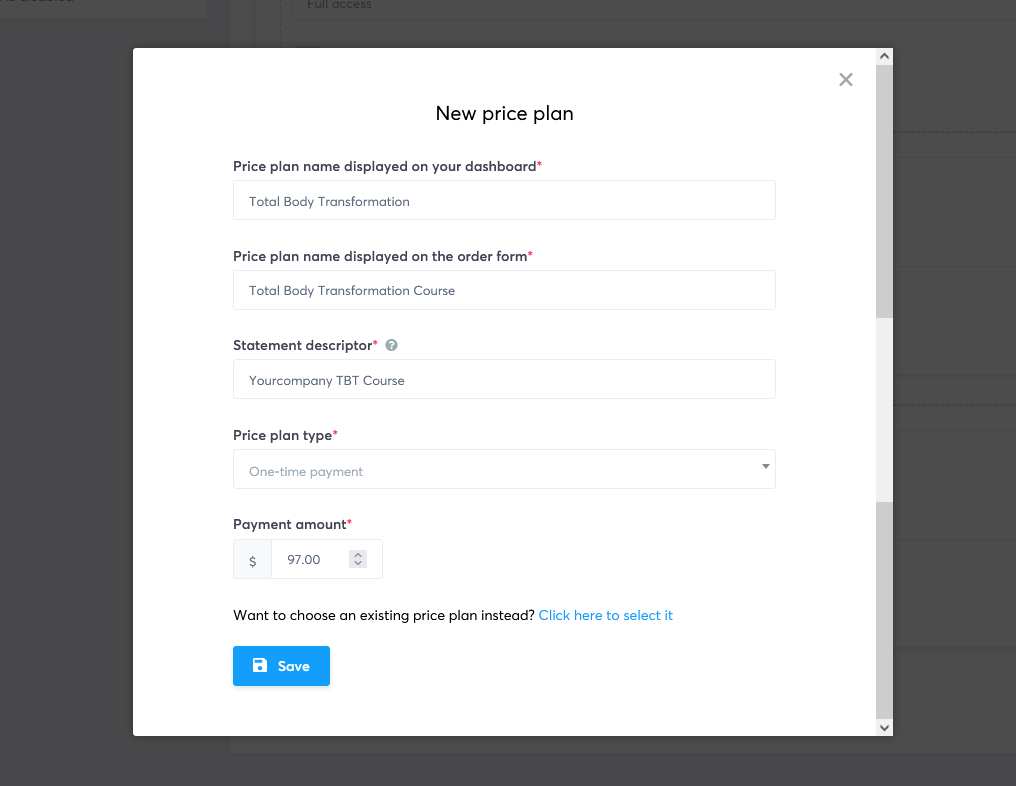
- For the ‘Price plan name displayed on your dashboard’, choose your course name e.g. “Total Body Transformation”.
- For the ‘Price plan name displayed on the order form’, choose your course name e.g. “Total Body Transformation Course”.
- For the ‘Statement descriptor’ that will show on your customers credit card statement, choose a short (less than 22 character) description that references your company and product e.g. “Yourcompany TBT Course”.
- For the ‘Price plan type’, choose “One-time payment”, for a one-time single payment.
- For the ‘Payment amount’, enter the amount of your course, for example $97.00. Make sure the currency is correct – if not, check your account settings as described in Step 2. Then click on “Save” to save your price plan settings. You will now see your new price plan showing in your funnel stage editor.
Important: If you don’t see the large ‘+’ sign to the right of the ‘Price plans’ and can only see a large pink box, this means you haven’t set up your payment gateways. In this case, click on the blue link that reads “Click here to connect to a payment gateway” to set one up, then return to this step.

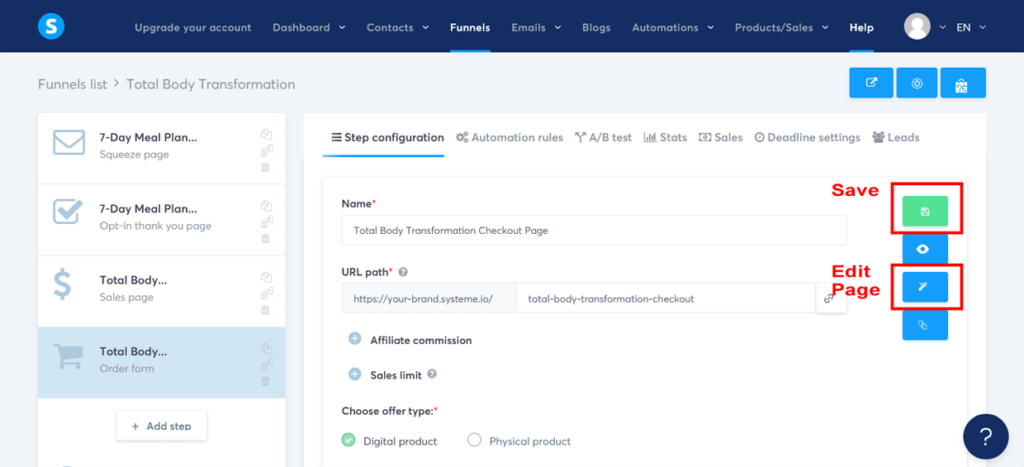
- Save your changes: Once you’ve customized your URL path, chosen your offer type, selected your course, and chosen your price plan, click on the green ‘Save funnel step’ button on the right-hand side to save your changes.
Customizing your checkout page
- Edit your checkout page: Now, click on the middle blue ‘Edit page’ button on the right-hand side to open the funnel editor.
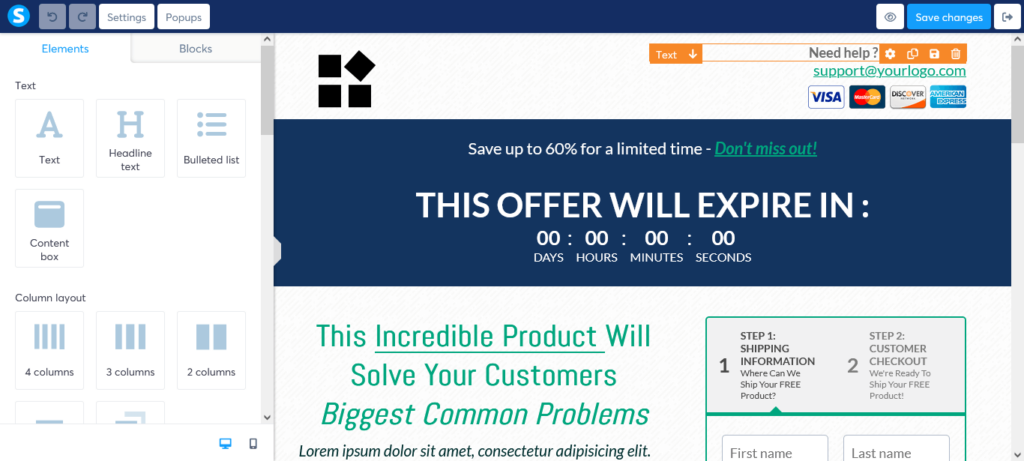
- Customize your checkout page: Use the drag-and-drop editor to customize the content on your checkout page by adding your course name, price, and a brief summary of what’s included. This serves as a gentle reminder of the incredible value they’re about to receive.
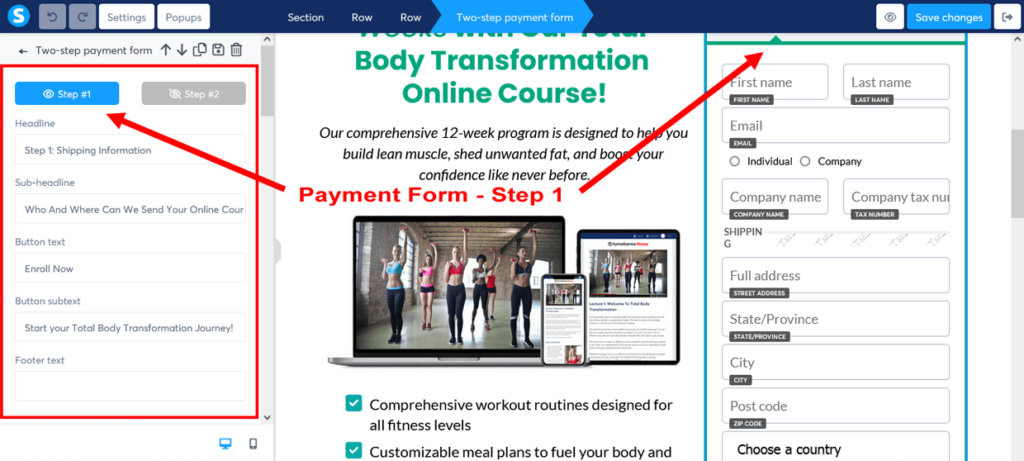
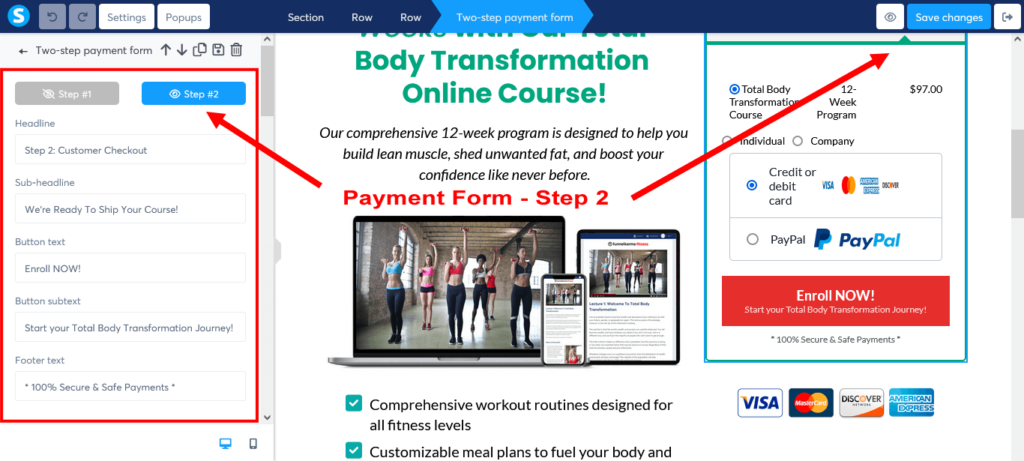
- Customize your two-step payment form: The order form template we are using to create this sales funnel has a two-step payment form. We highly recommend you use this type of payment form for one big reason. If your customer leaves your funnel after entering their contact and shipping information in Step 1, but before entering their payment information in Step 2, Systeme.io will still keep their contact details for you in your Contacts dashboard. This way you can reach out to your customer and address and concerns they may have and guide them better to return and purchase.
- Customize payment Step 1: To customize the first step of the two-step payment form, click on the “Step 1: Shipping Information” area of the form to open the element editor.
- Customize payment Step 2: To customize the second step of the two-step payment form, click on the “Step 2: Customer Checkout” area of the form to open the element editor. With your price plan set up, you should now see your product on the payment form.
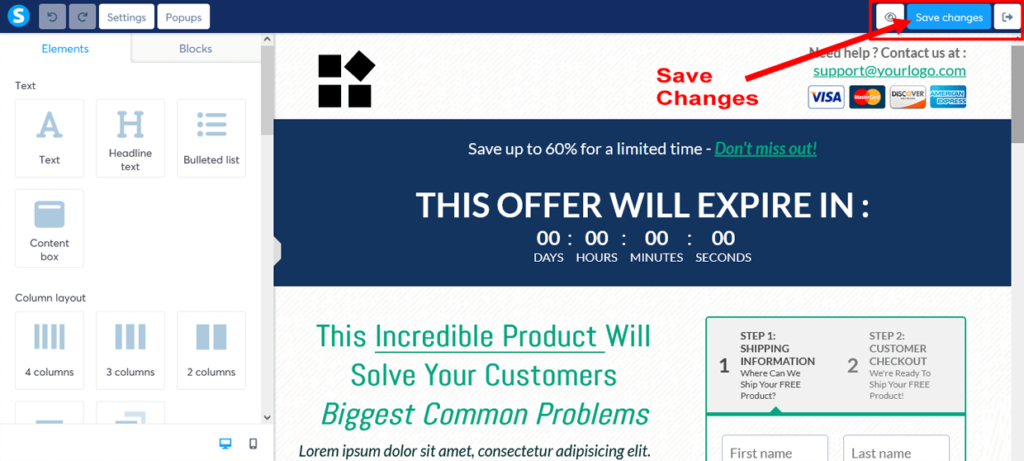
- Save your checkout page: Once you’re satisfied with your checkout page, click the “Save changes” button in the top-right corner of the editor. Then click the “Exit” button to return to your sales funnel stage editor.
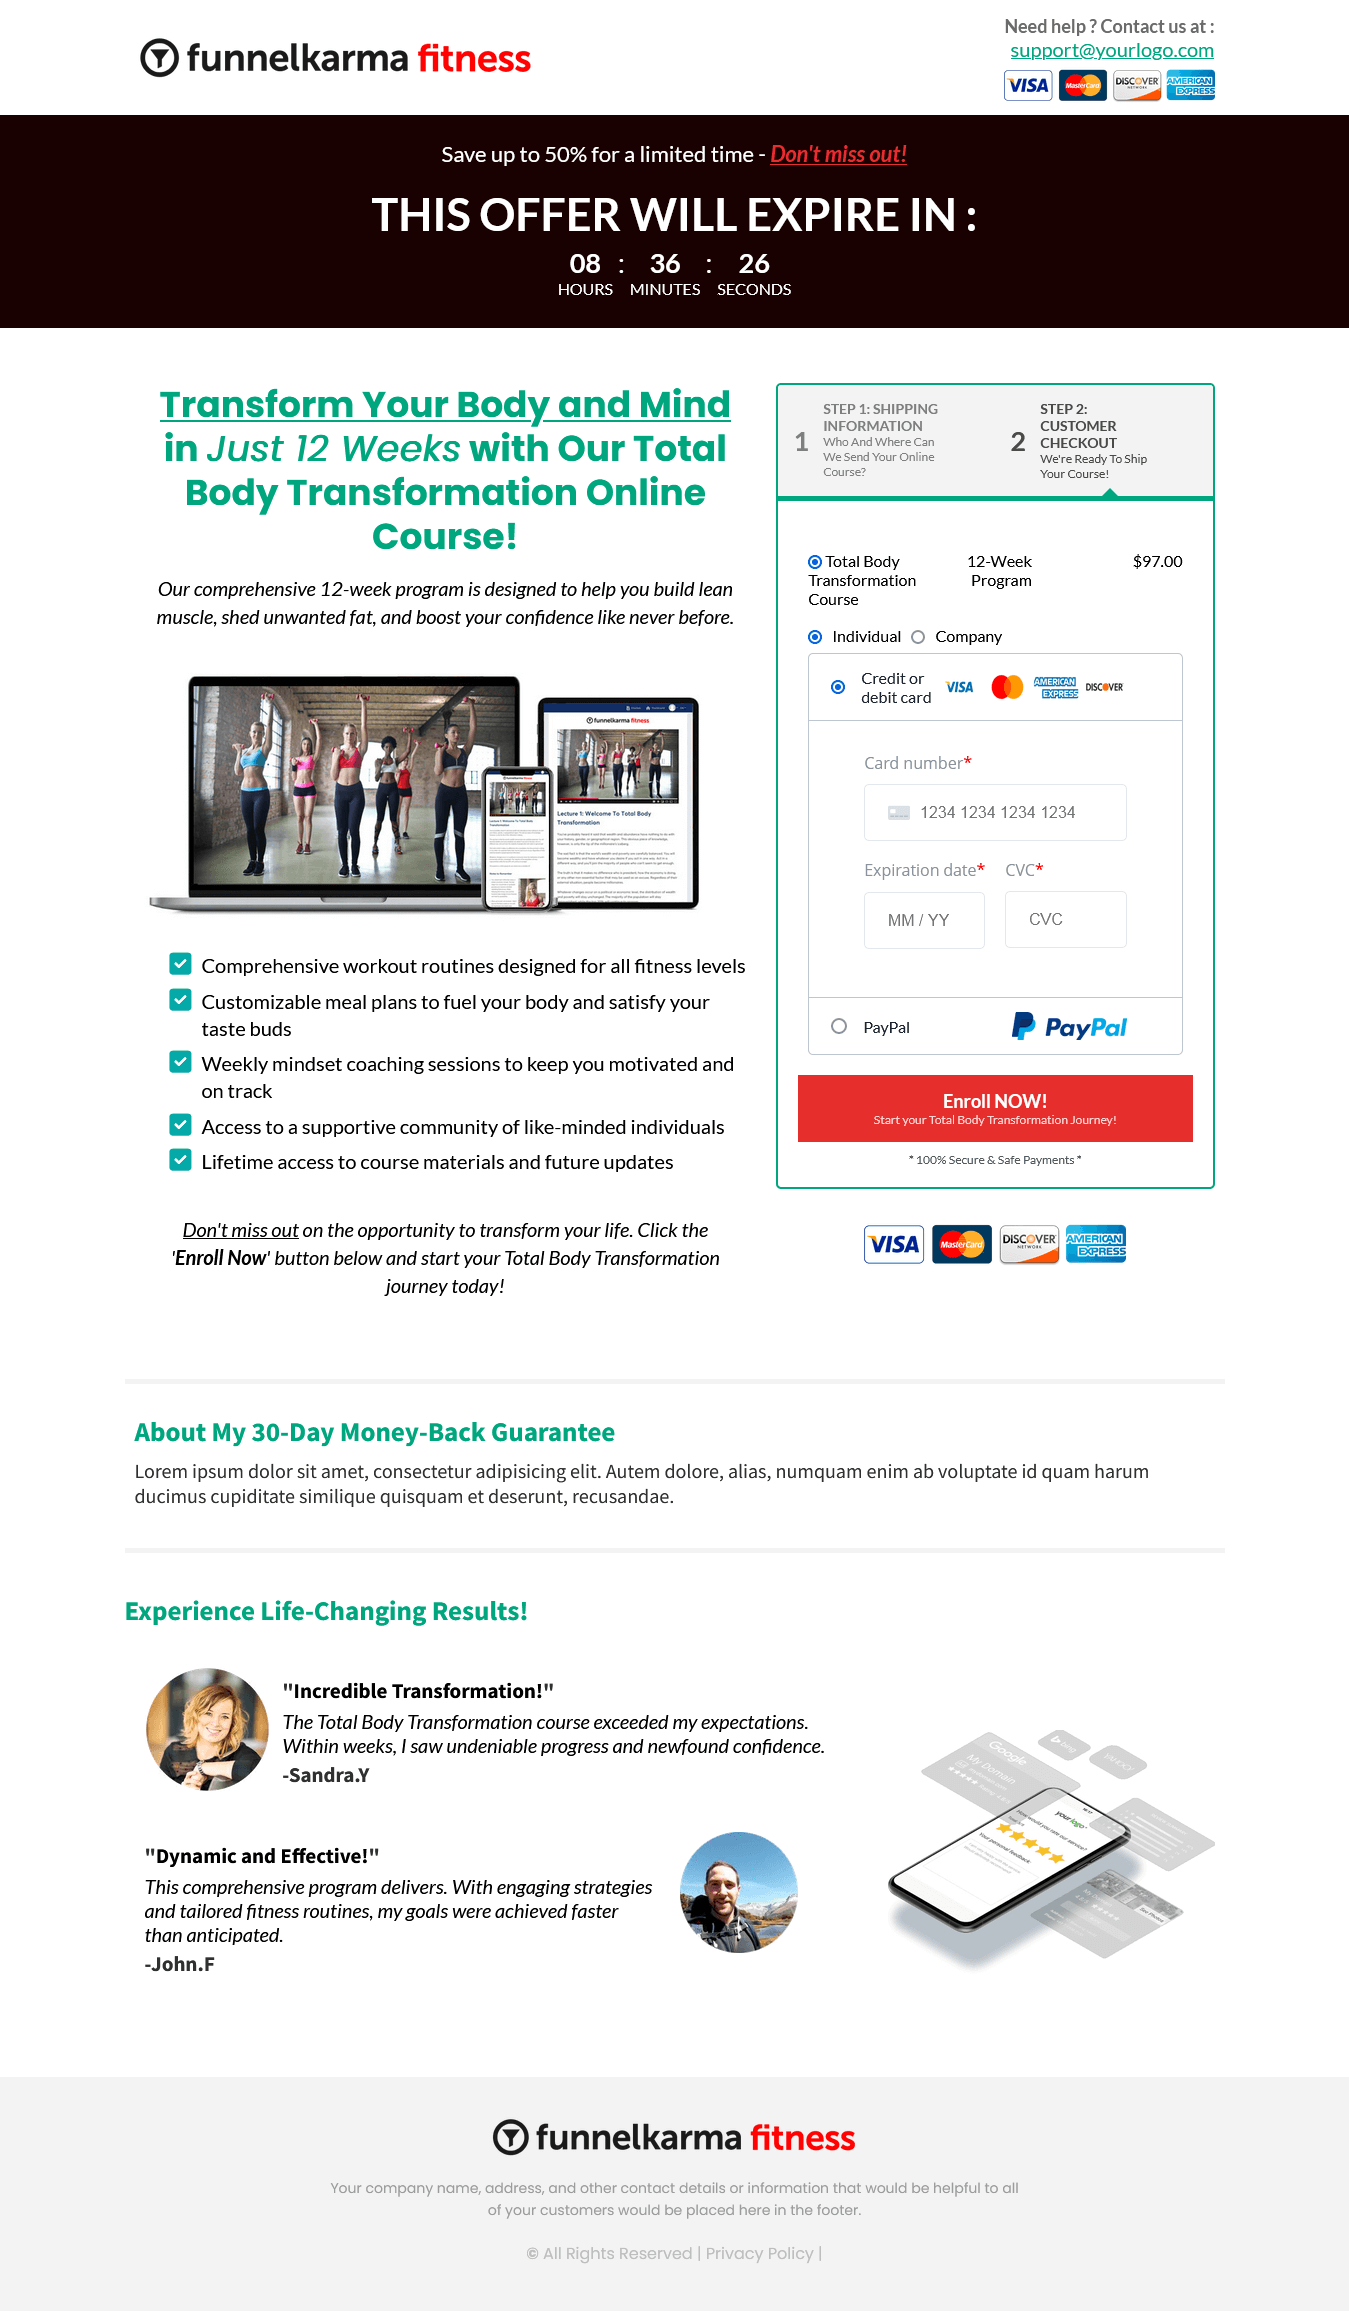
Here’s how we took one of Systeme.io’s checkout/order form page templates and simply edited it to create our FunnelKarma Fitness sales funnel example.
Click on each checkout page image above to enlarge and view in a full lightbox
To view and scroll through both steps of the final edited checkout page in full, click on the blue buttons below.
And there you have it! You’ve successfully created a seamless sales funnel checkout experience for your customers.
With this user-friendly checkout page in place, you’re all set to turn those eager prospects into satisfied customers, ready to embark on their Total Body Transformation journey.
You’re doing an amazing job so far! But don’t stop there – in the next step, you’ll learn how to nurture your customers even further by creating a post-purchase follow-up sales funnel email sequence. After all, a little extra care goes a long way, right?
Step 11: Create a Thank You for Purchase Page
Just like we created a sales funnel opt-in thank you page in Step 6 to thank subscribers for signing up for the lead magnet, we’ll now create another thank you page to express our gratitude to the customers who have bought your course.
This new thank you for purchase page will confirm their purchase, provide essential information to help them get started with your course, and further strengthen the relationship with your new customers.
So, let’s dive in and create a sales funnel thank you for purchase page that leaves a lasting impression and sets the stage for a successful experience with your course.
Ready? Let’s get to it!
Adding a thank you for purchase page to your existing funnel in Systeme.io
- Navigate to the Funnels section: If you’re not still in your Funnels dashboard, click on “Funnels” in the main header menu.
- Select your funnel: Locate the existing funnel you created earlier (e.g., “Total Body Transformation Funnel”) and click on it to open the funnel stage editor.
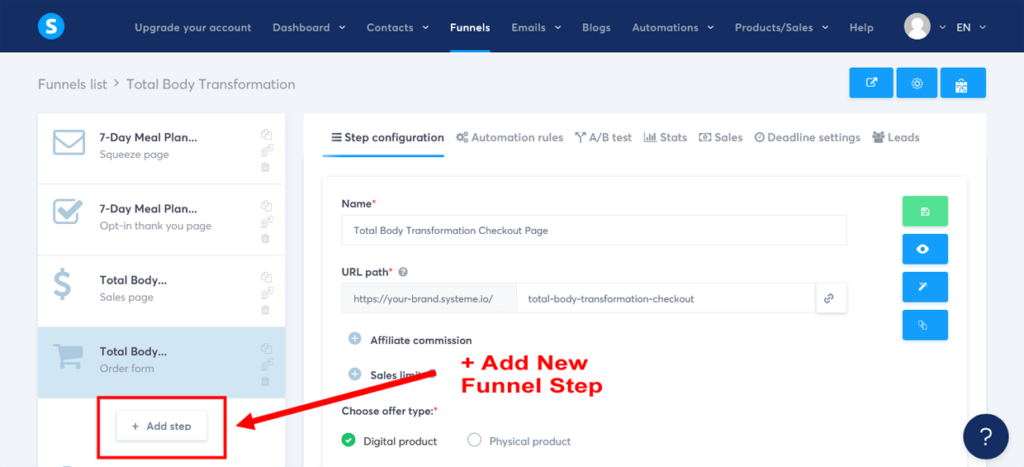
- Add a new step: Click on “+ Add step” below your Checkout page to open the ‘Add new step’ popup.
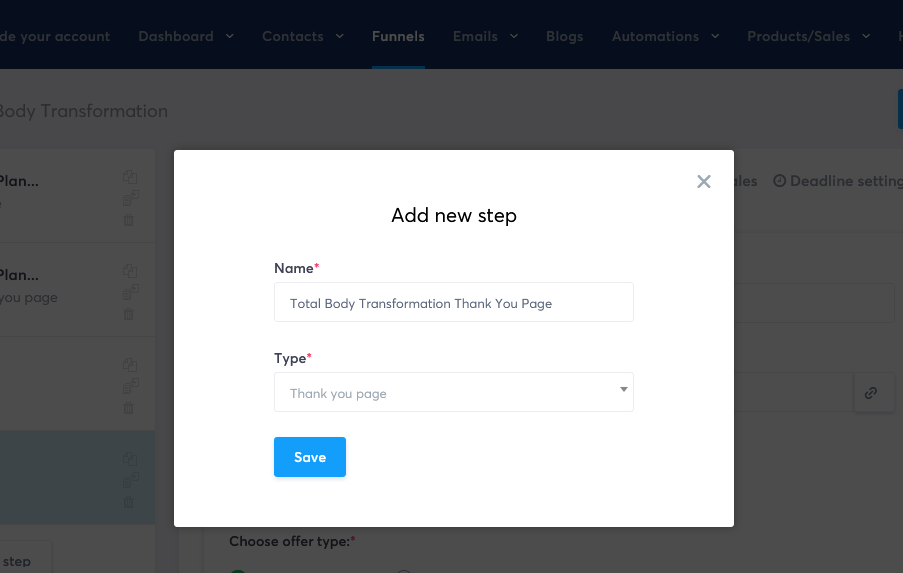
- Name your step: Give your new step a name, such as “Total Body Transformation Thank You Page”. In the ‘Type’ dropdown menu, select “Thank you page” from the ‘Sales’ section, and then click “Save”. This will add the sales page step to your funnel.
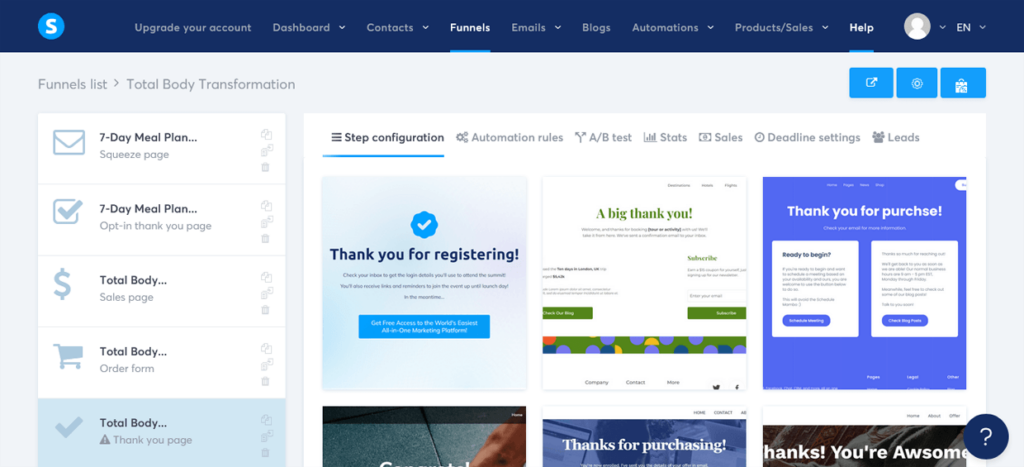
- Choose a template: Browse through the available thank you for purchase page templates and select one that best fits your needs. For consistency, choose the same template as your first Thank You page to maintain a cohesive look and feel. Then click on “Select” to choose the template to proceed.
- Customize your thank you for purchase page URL name: Edit the URL of your new thank you for purchase page to make it more user-friendly and closely related to your main offer. Click on “Settings” in the top right corner of the editor. In the “URL” field, change the URL to something like “total-body-transformation-thank-you” using dashes between words.
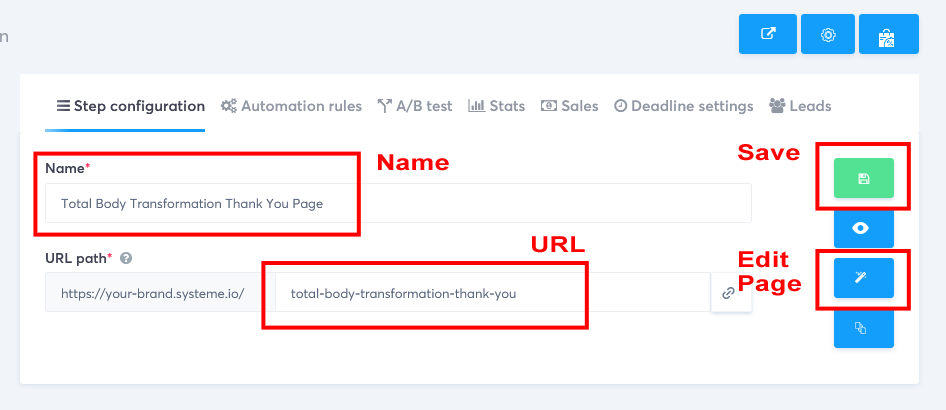
- Save your changes: Once you’ve customized your URL path, click on the green ‘Save funnel step’ button on the right-hand side to save your changes.
Customizing your thank you for purchase page
- Edit your thank you for purchase page: Now, click on the middle blue ‘Edit page’ button on the right-hand side to open the funnel editor.
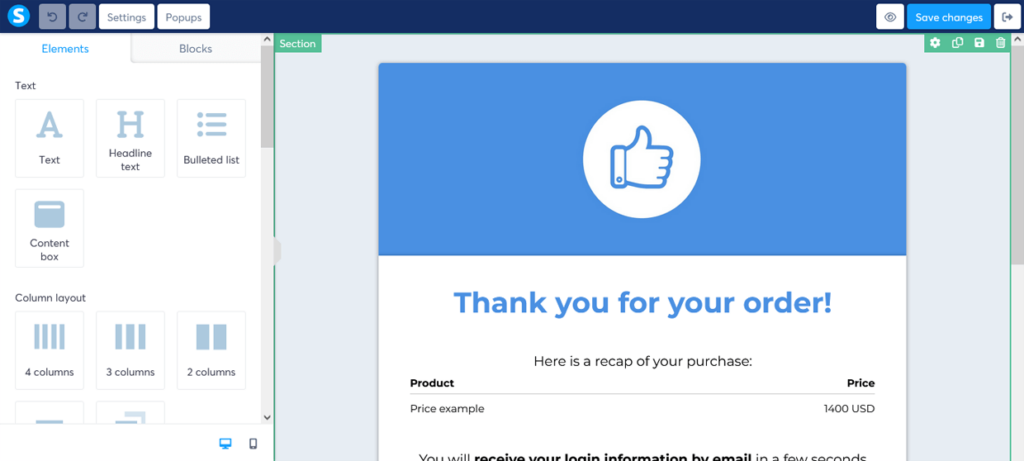
- Customize your thank you for purchase page: Customize the content on your new thank you for purchase page by adding a heartfelt message of gratitude, confirming their purchase, and providing any necessary instructions for accessing the course.
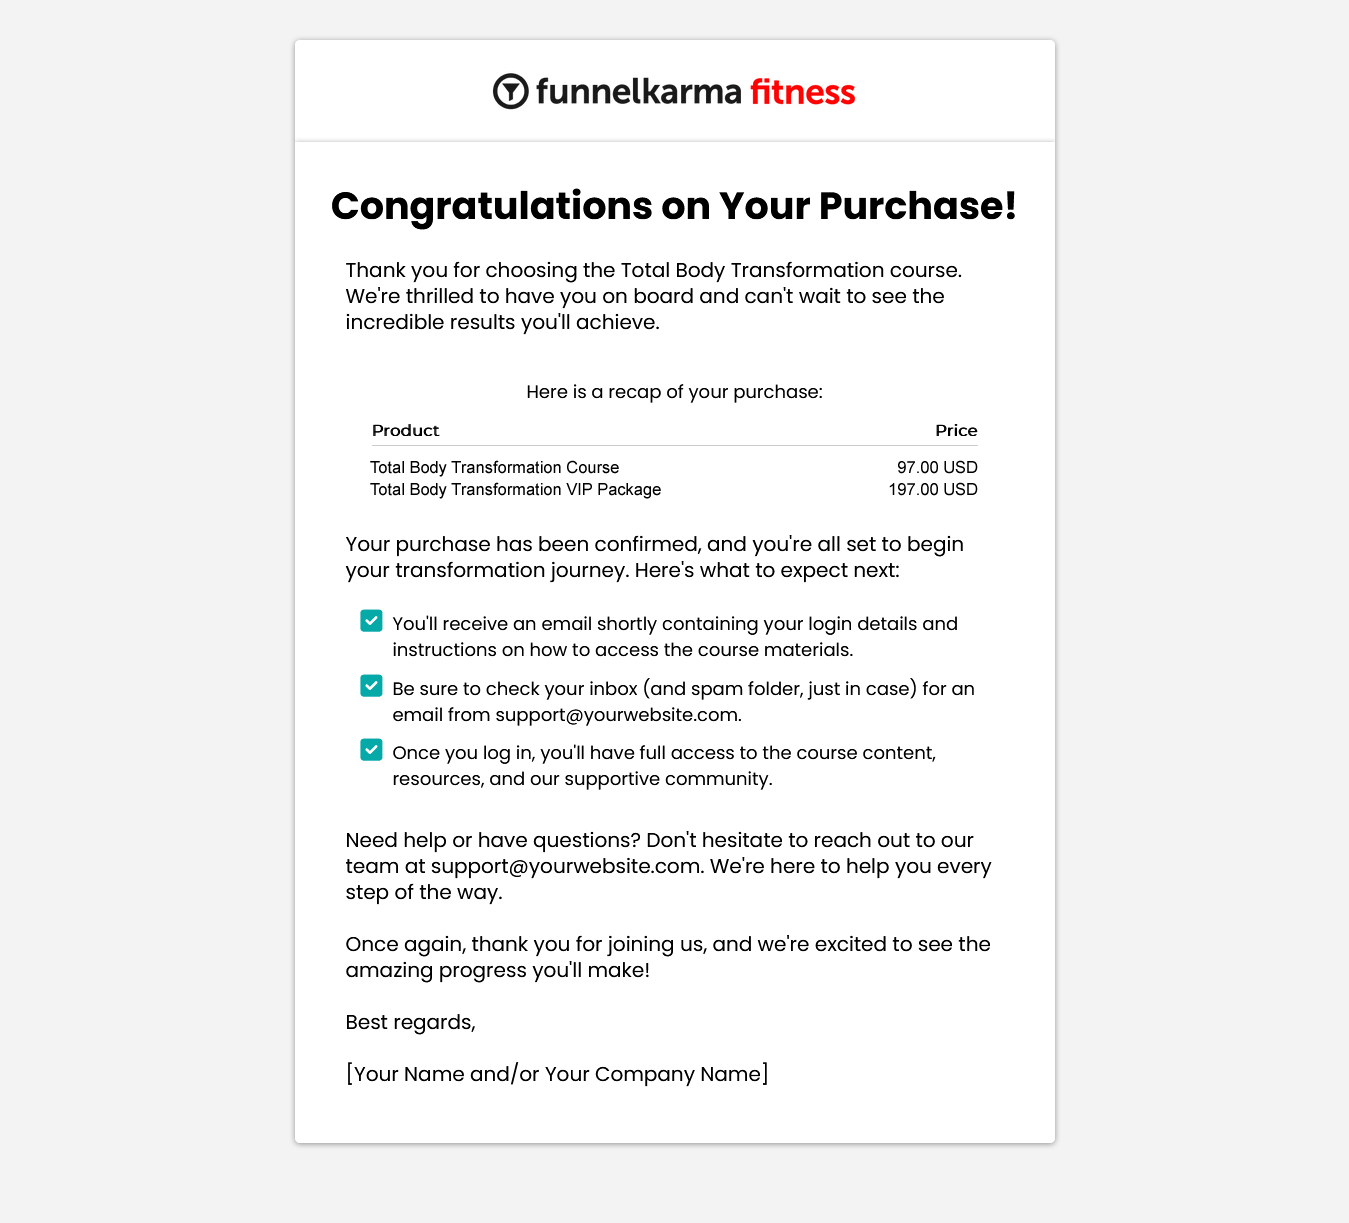
For example, you can use the following thank you page copy for customers who have bought the “Total Body Transformation” course:
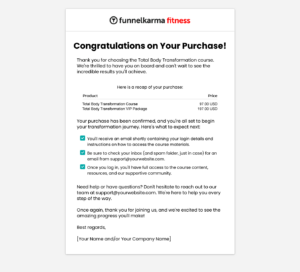
“Congratulations on Your Purchase!
Thank you for choosing the Total Body Transformation course. We’re thrilled to have you on board and can’t wait to see the incredible results you’ll achieve.
Here’s a recap of your purchase:
[Insert purchase details]
Your purchase has been confirmed, and you’re all set to begin your transformation journey. Here’s what to expect next:
- You’ll receive an email shortly containing your login details and instructions on how to access the course materials.
- Be sure to check your inbox (and spam folder, just in case) for an email from [Your Email Address or Company Name].
- Once you log in, you’ll have full access to the course content, resources, and our supportive community.
Need help or have questions? Don’t hesitate to reach out to our team at [Your Support Email Address or Contact Page Link]. We’re here to help you every step of the way.
Once again, thank you for joining us, and we’re excited to see the amazing progress you’ll make!
Best regards,
[Your Name and/or Your Company Name]”
Don’t forget to replace the placeholders (e.g., [Your Email Address or Company Name]) with the appropriate information using the drag-and-drop editor.
- Save your thank you for purchase page: Once you’re satisfied with your thank you for purchase page, click the “Save changes” button in the top-right corner of the editor. Then click the “Exit” button to return to your sales funnel stage editor.
Here’s how we took one of Systeme.io’s sales thank you page templates and simply edited it to create our FunnelKarma Fitness sales funnel example.
Click on each purchase thank you page image above to enlarge and view in a full lightbox
Well done! Your second sales funnel thank you page now confirms the purchase and kickstarts a memorable customer experience.
By sharing your appreciation and offering clear guidance, you’re building a strong bond with customers and setting the stage for future interactions.
With your sales page, checkout page, and thank you for purchase page built and ready to go, it’s time to boost your earnings and offer more value to your customers.
In the next step, we’ll create your sales funnel upsell page and product, allowing customers to enhance their purchase and connect even more with your brand. Get set to unleash your sales potential and deliver a truly outstanding customer experience!
Step 12: Create Your Sales Funnel Upsell Page and Product (Optional)
Why stop at just one sale when you can make even more? That’s where sales funnel upsells come in!
Upsells are additional offers that complement your main product or service. Think of them like the cherry on top of an already delicious sundae.
By offering an upsell, you’re giving your customers the chance to get even more value from their purchase – while boosting your bottom line in the process. It’s a win-win!
And here’s the thing:
Sales funnel upsells are often the easiest sales to make.
Why?
Because at the checkout, buyers already have their wallets out. By offering something else at the same time that adds to your great offer, many people will simply say “Yes. I’ll have that too!”.
And the kicker?
This extra sale costs you nothing. Zero. Zilch. Not a penny extra in marketing. Pretty cool, right?
But, what if you don’t have an upsell yet?
Don’t worry – keep moving forward with this tutorial to learn how it fits into your funnel. Then, you’ll be better prepared to create your own upsell that complements your main offer when you’re ready.
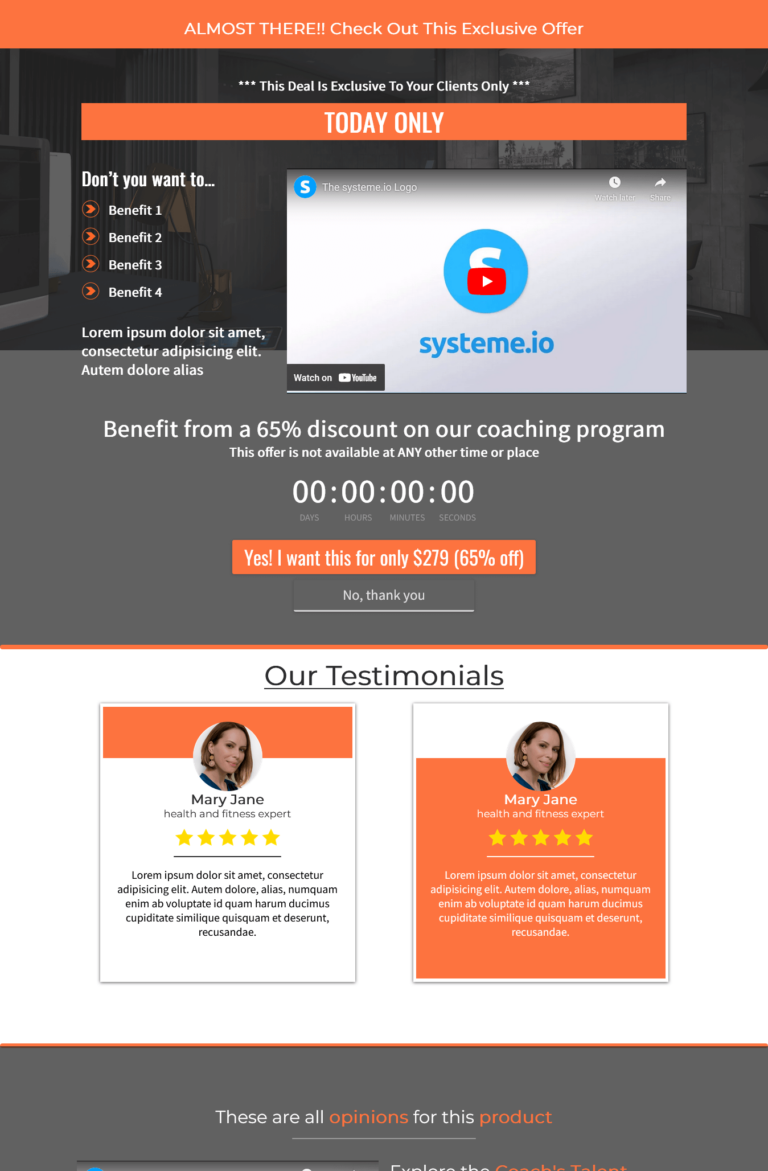
In this step, we’ll create a sales funnel upsell page featuring an upsell offer, which will appear after the course checkout page, giving customers the option to accept or decline the offer.
Our example upsell is a premium personal service upgrade to the Total Body Transformation 12-Week Course, called “Total Body Transformation VIP: Our Exclusive Program with Personalized Workout Plans, Nutrition Coaching, and 1-on-1 Support.”.
This upsell isn’t a downloadable digital product like the main offer. Instead, we’ll add a tag to customers who purchase it, and then use this tag to grant them access to the upsell via email in a following step.
This unique method allows us to seamlessly integrate a personalized add-on service directly into the sales funnel.
Ready? Let’s get started!
Create a tag for your course customers who buy your upsell
- Navigate to the Contacts section: On the main Systeme.io dashboard, click on “Contacts” in the header menu. Then click on “Tags’ in the drop-down menu. This will take you to the Tags dashboard.
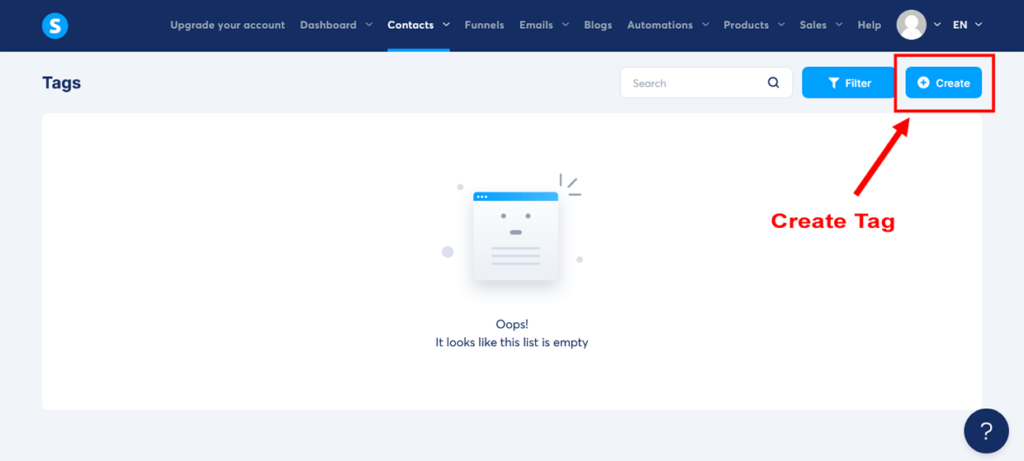
- Create a new tag: Click on “Create” to open the ‘Create tag’ popup. Give your tag a name, such as “Course Buyers – Upsell” and click “Save”. You’ll then see your new tag in your Tags Dashboard.
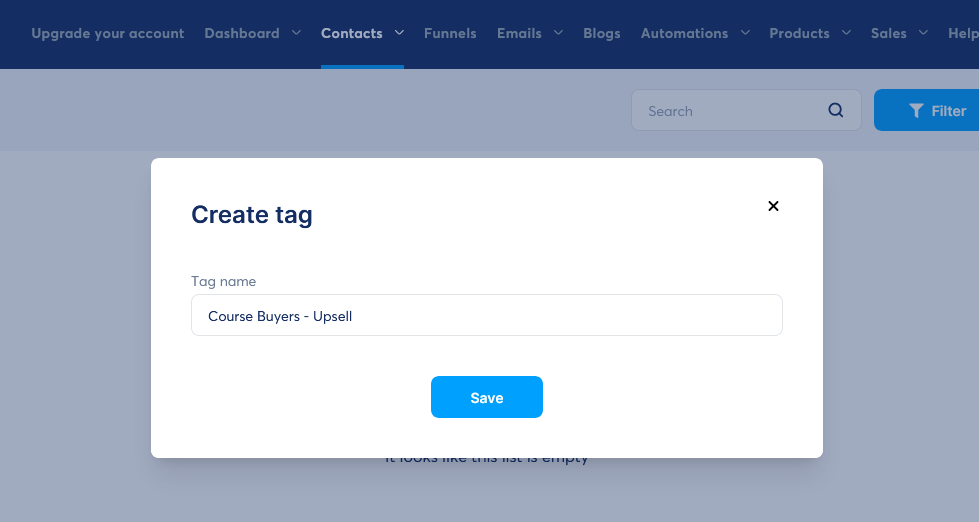
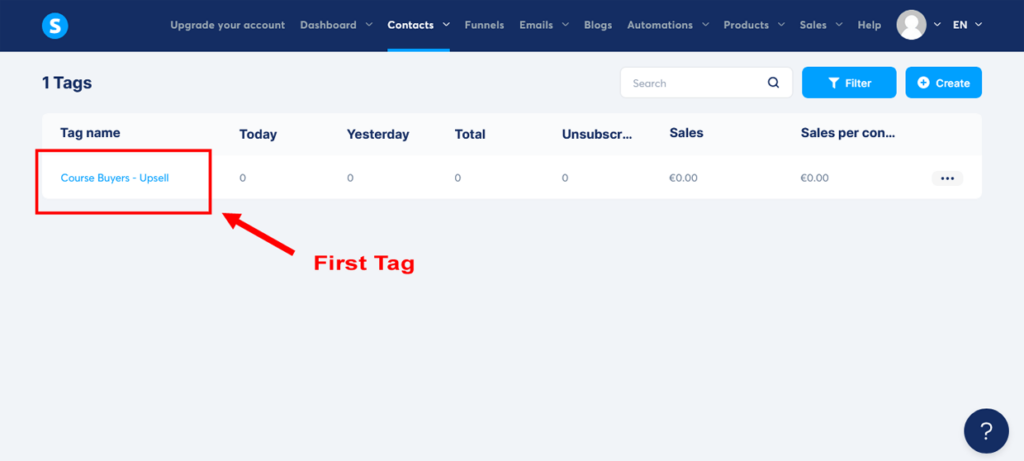
Creating your sales funnel upsell page
- Navigate to the Funnels section: Now, head back to your sales funnel by clicking on “Funnels” in the main header menu.
- Select your funnel: Locate the existing funnel you created earlier (e.g., “Total Body Transformation Funnel”) and click on it to open the funnel stage editor.
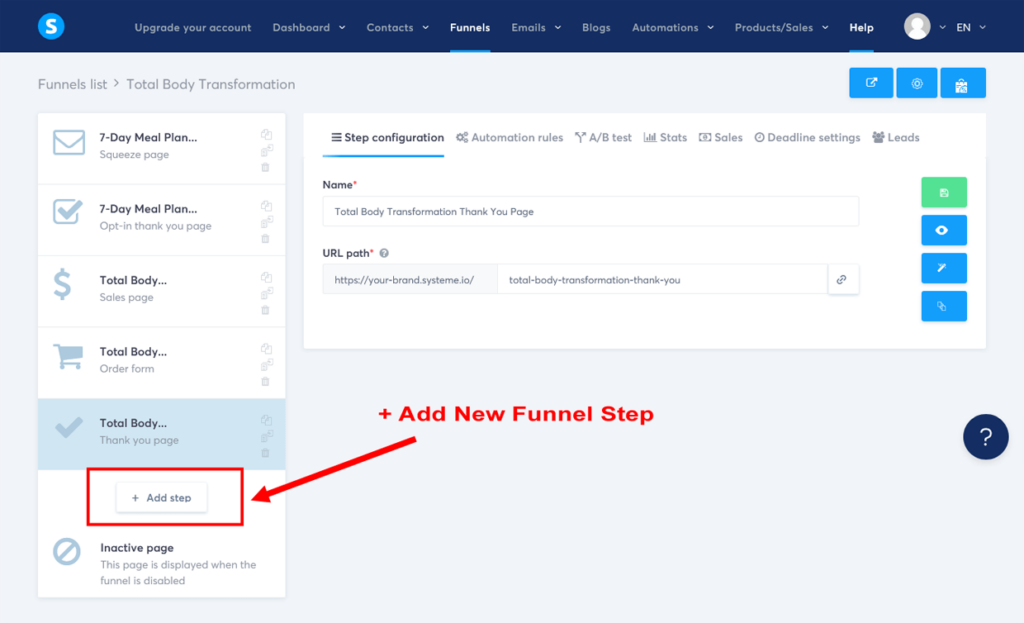
- Add a new step: Click on “+ Add step” below your Thank you page to open the ‘Add new step’ popup.
- Name your step: Give your new step a name, such as “Total Body Transformation Upsell Page”. In the ‘Type’ dropdown menu, select “Upsell” from the ‘Sales’ section, and then click “Save”. This will add the upsell page step to your funnel.
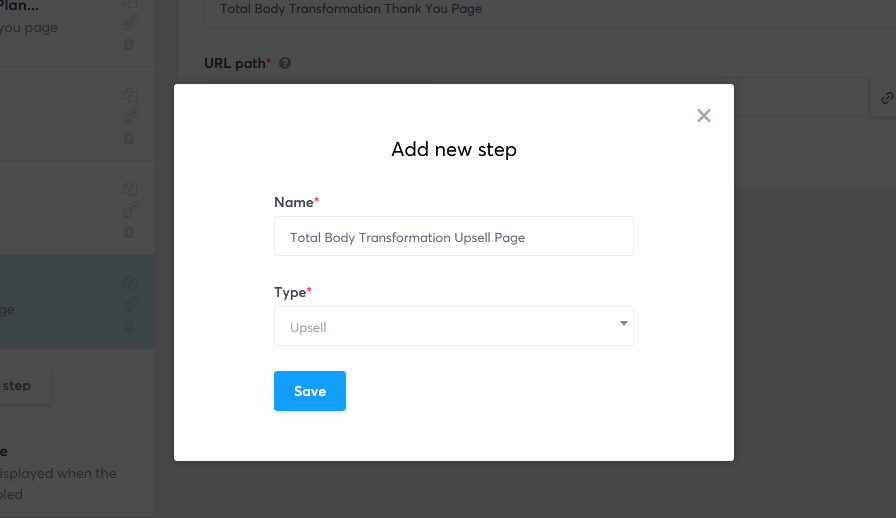
- Choose a template: Browse through the available upsell page options and select one that best fits your needs. For consistency, choose a template for your Upsell Page that’s consistent with your previous sales page’s design. Then click on “Select” to choose the template to proceed.
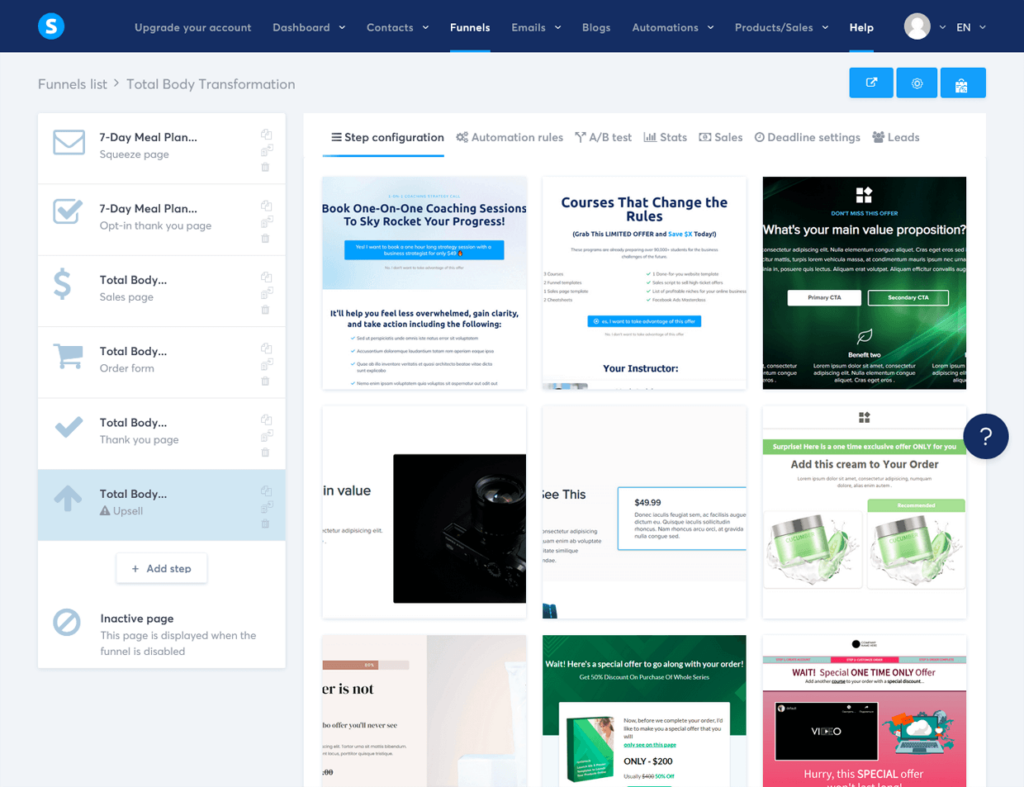
- Move your upsell page up a step: [IMPORTANT] Make sure the upsell page is placed after the main order form page and before the thank you page. You can rearrange the steps in your funnel by clicking and dragging the steps within the funnel editor.
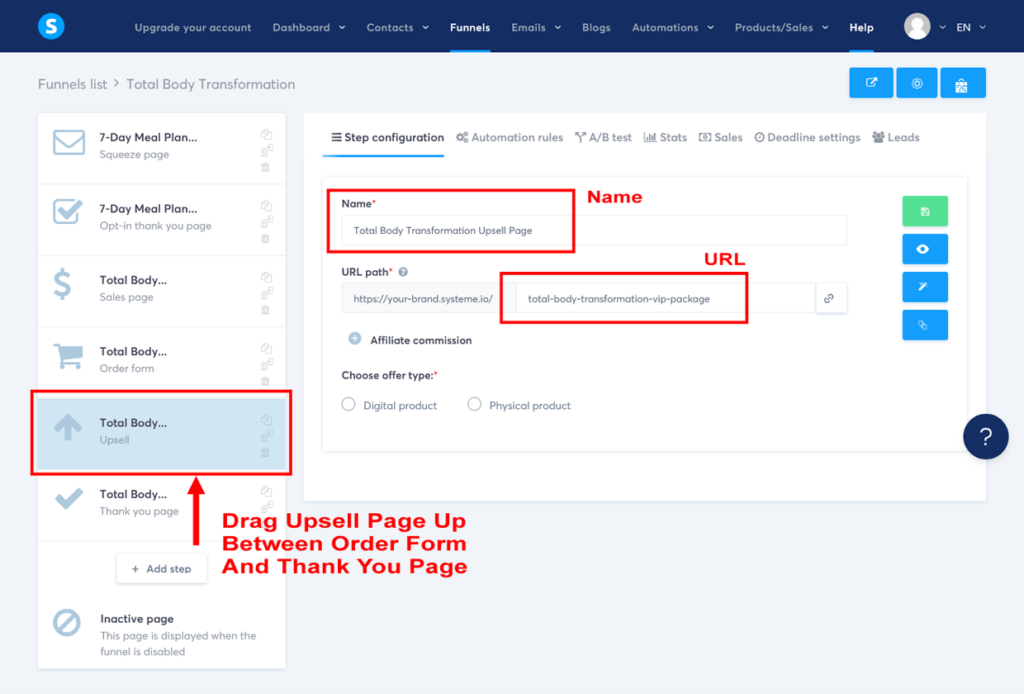
- Customize your upsell page URL name: Edit the URL of your upsell page to make it more user-friendly and closely related to your upsell offer. Click on “Settings” in the top right corner of the editor. In the “URL” field, change the URL to something like “total-body-transformation-vip-package” using dashes between words. [See image above]
- Choose your offer type: Select “Digital product” from the ‘Choose offer type’ options. This will open a drop-down menu to the page.
- Select your resource: Click on the large “+” button to the right of ‘Resources’. This opens a new drop-down menu to ‘Select a resource’. Click on the drop-down arrow and select “Tag”. Then click on the drop-down arrow to ‘Choose a tag’ and select the tag you just created “Course Buyers – Upsell”.
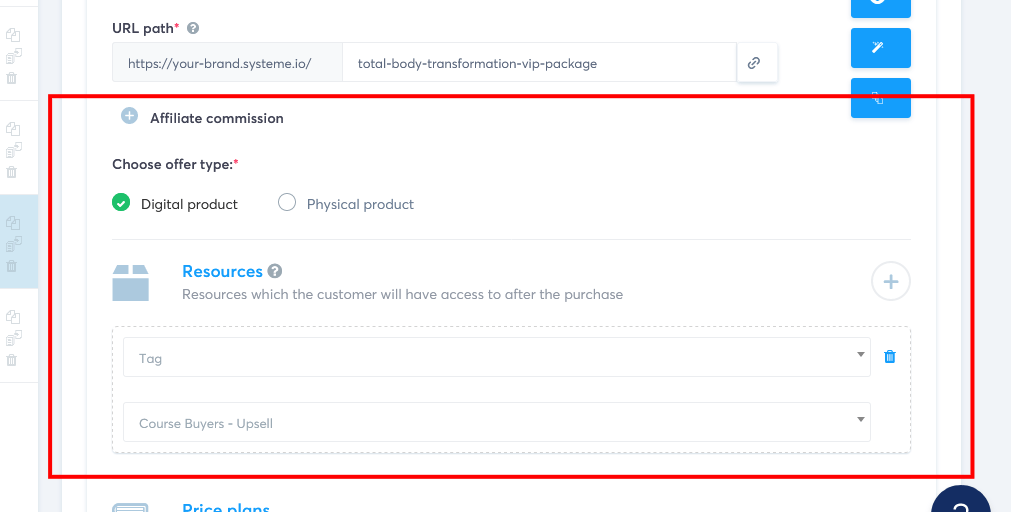
- Select your price plan: Click on the large “+” button to the right of ‘Price plans’. This opens a new popup to ‘Choose a price plan’. Click on “Create a new one”. Now complete the ‘New price plan details’ for your upsell.
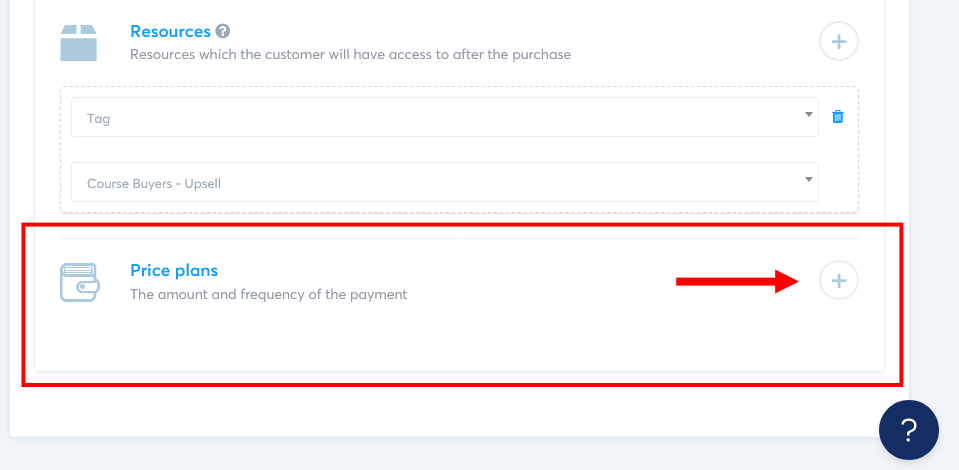
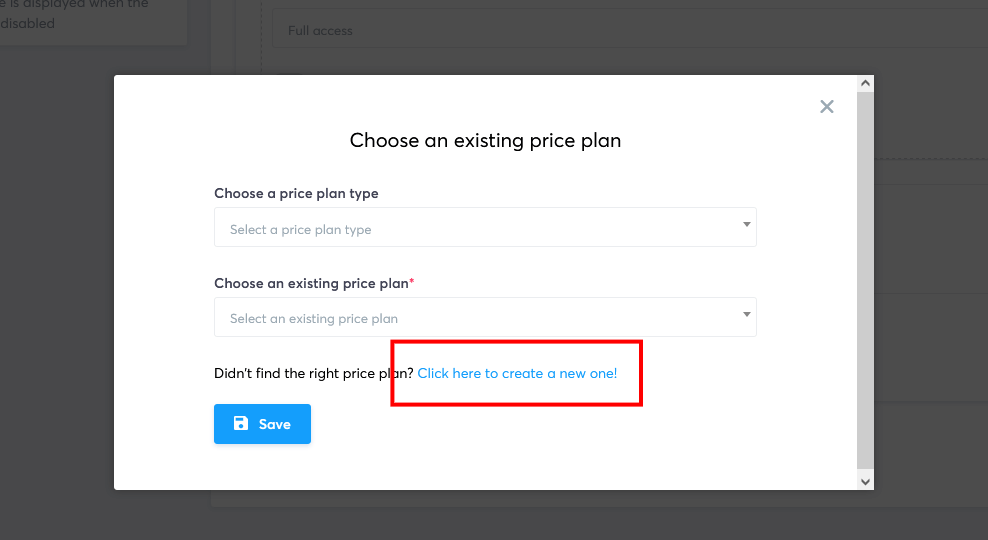
- For the ‘Price plan name displayed on your dashboard’, choose your course name e.g. “Total Body Transformation Upsell”.
- For the ‘Price plan name displayed on the order form’, choose your course name e.g. “Total Body Transformation VIP Package”.
- For the ‘Statement descriptor’ that will show on your customers credit card statement, choose a short (less than 22 character) description that references your company and product e.g. “Yourcompany TBT VIP”.
- For the ‘Price plan type’, choose “One-time payment”, for a one-time single payment.
- For the ‘Payment amount’, enter the amount of your upsell, for example $197.00. Make sure the currency is correct – if not, check your account settings as described in Step 2. Then click on “Save” to save your price plan settings. You will now see your new upsell price plan showing in your funnel stage editor.
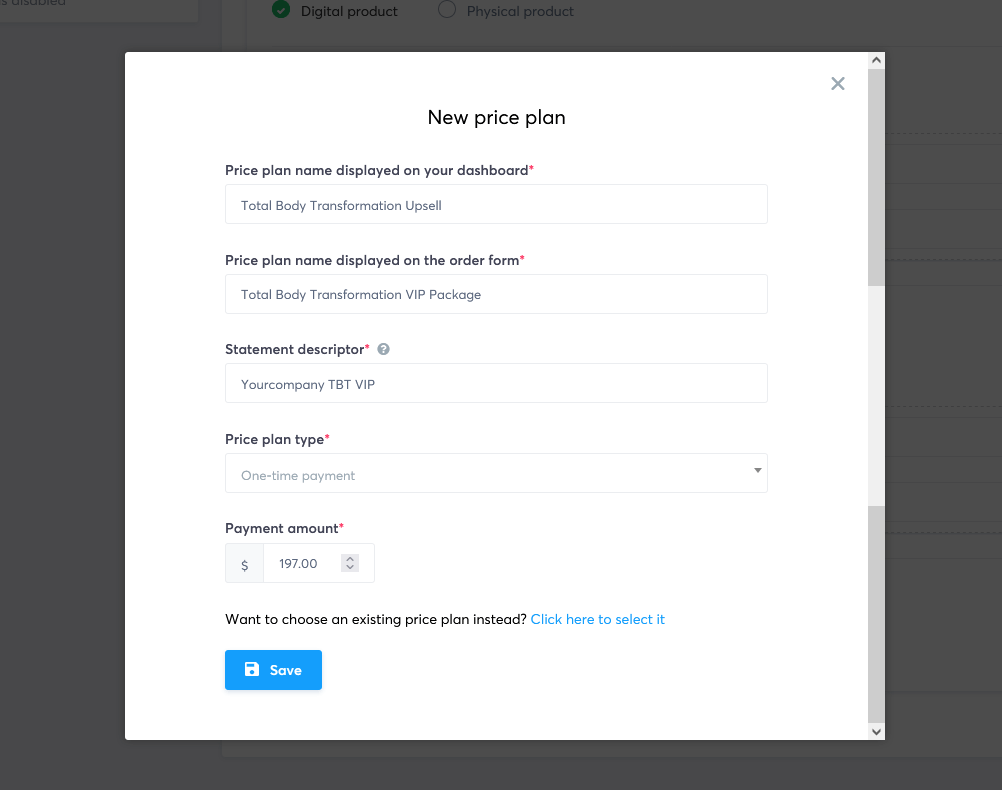

- Save your changes: Once you’ve customized your URL path, chosen your offer type, selected your upsell tag, and chosen your price plan, click on the green ‘Save funnel step’ button on the right-hand side to save your changes.
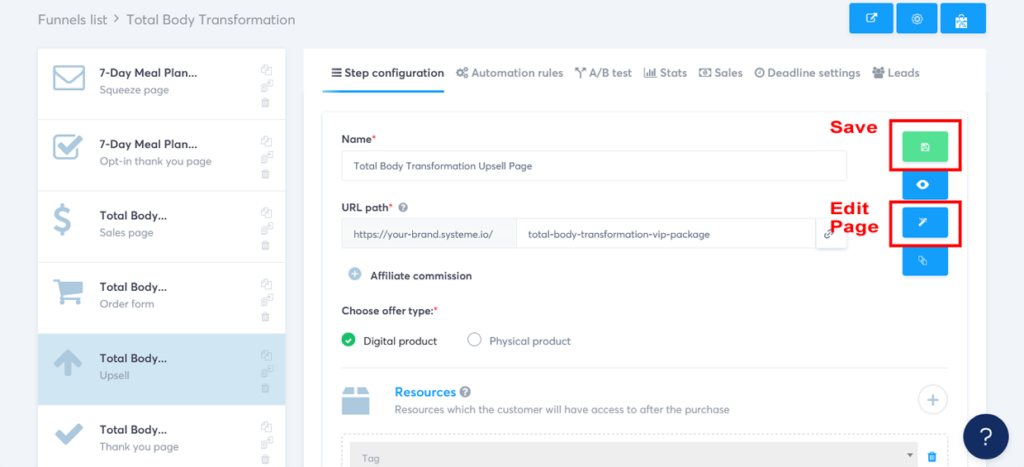
Customizing your sales funnel upsell page
- Edit your upsell page: Now, click on the middle blue ‘Edit page’ button on the right-hand side to open the funnel editor.
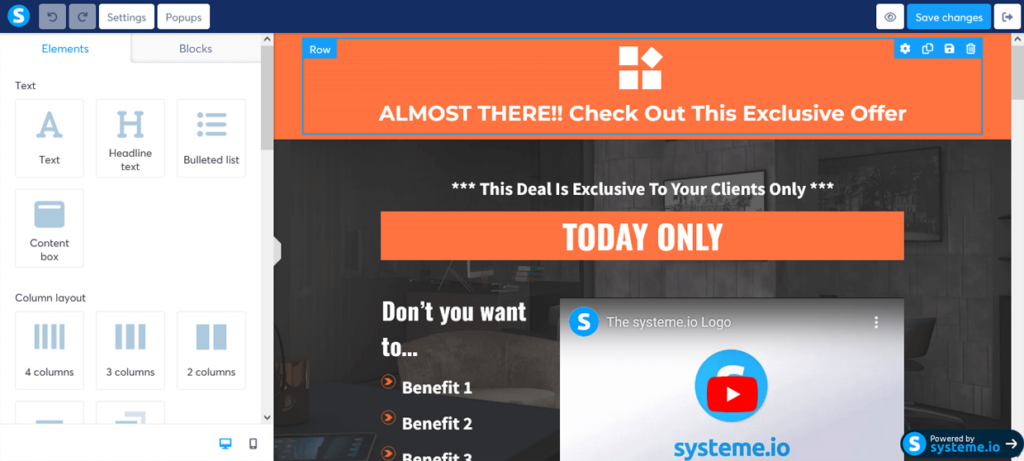
- Customize your upsell page: Customize the content on your Upsell Page to showcase the benefits and value of your upsell product, the “Total Body Transformation VIP: Our Exclusive Program with Personalized Workout Plans, Nutrition Coaching, and 1-on-1 Support.” Clearly explain how it complements the main offer and enhances the customer’s experience.
For consistency, use a similar content style to your sales page but try to keep it shorter and simpler. Also, consider creating a sense of urgency with the limited availability of the offer to encourage customers to make a decision.
For your sales copy, we recommend using a framework similar to the AIDA formula that we used for the sales page.
Here are some suggested sections and sales copy to structure your upsell page:
Headline: Upgrade to Total Body Transformation VIP and Accelerate Your Results!
Subheadline: You’re already on your way to transforming your body with the Total Body Transformation course. But what if you could get even BETTER results, FASTER?
Introduction: Introducing Total Body Transformation VIP: Our Exclusive Program with Personalized Workout Plans, Nutrition Coaching, and 1-on-1 Support.
Benefits Bullet Points: As a VIP member, you’ll get:
- Personalized 1-on-1 coaching sessions every two weeks, providing valuable guidance and support from a skilled trainer
- Customized workout plans tailored to individual fitness levels, goals, and preferences
- Personalized nutrition coaching to optimize meal plans for faster results
- Priority email support to answer specific questions and enhance motivation
- Exclusive access to the VIP community of like-minded individuals on the same fitness journey
Limited Availability: This exclusive upgrade is only available to a limited number of members, so don’t miss out on the chance to supercharge your transformation!
Upgrade Offer: Upgrade now for just [Your VIP Package Price] and unlock the full potential of your Total Body Transformation journey.
Upsell Accept Button: [Add Upsell Accept Button: “Yes, Upgrade Me to VIP!”]
Upsell Decline Text: Not interested in the VIP experience? No problem, you can continue with your Total Body Transformation course purchase.
Upsell Decline Button: [Add Upsell Decline Button: “No, Thanks. I’ll Stick with My Current Purchase.”]
Don’t forget to replace the placeholders (e.g., [Your VIP Package Price]) with the appropriate information using the drag-and-drop editor.
Once you’re satisfied with your upsell page copy, proceed with the remaining steps.
- Add an upsell accept and decline buttons: Make sure your upsell page has 1-click buttons to accept or decline the offer. If the template you chose doesn’t already have these, then add both buttons to your page using the drag-and-drop editor. Make sure both buttons are clearly labeled and easy to see to make the upsell buying or declining process as seamless as possible. This ensures the customer always has the option to accept or decline the offer without any confusion.
- Save your upsell page: Once you’re satisfied with your upsell page, click the “Save changes” button in the top-right corner of the editor. Then click the “Exit” button to return to your sales funnel stage editor.
Here’s how we took one of Systeme.io’s upsell page templates and simply edited it to create our FunnelKarma Fitness sales funnel example.
Click on each upsell page image above to enlarge and view in a full lightbox
To view and scroll through the final edited upsell page in full, click on the blue button below.
Kudos on creating your sales funnel upsell product and page! You’re doing an outstanding job!
You’re now ready to unlock your sales potential and deliver even more value to your customers. Remember, including an upsell, though optional, serves as a powerful tool for increasing revenue and enhancing your customer experience.
By incorporating this step into your funnel, you’re seizing every opportunity to grow and thrive in your online business. Way to go!
Now, let’s dive into Step 13, where we’ll create an automated sales funnel email workflow for the main offer and optional upsell. This will help you maintain strong customer engagement and further optimize your sales funnel.
Keep up the great work!
Step 13: Create an Automated Thank You Email Workflow For Main Offer and Optional Upsell
Alright, let’s talk about workflows. You might be wondering, “What’s the big deal with workflows?”
Well, workflows are like the glue that holds your sales funnel together. They help you automate your communication with your leads and customers, making sure they receive the right message at the right time.
Now, remember that tag we created for our sales funnel upsell?
We’re going to use it along with a workflow to send two different thank you emails depending on whether the buyer purchased the course on its own or with the upsell for 1-on-1 support. Sounds pretty neat, right?
Let’s dive into how to create a simple sales funnel workflow with Systeme.io.
Creating your sales funnel workflow
- Navigate to the Workflows section: From the main Systeme.io dashboard and click on “Automations”, then click on “Workflows”.
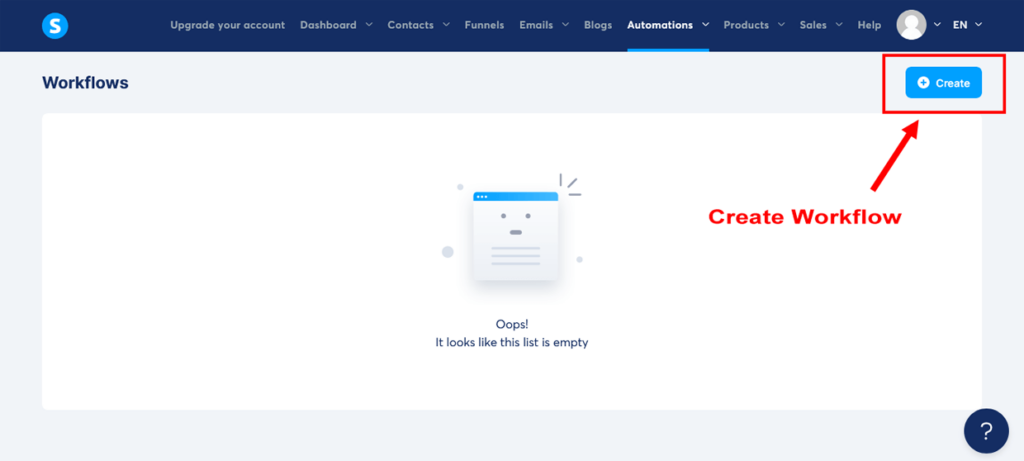
- Create a workflow: Next, click on “Create” to open the ‘Create workflow’ popup.
- Name your workflow: Give your workflow a name, like “Thank You Email Workflow” and click “Save”. This will take you to your Workflows dashboard.
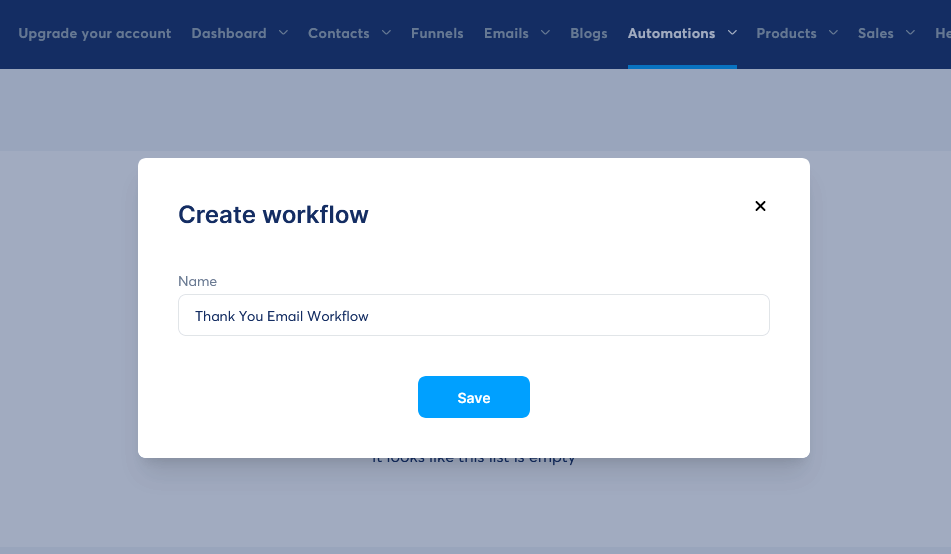
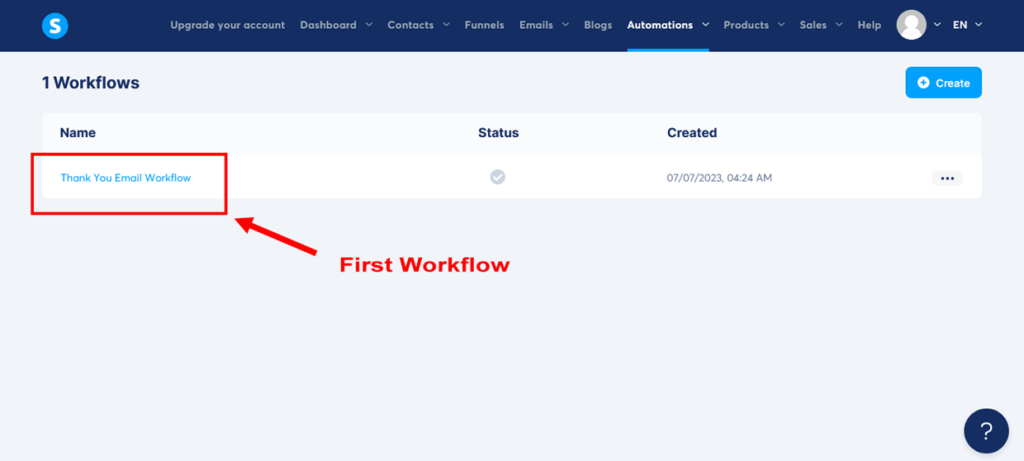
- Open your workflow: Click on your workflow to open the workflow builder.

- Create your trigger: Set the trigger for your workflow by clicking on the green ‘Create your first trigger’ button. In the ‘Create trigger’ popup, click on the ‘Choose a trigger’ dropdown and choose “New sale”. In the next ‘Select…’ dropdown, select your upsell “Total Body Transformation Upsell Page” and then click “Create”. The green button will now read “New sale was made”.
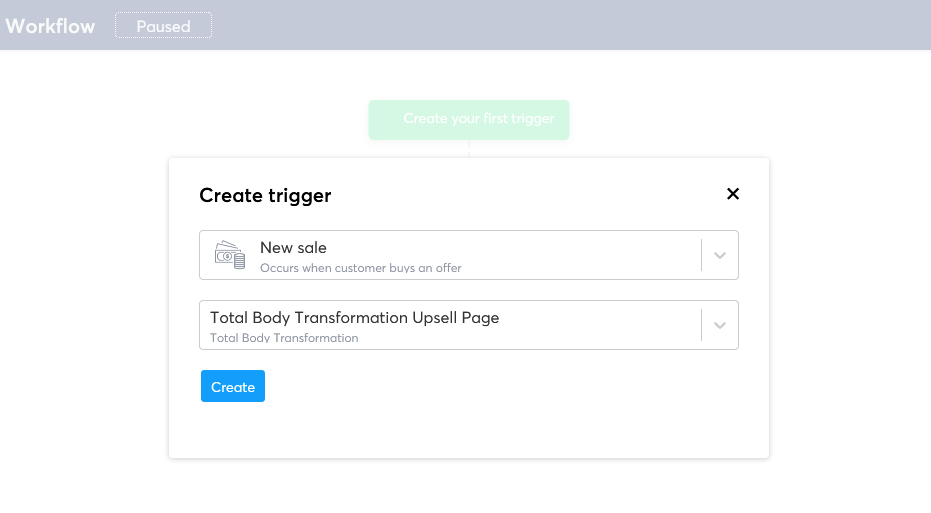
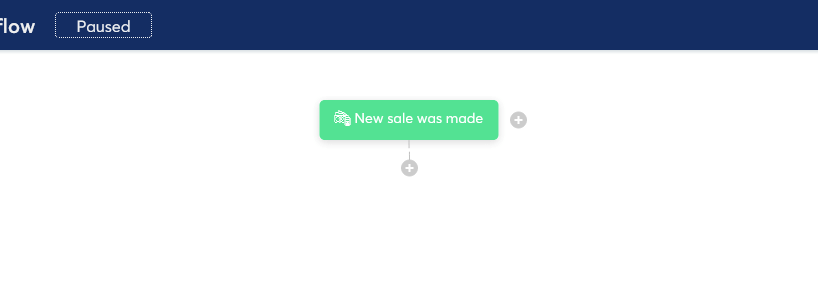
- Add an action: Now, we need to make a decision based on whether the contact has the “Course Buyers – Upsell” tag or not. Click on the “+’ icon underneath green button to open the ‘What kind of step would you like to add?’ popup. Choose “Decision”.
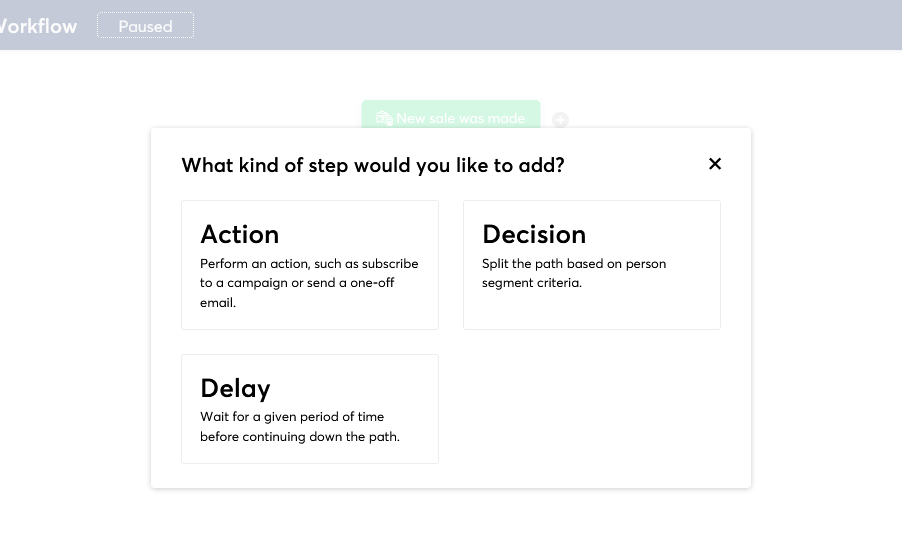
- Add a decision: In the ‘Create decision’ popup, from the ‘Choose a filter’ dropdown, select “Tag”. And in the dropdown option after “Contact tagged with”, choose the “Course Buyers – Upsell” tag. Then click “Create”.
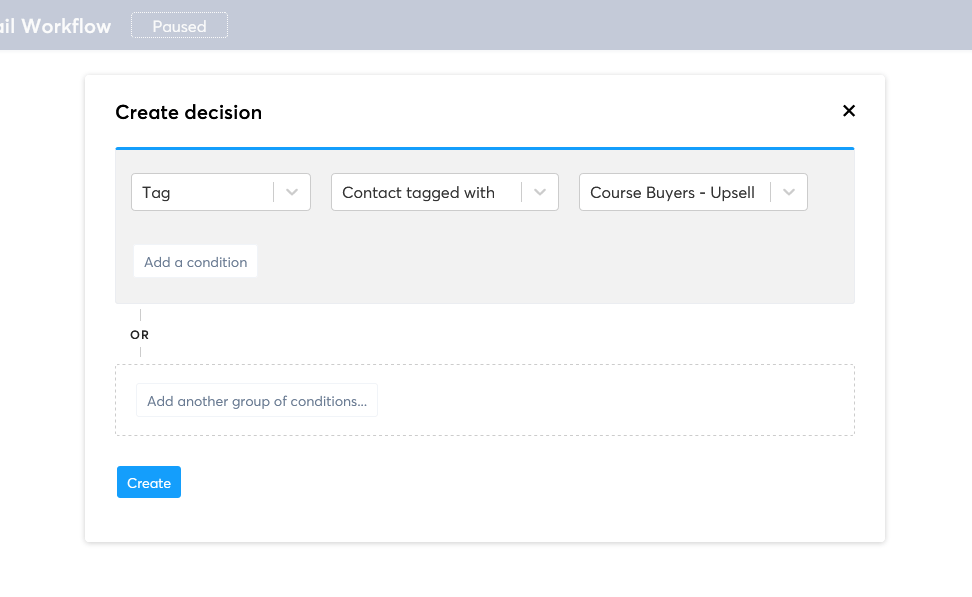
- ‘Yes’ and ‘No’ branches: You’ll now see a new dark blue button in your workflow asking ‘Person is tagged with “upsell buyer test”?’ and two branches: “Yes” and “No.” If “Yes,” the contact has purchased the upsell. If “No,” they’ve only bought the course.
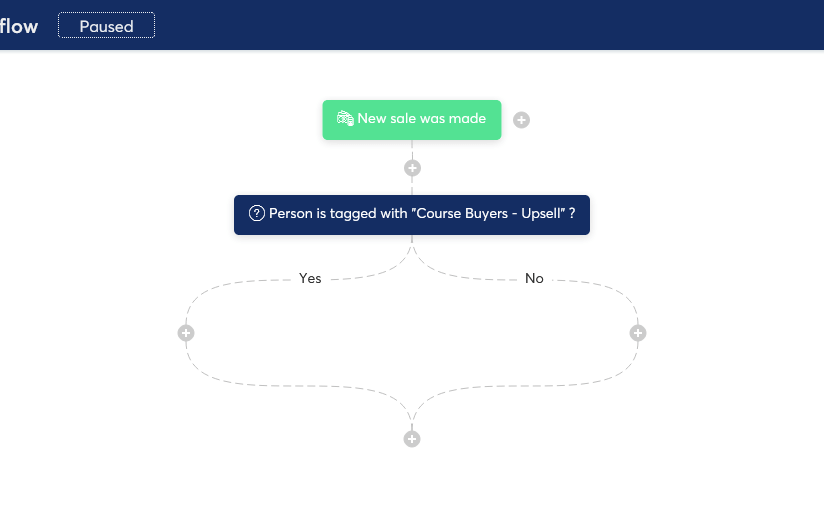
- Add two more actions: For each branch, we’re going to add an action to send a thank you email to your customers – the content of which depends on whether or not they bought the upsell .
- Add the ‘Yes’ action: First, for the ‘Yes’ side, click on the “+’ icon on the left to open the ‘What kind of step would you like to add?’ popup. Choose “Action”. In the ‘Create an action’ popup, choose ‘Send an email’, and then click on the blue link ‘Create a new one!’.
- Create your ‘Yes’ upsell email: In the ‘Create an email’ popup, for the upsell email subject line enter “Welcome to Your VIP Total Body Transformation Experience!”, and click ‘Save and edit email’. Then write the body of your upsell thank you email.
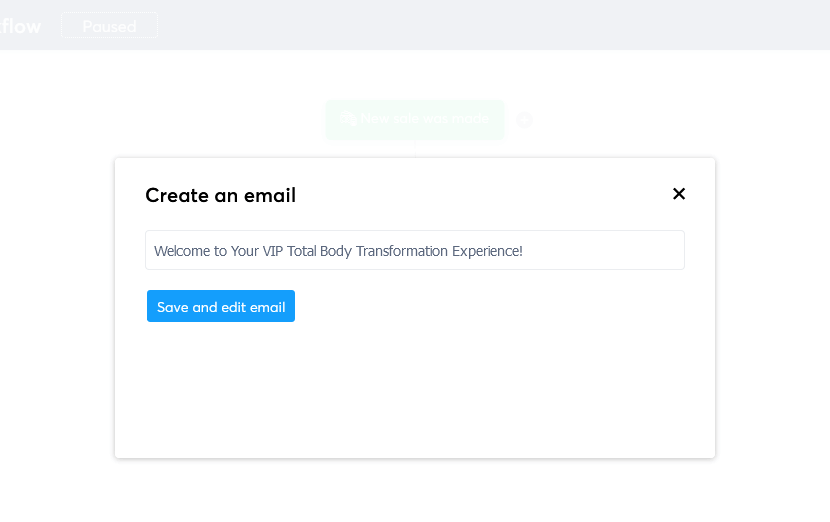
Here’s an example of some upsell thank you email copy to get you started. You can use this as a guide for your email templates as you create your sales funnel.
“Hi [First Name],
Congratulations on upgrading to the Total Body Transformation VIP program! You’ve made an excellent decision to accelerate your fitness journey with personalized support and guidance.
As a VIP member, you’ll receive:
- Personalized 1-on-1 coaching sessions every two weeks, providing valuable guidance and support from me
- Customized workout plans tailored to individual fitness levels, goals, and preferences
- Personalized nutrition coaching to optimize meal plans for faster results
- Priority email support to answer specific questions and enhance motivation
- Exclusive access to the VIP community of like-minded individuals on the same fitness journey
I’ll be in touch soon with more details on how to access your VIP benefits. In the meantime, if you have any questions, feel free to reach out to our support team.
Welcome to the VIP experience, and here’s to your Total Body Transformation!
Best regards,
[Your Name]
[Your Business Name]”
This email not only welcomes your VIP customers, but also highlights the exclusive benefits they’ll receive. This makes them feel valued and excited about their decision to upgrade.
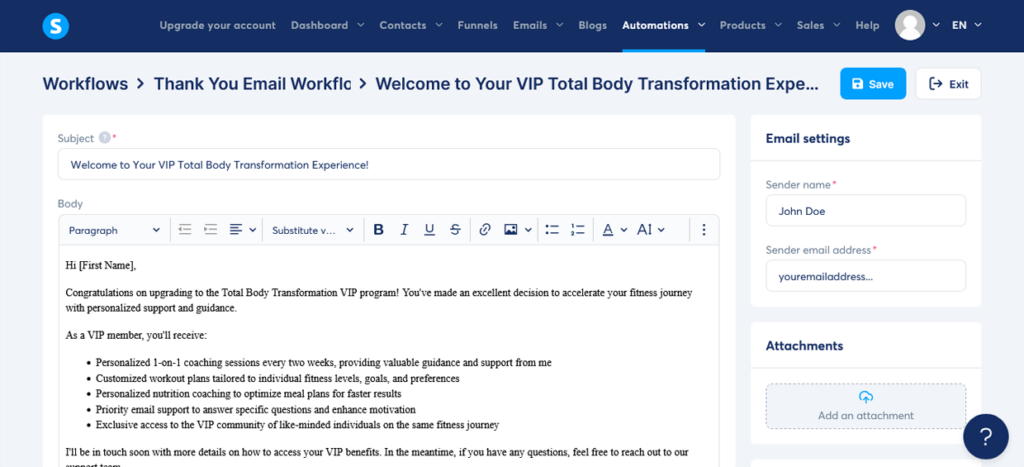
- Save the ‘Yes’ email: When you’re satisfied with your email, click “Save”. You will now see a blue button on the ‘Yes’ side of the workflow with ‘Send’ and the subject line.
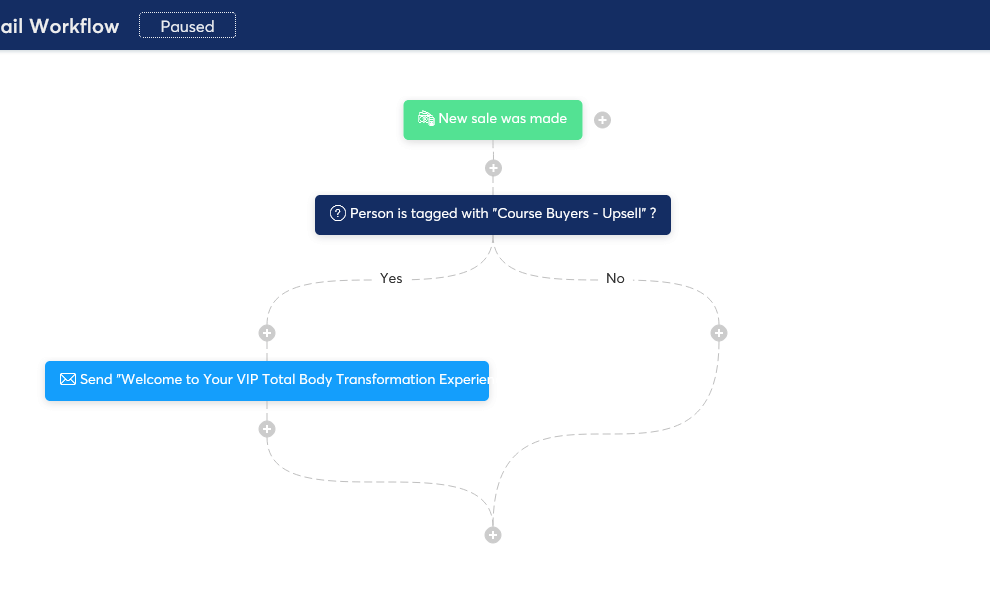
- Add the ‘No’ action: Now, for the ‘No’ side, click on the “+’ icon on the right to open the ‘What kind of step would you like to add?’ popup. Choose “Action”. In the ‘Create an action’ popup, choose ‘Send an email’, and then click on the blue link ‘Create a new one!’.
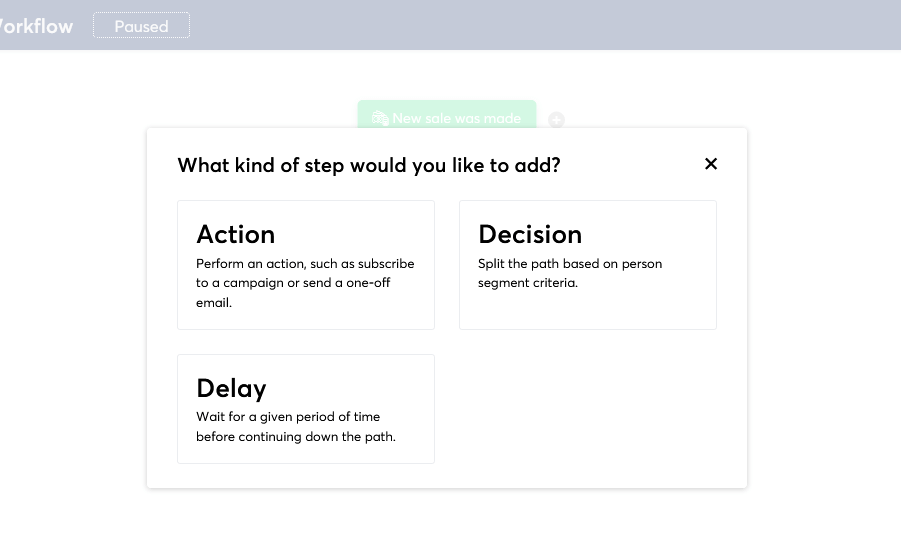
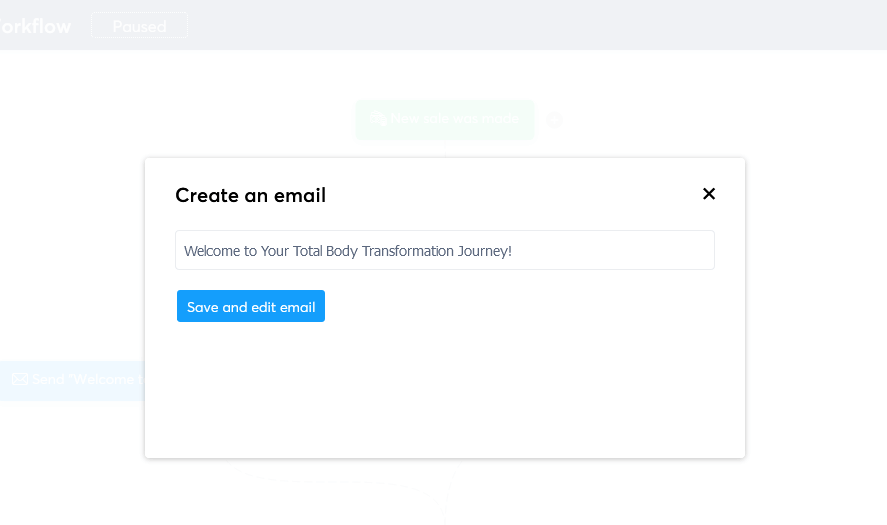
- Create your ‘No’ upsell email: In the ‘Create an email’ popup, for the ‘course only’ email subject line enter “Welcome to Your Total Body Transformation Journey!”, and click ‘Save and edit email’. Then write the body of your ‘course only’ thank you email.

Here’s an example of some sale thank you email copy to get you started. Like with the previous upsell email copy, you can use this copy as a guide for your email templates as you create your sales funnel.
“Hi [First Name],
Thank you for joining the Total Body Transformation 12-Week Course! We’re thrilled to have you on board and can’t wait to see the amazing progress you’ll make.
Over the next 12 weeks, you’ll receive:
- Comprehensive workout plans designed for all fitness levels
- Customizable meal plans to fuel the body and satisfy taste buds
- Weekly mindset coaching to keep you motivated and on track
- Access to our supportive community of like-minded individuals
- Lifetime access to course materials and future updates
We’ll be sending you an email shortly with more details on how to access your course materials and get started on your transformation journey.
If you have any questions or need assistance, please don’t hesitate to reach out to our support team.
Welcome to the Total Body Transformation family!
Best regards,
[Your Name]
[Your Business Name]”
In comparison to the upsell email, this version focuses on welcoming new course participants. It provides a clear overview of the program, setting the stage for a positive experience.
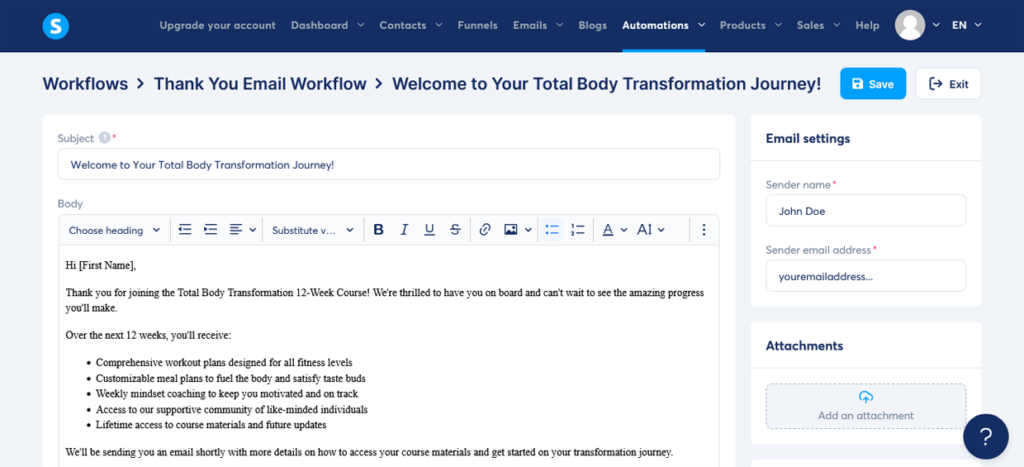
- Save the ‘No’ email: When you’re satisfied with your email, click “Save”. You will now see a blue button on the ‘No’ side of the workflow with ‘Send’ and the subject line.
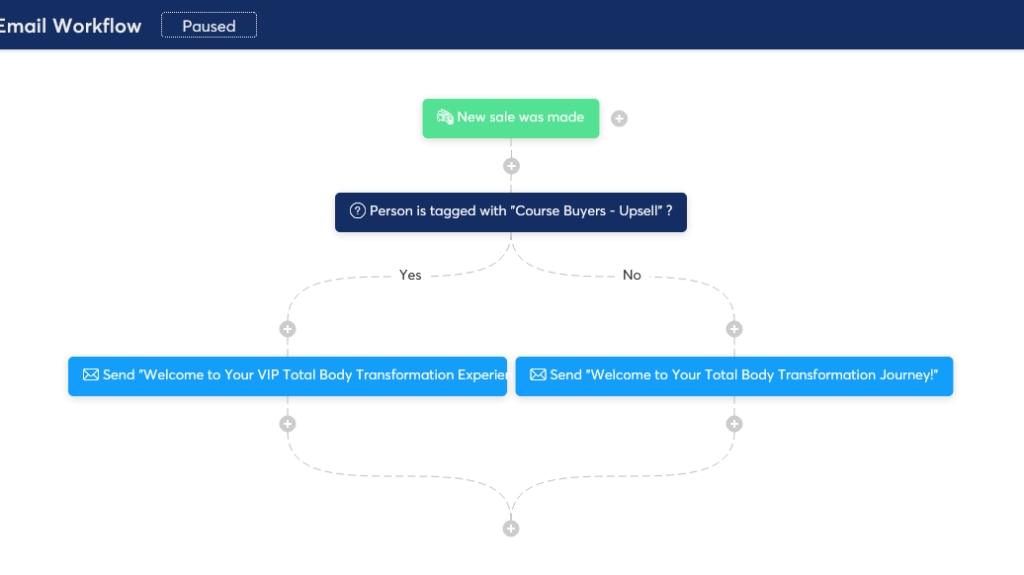
- Exit your workflow: Once you’ve created and saved both emails, click on “Exit” to apply the changes and close the workflow editor.
And bingo! You’ve just created an automated sales funnel thank you email workflow for your main offer and optional upsell.
This ensures that your customers receive personalized communication depending on their purchase, making them feel valued and well taken care of.
You’re rocking this!
Important: It should be noted here, that by default, Systeme.io also sends a separate automated thank you email to any student who joins a course via a payment page. This email contains a congratulatory message, their username, and a link to choose their password. The subject line reads, “Important: Your Access To Training.”.
Step 14: Create Additional Emails for your Email Marketing Campaign
Okay, let’s take a moment to acknowledge how far you’ve come in building your sales funnel.
You’ve got all the main pages in place, but remember back in Step 7, we only set up one automated email to thank them for signing up for the lead magnet and to welcome them onboard.
We still have some work to do to nurture those leads and drive them to the sales page with the main offer.
Now, we’re going to create a couple more automated emails to add to that sequence and send in the days following the welcome email.
This will help you connect with your leads, provide value, and guide them towards your main offer. Just two emails for now, but feel free to add more as you see fit.
Are you ready? Let’s do this!
Here’s how to create those additional sales funnel emails using Systeme.io’s built-in tools:
Creating additional sales funnel marketing emails
- Navigate to the Email Campaigns section: From the main Systeme.io header menu, head back to the “Emails” tab and click on “Campaigns” to take you to your Campaigns dashboard.
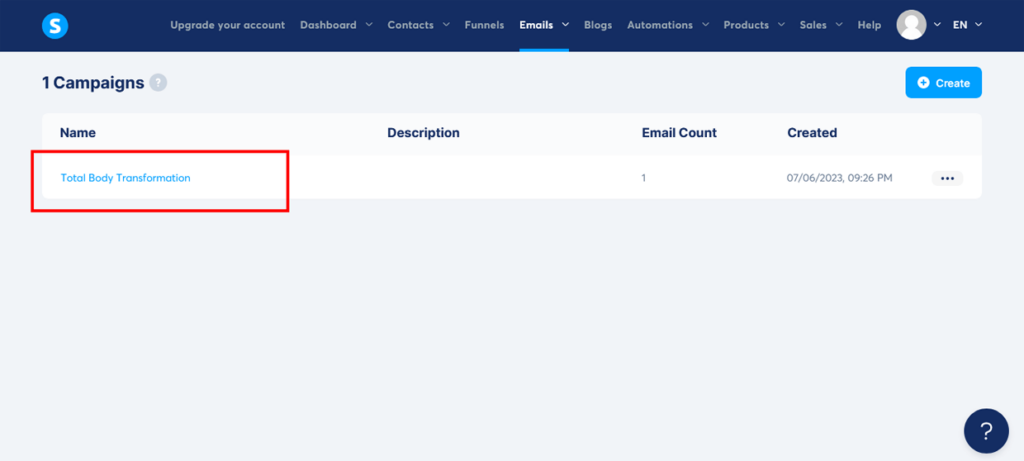
- Open your campaign: Locate the email campaign ‘Total Body Transformation’ that you created in Step 7 and click on it to open the campaign dashboard.
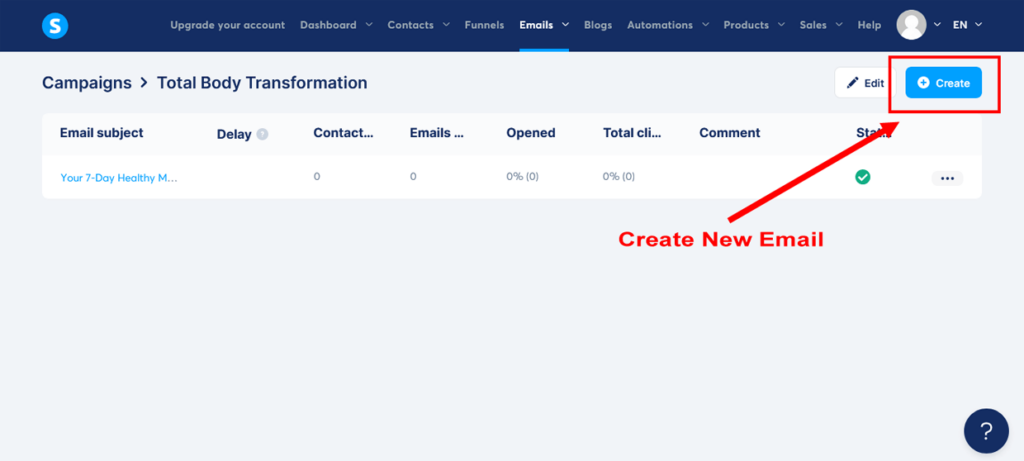
- Add an email: Click on “Create” to add another email and open up the ‘Create campaign step’ popup. In the ‘Create campaign step’ popup add the ‘Subject’. Write an attention-grabbing subject line that clearly states the purpose of the email (e.g., “Discover the Secret to Lasting Fitness Success!”). Check your ‘Sender name’ and ‘Sender email’ address. Click ‘Save’ to open the email editor.
Remember, we’re using the classic email editor to create these emails. It’s more personal and can improve deliverability and open rates since it doesn’t look as spammy as emails with images and templates.
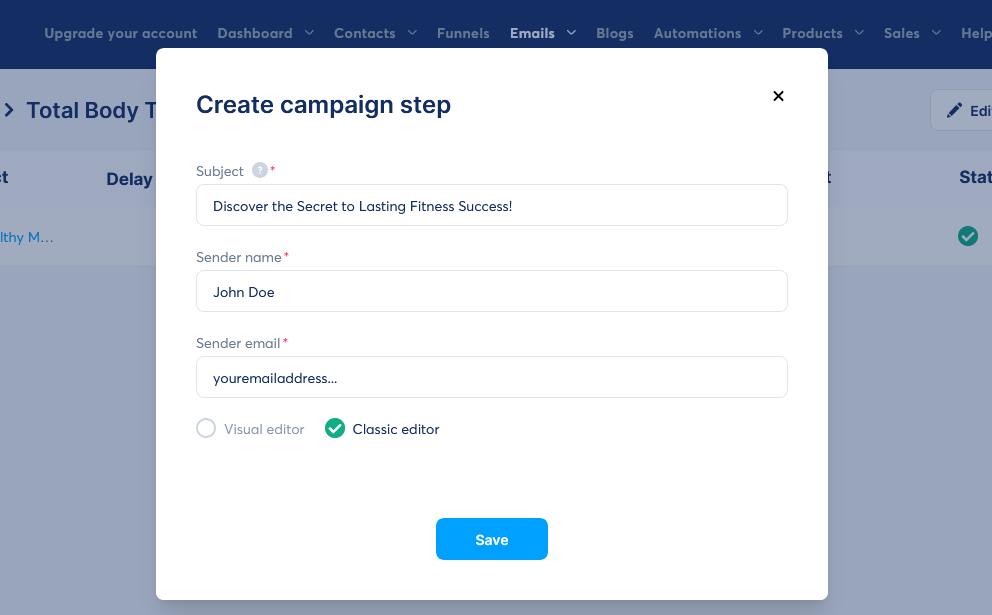
- Write the email body: In the email editor, write the body of your email. Make sure to keep the email friendly, benefit-driven, and focused on directing your new subscribers to your sales page without being pushy.
Customize the email body with an example like the one below. Feel free to use this copy as a guide for your marketing email templates as you create your sales funnel.
Subject: Discover the Secret to Lasting Fitness Success!
“Hi [First Name],
I hope you’ve been enjoying the delicious and nutritious recipes from our “7-Day Healthy Meal Plan” guide, and that it has helped kickstart your fitness journey. Today, I want to let you in on a little secret that can make all the difference in your fitness journey: consistency.
Consistency is the key to lasting fitness success, and our Total Body Transformation program is designed to help you build healthy habits that will stick with you for life.
[Insert a link to your sales page here]
Check out our comprehensive 12-week program that combines effective workouts, nutrition guidance, and ongoing support to help you stay on track and achieve your goals.
Remember, the first step to unlocking your full potential is just one click away. Don’t let this opportunity pass you by!
To your success,
[Your Name]
[Your Business Name]”
This email builds upon the value provided in the “7-Day Healthy Meal Plan” guide and introduces your subscribers to your Total Body Transformation program.
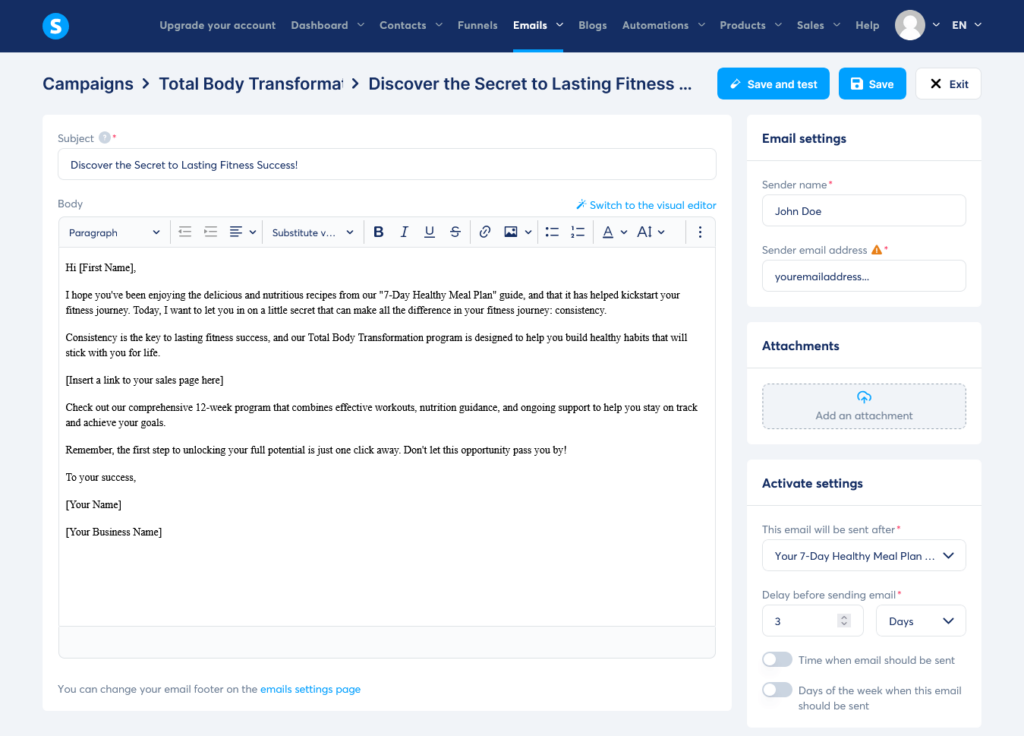
- Insert your sales page link: Insert the link to your sales page by clicking on the “Insert a link” button or by highlighting the text you want to link, clicking on the chain icon, and pasting the sales page URL you copied in Step 9.
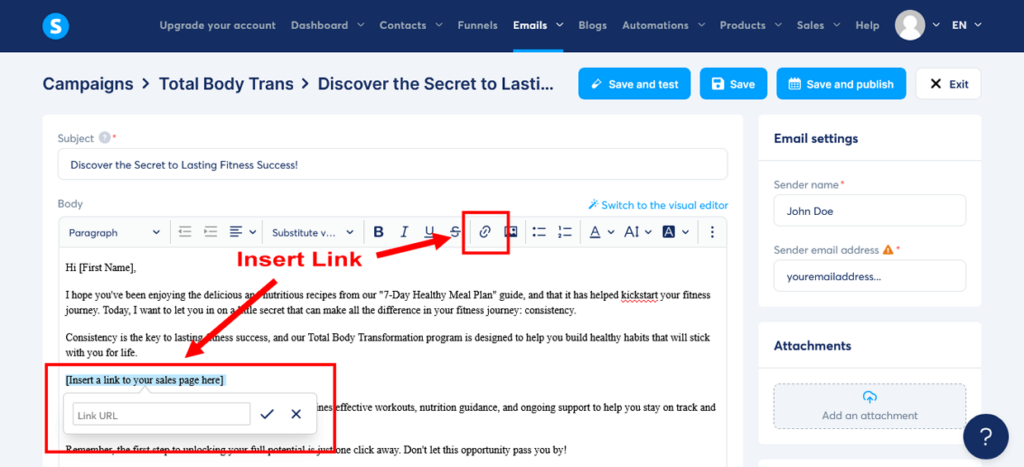
- Save your email: Once your satisfied with your email content, click on “Save and Publish”.
- Set up your sending delay: After you click “Save and Publish”, you will see a popup appear regarding the activation of the email. For the ‘This email will be sent after’ option, select your first lead magnet/welcome email titled ‘Your 7-Day Healthy Meal Plan is here!’. And then, in the ‘Delay before sending email’ field, enter ‘3’ so that the email will be sent three days after the first email. Then click “Activate”. Then click “Save” to exit the email editor and return to your Campaign dashboard.
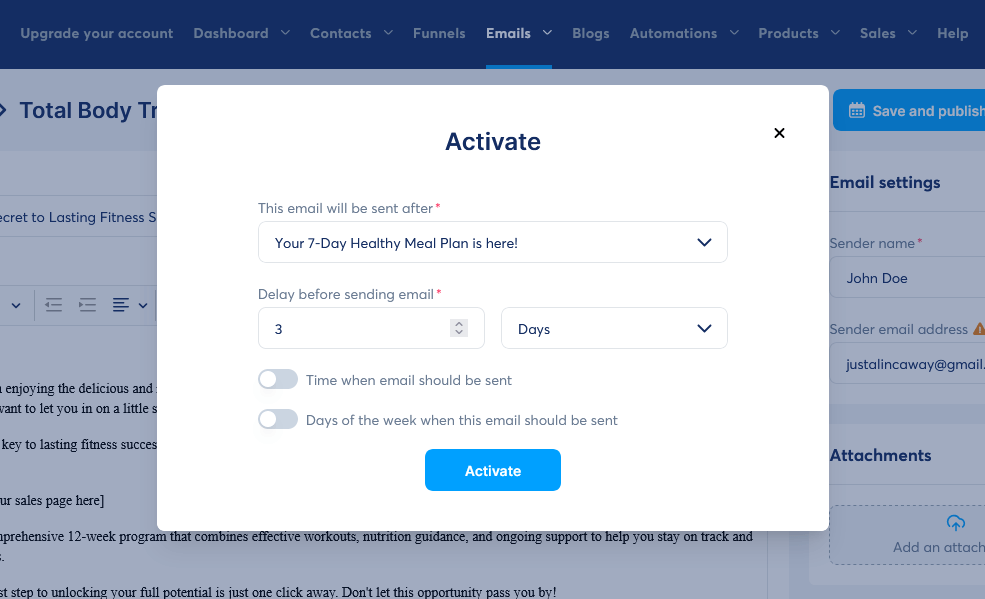
- Add another email: Click on “Create” again to add another email and open up the ‘Create campaign step’ popup. In the ‘Create campaign step’ popup add the ‘Subject’. Write a new attention-grabbing subject line that clearly states the purpose of the email (e.g., “Unlock the Power of Personalized Coaching!”). Check your ‘Sender name’ and ‘Sender email’ address. Click ‘Save’ to open the email editor.
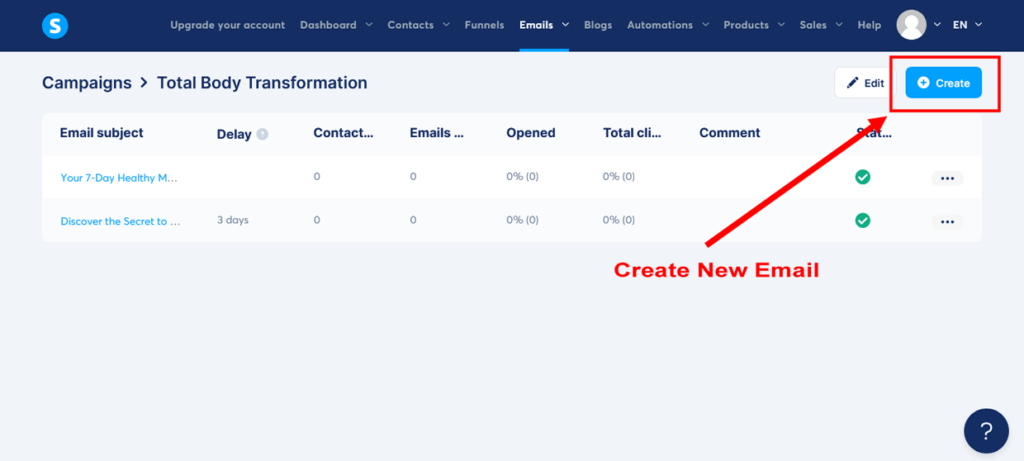
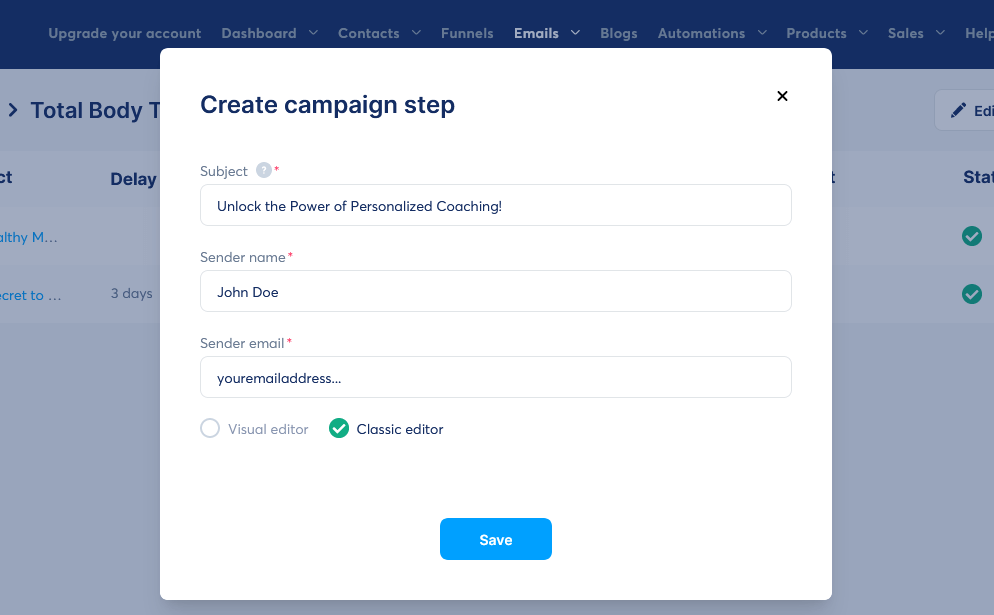
- Write the email body: In the email editor, write the body of your new email. While providing additional value and new insights, remember to subtly keep guiding your new subscribers towards your sales page without appearing too insistent.
Customize the email body with an example like the one below. As per the second marketing email, feel free to use this as a guide for email templates as you create your sales funnel.
Subject: Unlock the Power of Personalized Coaching!
“Hi [First Name],
In our last email, we talked about the power of consistency in achieving your fitness goals. Today, I want to share another game-changer with you: personalized coaching.
As your personal expert trainer, I’m excited to offer an exclusive VIP upgrade that includes 1-on-1 coaching sessions with me.
[Insert a link to your sales page here]
Unlock the power of personalized coaching and receive customized workout plans, nutrition advice, and direct access to me for support and guidance.
Don’t miss out on this chance to fast-track your progress and reach your goals with my help!
To your success,
[Your Name]
[Your Business Name]”
This email emphasizes the benefits of personalized coaching and encourages subscribers to consider the VIP upgrade for a more tailored fitness experience with you as their expert trainer.
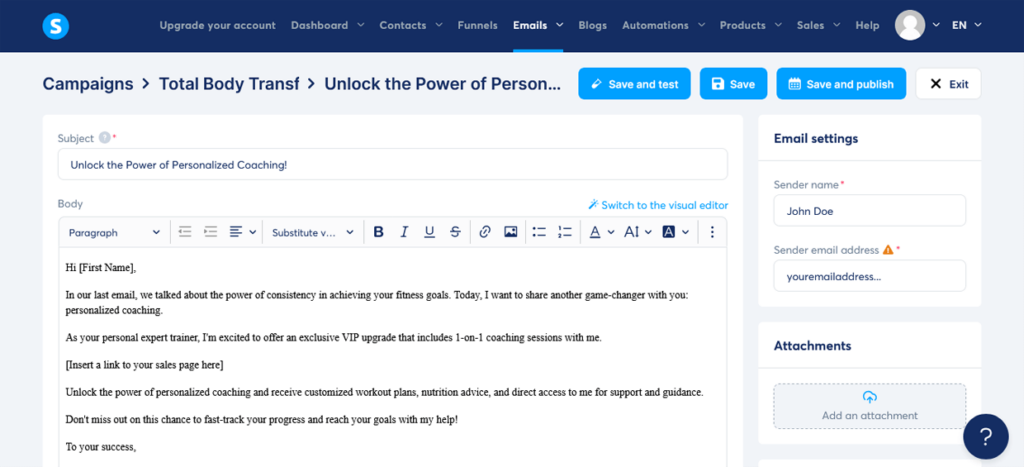
- Insert your sales page link: Insert the link to your sales page by clicking on the “Insert a link” button or by highlighting the text you want to link, clicking on the chain icon, and pasting the sales page URL you copied in Step 9.
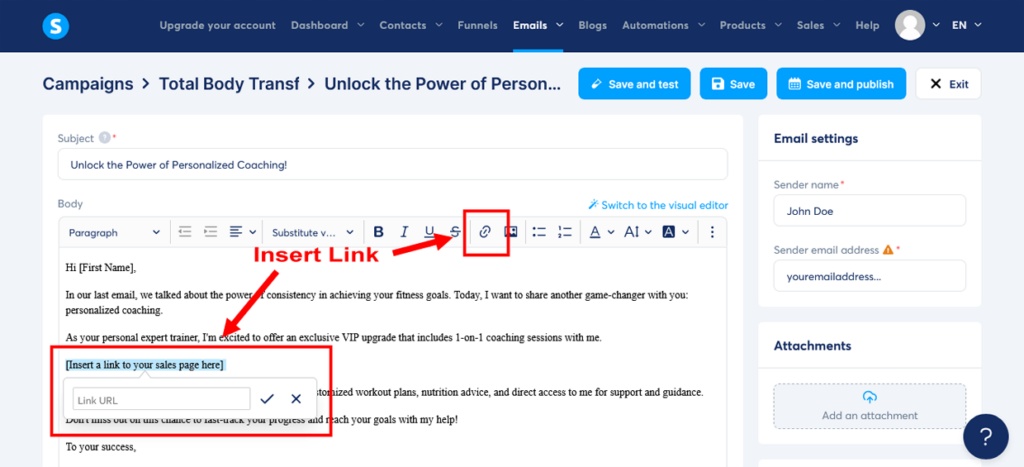
- Save your email: Once your satisfied with your email content, click on “Save and Publish”.
- Set up your sending delay: After you click “Save and Publish”, you will see the popup appear regarding the activation of the email. For the ‘This email will be sent after’ option, this time select your second email, the one titled ‘Discover the Secret to Lasting Fitness Success!’. Then, in the ‘Delay before sending email’ field, enter ‘3’ again so that the email will be sent three days after the second email. Then click “Activate”. Then click “Save” to exit the email editor and return to your Campaigns dashboard.
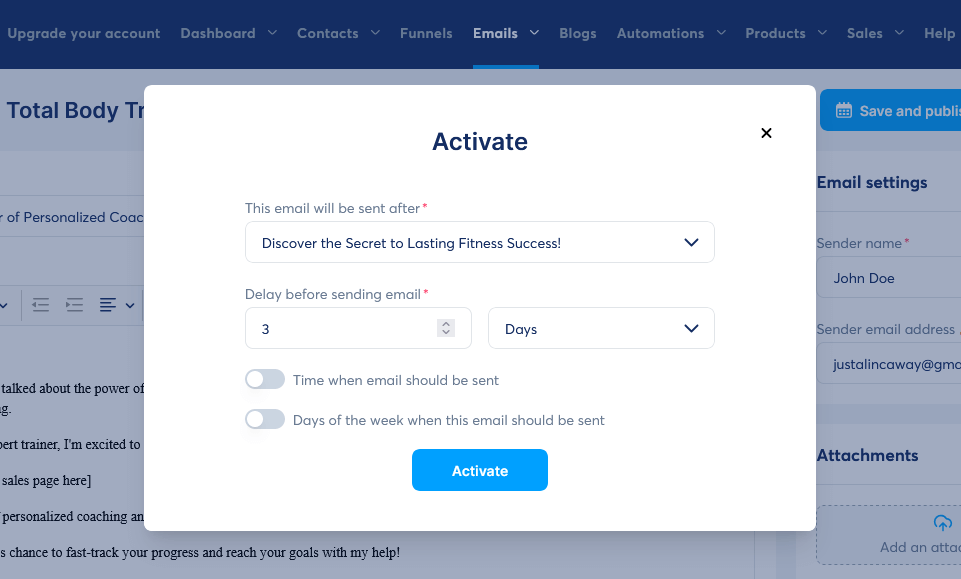
You should now see three emails in your Campaigns dashboard. The first email with zero delay, and two more emails, each with a delay for three days.
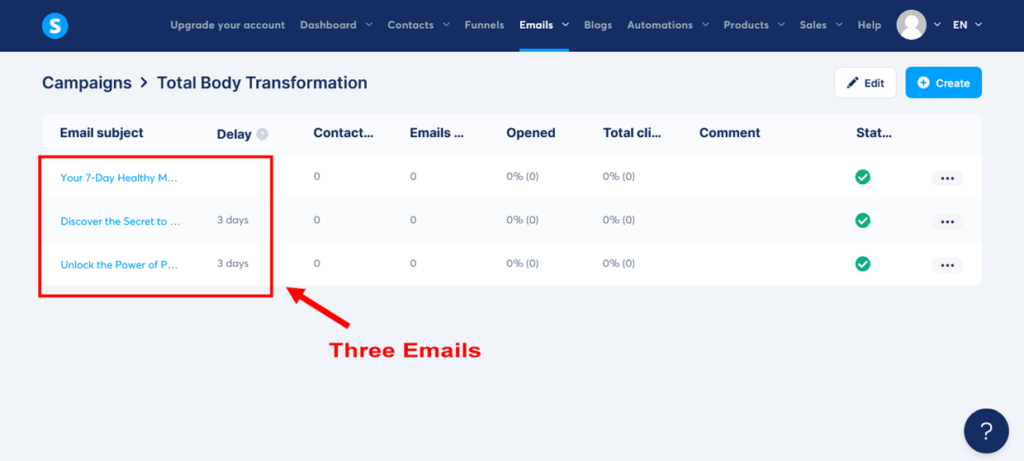
Great job! You’ve now successfully created and set up additional sales funnel emails to nurture your leads and guide them towards the main offer.
Remember, the key is to provide value, support, and address your audience’s hopes, dreams, fears, and frustrations. Keep refining your approach based on your audience’s needs.
Now, let’s gear up for Step 15: Launch Your Sales Funnel. You’re almost at the finish line – let’s ensure your funnel is primed for success and ready to drive results!
Step 15: Launch Your Sales Funnel
You’ve done it! You’ve built your sales funnel, and now it’s time to celebrate this fantastic achievement. Get ready to set your creation free into the wild!
But before you do, make sure to test it thoroughly. You want to make sure everything is running smoothly and looking great before you start driving traffic to your funnel.
Let’s go over the steps you need to take to launch your sales funnel using Systeme.io and start attracting potential customers.
- Navigate to the Funnels section: From the main Systeme.io dashboard, click on “Funnels” in the header menu to access your Funnels dashboard.
- Select your funnel: Locate the existing funnel you created earlier (e.g., “Total Body Transformation Funnel”) and click on it to open the funnel stage editor.
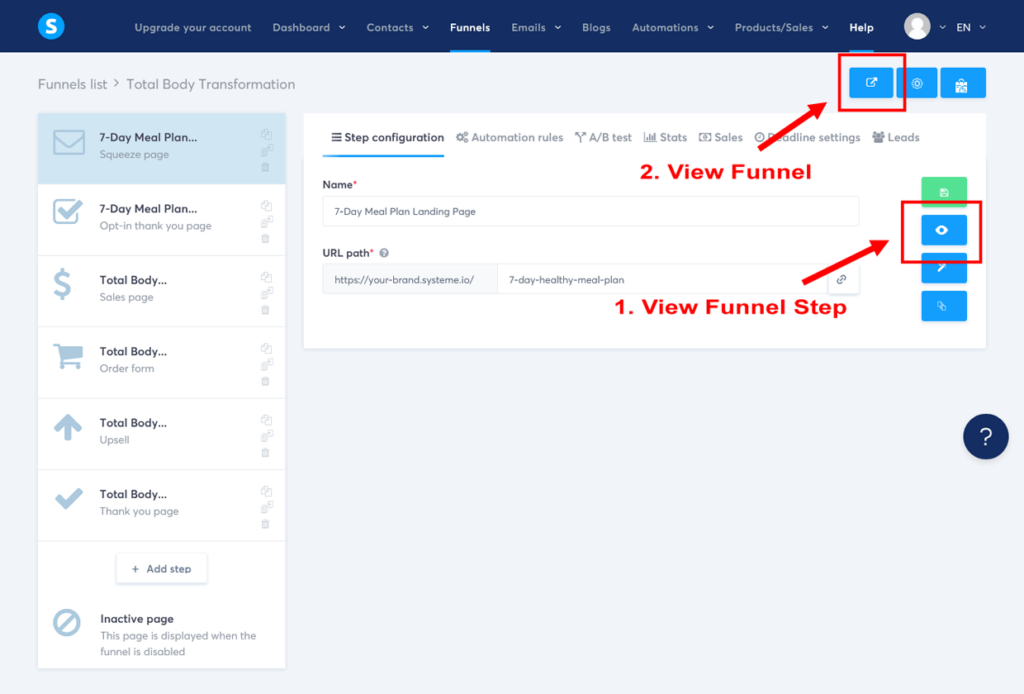
- Preview each funnel step: Before launching your funnel, preview each page in your funnel to ensure everything is set up correctly. For each of your sales funnel steps, click on the “View funnel step” button underneath the green save button on the right hand side of the funnel stage editor.
- Test your funnel: Once you’ve checked each individual funnel step, click on the blue “View funnel” button in the top-right corner of the funnel stage dashboard, below your user photo. Go through your funnel as a user, testing each step, including your lead magnet form submissions and upsell opt-in. To fully test the checkout and payment processing stage, you’ll need to have your payment gateways connected – please read this important step below.
Important: When you’re ready to test the payment processing, go back into your checkout page you’re your course and your upsell page and temporarily change the pricing of each to $1 in the ‘Price plans’ section. This will allow you to test the payment process without incurring significant costs.
After confirming that the payment processing went through successfully, go back to both of your products and change their prices back to their original values. Testing this stage is essential to help ensure a smooth and trusted buying experience for your first leads and customers.
- Launch your funnel: Once you’re satisfied with the functionality of your sales funnel, it’s time to launch it to your target audience. Click on the first step of your funnel. In our example, this is the ‘7-Day Meal Plan Landing Page’. In the ‘Step configuration’ settings, click on the grey ‘Copy’ icon on the right side of the ‘URL path’ field. This will copy your landing page link URL and provide you with a direct link to your funnel’s first page.
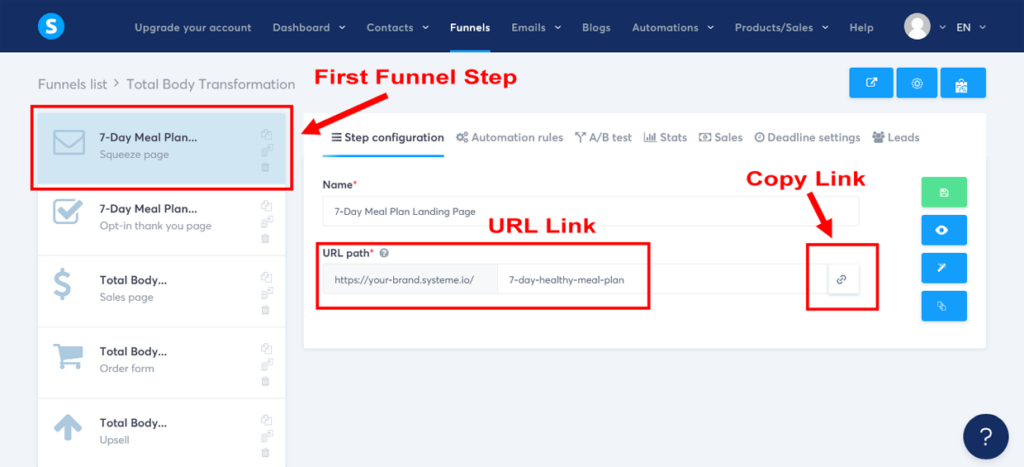
- Drive traffic to your funnel: Now that your sales funnel is live, it’s time to start driving traffic to it via the direct link. Use various marketing channels to promote your funnel, such as social media, email marketing, paid advertising, and content marketing. See the next Step 16 to learn more about driving traffic to your sales funnel.
- Monitor and optimize your funnel: Once your sales funnel is receiving traffic, make sure to regularly review your funnel’s performance, conversion rates, and user feedback to identify areas for improvement. Make necessary changes and continue to optimize your funnel for better results. See Step 17 to learn more about monitoring your sales funnel.
And there you have it! Congratulations!
You’ve successfully launched your sales funnel using Systeme.io’s platform.
Your sales funnel is now live, and you’re ready to start attracting potential customers and generating sales.
Remember, building and launching your sales funnel is just the beginning. Continuously monitor, analyze, and optimize your funnel to maximize its performance and grow your online business.
Step 16: Drive Traffic to Your Sales Funnel
Your funnel is now active and ready to make an impact! It’s time to spread the word, attract potential customers, and generate sales. To drive traffic to your sales funnel, you need to employ a variety of traffic generation strategies.
Remember, the more people who discover your offer, the more potential customers you’ll have.
There are various methods you can use to drive traffic to your sales funnel, and in this step, we’ll explore some of the most effective strategies.
- Content marketing: Attract potential customers by creating engaging content like blog posts, articles, videos, or podcasts. Share your expertise, build trust, and include a link to your lead magnet or main offer.
- Social media marketing: Utilize platforms like Facebook, Instagram, Twitter, LinkedIn, and Pinterest to share your lead magnet, main offer, and valuable content. Engage with followers, respond to comments, and participate in relevant groups to boost visibility and credibility.
- Paid advertising: Drive targeted traffic using Google Ads, Facebook Ads, or Instagram Ads. Set up campaigns promoting your lead magnet or main offer, track their performance to optimize ad spend, and improve your return on investment (ROI).
- Email marketing: If you already have an email list, announce to your subscribers the launch of your new course and direct them to your sales funnel with your link. Additionally, run a referral campaign to encourage your existing subscribers to share your lead magnet or main offer with their network.
- Influencer marketing: Collaborate with niche influencers to promote your lead magnet or main offer to their audience, expanding your reach and driving more traffic to your sales funnel. Make sure to choose influencers with engaged followers who are interested in your niche.
- Guest posting: Write guest posts for websites or blogs in your niche, gaining exposure to new audiences and driving traffic back to your sales funnel. Include a link to your lead magnet or main offer in your author bio or content.
By employing a combination of these traffic generation strategies, you can effectively drive a steady stream of customers to your sales funnel, generate leads and sales, and grow your online business.
Remember to track and optimize each strategy’s performance to refine your marketing efforts and achieve impressive results.
With that in mind, let’s smoothly transition into monitoring and analyzing your sales funnel performance in Step 17!
Note: For more help on how to drive traffic to your sales funnel, be sure to check out this guide:
Step 17: Monitor and Analyze Your Sales Funnel Performance
You can’t improve what you don’t measure, right? So keep an eye on your funnel’s performance, and use the data to make tweaks and improvements as needed. Sales funnel optimization is all about learning, iterating, and refining your funnel until it’s a well-oiled sales machine.
In this step, we’ll discuss the critical aspects of monitoring and analyzing your sales funnel performance.
Tracking tools
To effectively monitor your sales funnel performance, you need tracking tools that can provide you with valuable insights. Systeme.io makes this easy for you with its built-in sales funnel metrics, allowing you to track key analytics such as conversion rates, email open rates, and click-through rates.
For those who crave even more in-depth sales funnel data like the pros, you can also set up Google Analytics. This powerful tracking tool can be connected to Systeme.io using code in your sales funnel settings. However, this is beyond the scope of this tutorial.
Just remember, by utilizing these tracking tools, you’ll be able to make better data-driven decisions to optimize your sales funnel performance.
Identify key metrics
Determine the key sales funnel metrics you want to monitor and analyze. Some important metrics to consider include:
- Funnel Analytics: Systeme.io offers built-in analytics for each funnel, tracking metrics such as page views, opt-ins, sales, and conversion rates. To access your sales funnel analytics, locate your funnel from your Funnels dashboard. Next, select your funnel to open the funnel stage editor. Then click on “Stats” in the funnel stage editor top menu. Use this data to identify your sales funnel leakage – those pages where visitors leave your funnel. This will help you pinpoint areas for improvement so you can optimize your funnel for better results.
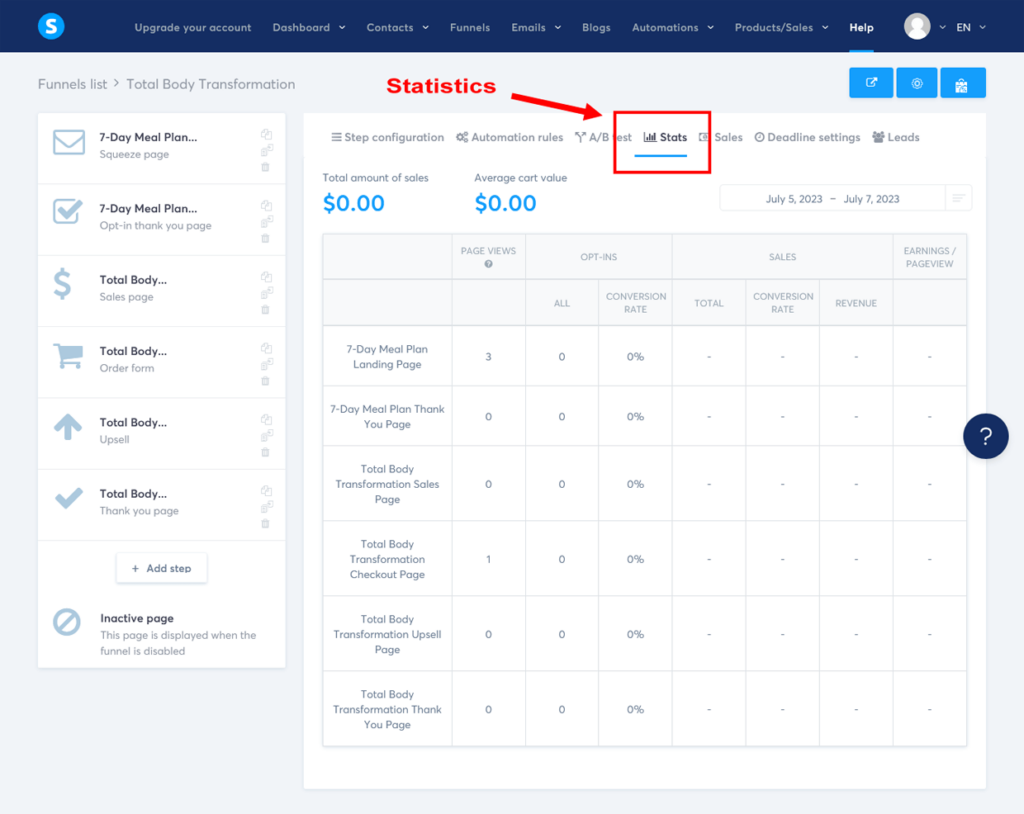
- Email Campaign Analytics: Monitor your email campaigns with Systeme.io’s email analytics, including open rates, click-through rates, and unsubscribe rates. To access email campaign analytics, click on “Emails” in the main header. Then click on “Campaigns” in the drop-down menu to open up your Campaigns dashboard. Next, select your campaign. Here, you will see the three emails you created with columns for ‘Opened’ and ‘Total clicks’. Analyze this data to improve your email content and subject lines for better engagement.
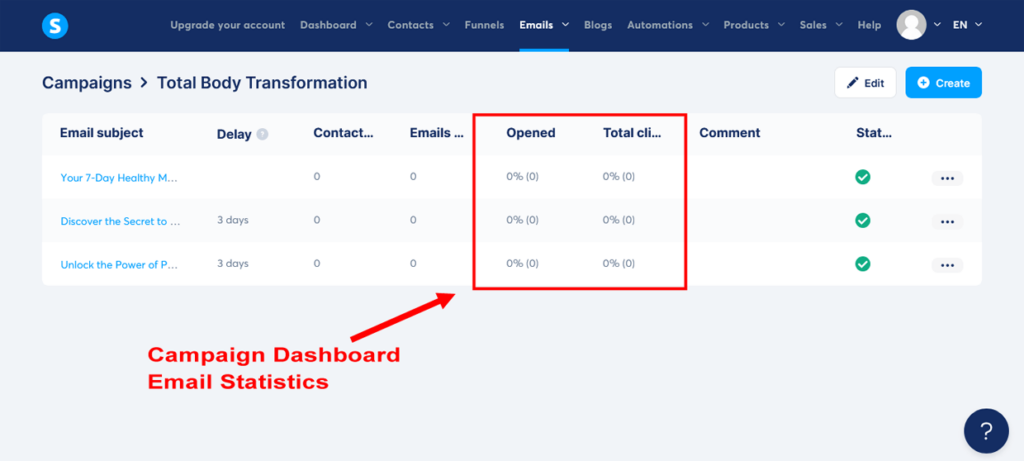
To access additional email campaign analytics for each email, simply select an email and then click on the three dots on the right and choose “Stats”. This will give data on the Open Rate, Spam Report Rate, Click Rate, and Bounced Rate for each email.
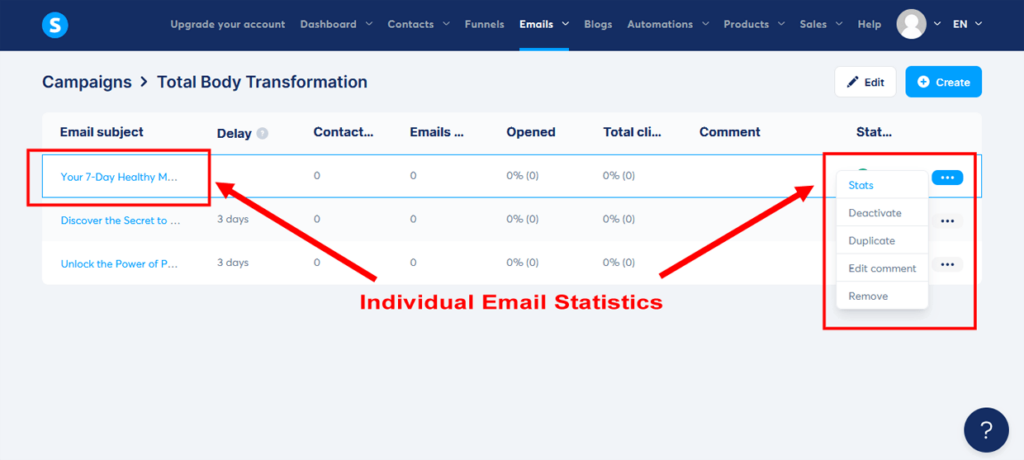
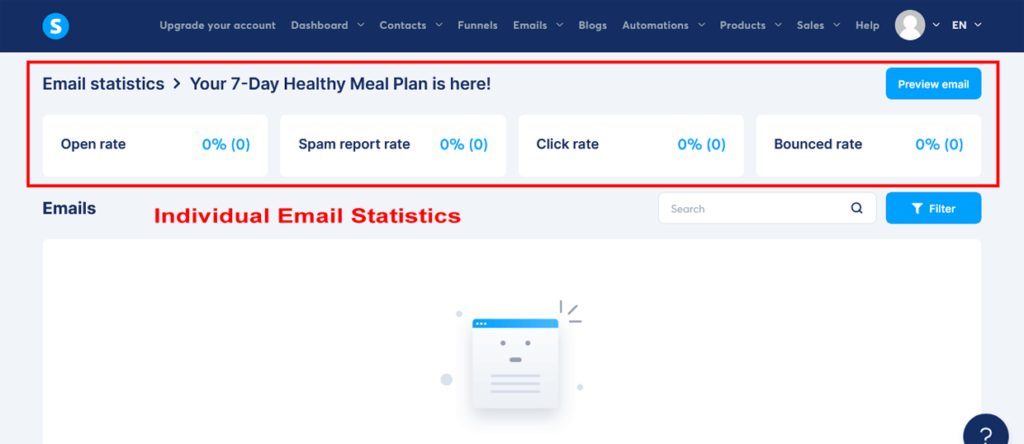
You can also get further email statistics by going to the main Systeme.io header, clicking on “Emails”, then clicking on “Statistics”. Here you will be able to view:
- Number of emails sent
- Average percentage of opened emails
- Average percentage of spam reports per opened email
- Average percentage of bounced emails
Once you start sending out emails, keep a close eye on this email data to monitor the performance of your email campaigns. Like with your sales funnel analytics, you can use this data to identify opportunities for improvement and boost your results.
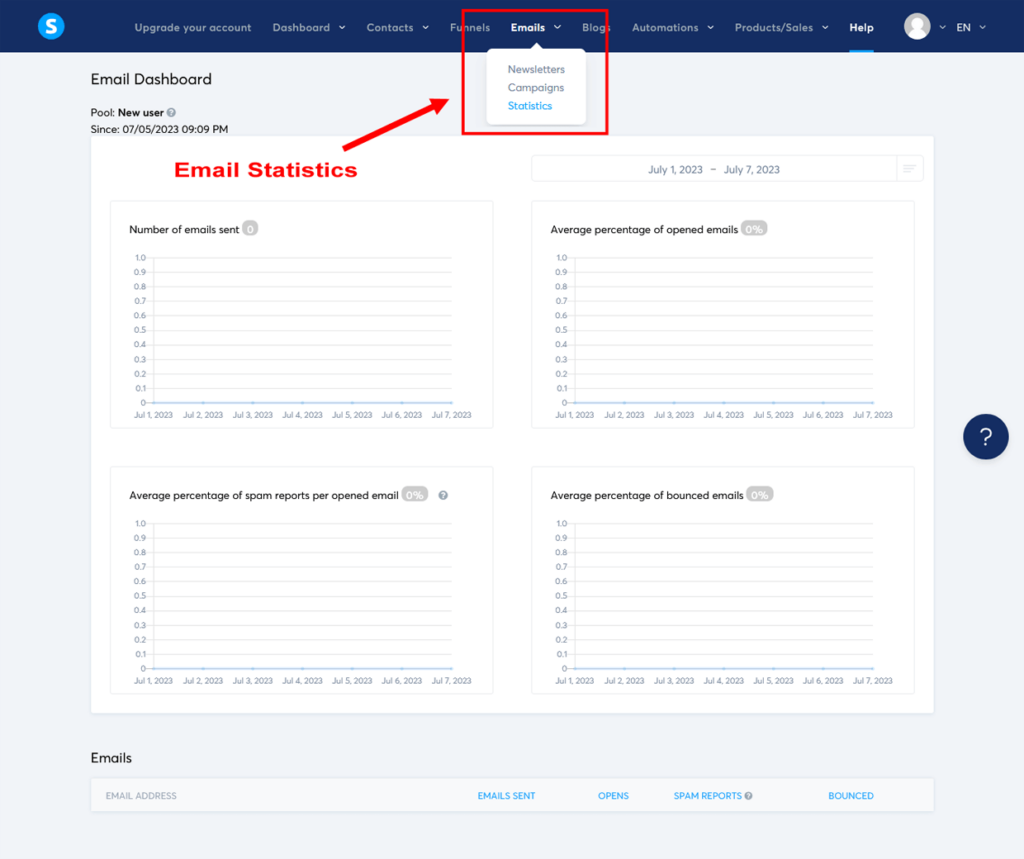
- Revenue Analytics: Track your overall revenue, sales, and refunds with Systeme.io’s revenue analytics. To access revenue analytics, go to the main Systeme.io dashboard by clicking on “Dashboard” in the header menu. Then, click on “Main dashboard”. Here you will see an overview of your total New Leads and Sales for a specific time period. You can adjust the time period in the top right corner under your profile photo.
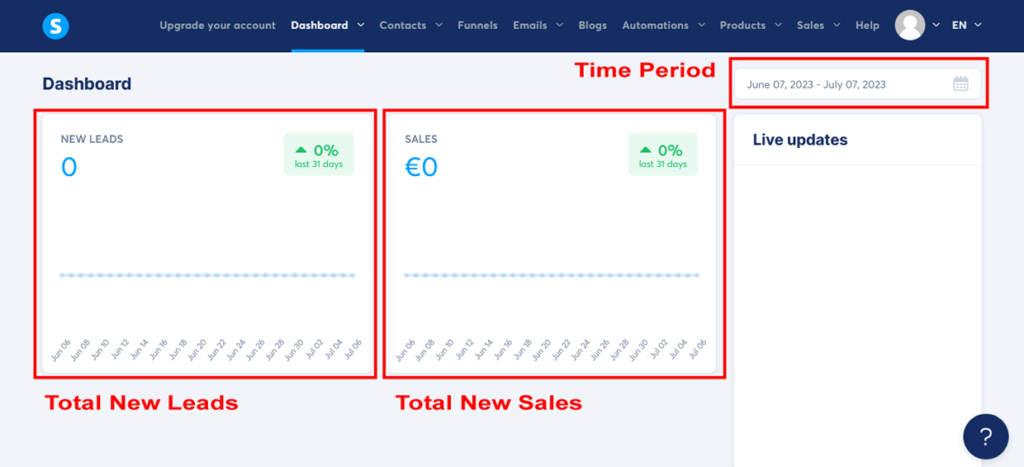
Important: Keep in mind that you won’t be able to see any data in any of these analytic dashboards until traffic starts coming into your sales funnel. Once you have traffic, you’ll be able to use this valuable information to make informed decisions to boost your sales funnel performance.
Analyze your data
Regularly review your data to identify trends, patterns, and areas for improvement. Look for any bottlenecks or drop-off points (leakage) in your funnel, and consider what changes you can make to improve the user experience and increase conversions.
A/B testing
To optimize your sales funnel, consider running A/B tests on various elements, such as headlines, calls to action, email subject lines, and content. By testing different variations, you can determine which version performs better and make data-driven decisions to improve your funnel performance.
Optimize your strategies
Based on your analysis, make adjustments to your sales funnel, email marketing campaign, and traffic generation strategies to improve their performance. Continuously monitor and analyze the impact of these changes to ensure you’re moving in the right direction.
And there you have it my fellow entrepreneur. Congratulations on making it to the final step of this create a sales funnel guide!
You’ve come a long way – your dedication to mastering the art of sales funnels is truly commendable.
As you continue to monitor and analyze your sales funnel performance, remember that this is an ongoing process that requires persistence and adaptability. Stay proactive, and use the insights you gain to optimize your strategies and maximize your results.
By consistently refining your funnel, you’re not only setting yourself up for long-term success, but you’re also proving that you have what it takes to thrive in the world of online business.
So, as you embark on this exciting journey, let your passion and determination fuel your progress.
Remember, every step you take brings you closer to achieving your dreams – and with the right mindset and tools at your disposal, there’s no limit to what you can accomplish.
Now, go out there and make your mark on the world of sales funnels – the stage is yours, and greatness awaits!
Your Sales Funnel Journey Awaits
We’ve reached the end of this how to create a sales funnel guide, but this is just the beginning of your sales funnel adventure. You’ve got dreams to chase and fears to conquer, and it’s totally normal to feel a mix of excitement and uncertainty.
Maybe you’re thinking, “Can I really pull this off?”
Let me tell you, you absolutely can!
Now’s the time to put everything you’ve learned into action. And don’t forget that Systeme.io is here to be your ally, making the process of creating a sales funnel simple and efficient. Harness its potential to build an effective sales funnel with ease.
Remember those traffic-driving strategies we talked about? Start implementing them and watch your sales funnel come to life.
Engage your audience with captivating landing and sales pages, entice them with irresistible upsells, and keep them coming back for more with powerful email campaigns. You’ve got the tools, the knowledge, and the passion to make it happen.
And don’t forget, our sales funnel example focused on personal trainers. However, the principles and strategies apply to any industry, product, or service.
No matter your business, you can confidently modify this classic sales funnel model to drive your growth, transform your bank account, and create an income stream that’ll make your wallet smile!
But what if you stumble along the way?
That’s okay! We’re here for you and all your sales funnel questions. Embrace the challenges, learn from them, and keep moving forward. You’re building something amazing here, and Rome wasn’t built in a day, right?
So, take a deep breath, believe in yourself, and dive headfirst into the world of creating sales funnels.
Your future customers are out there, waiting for you to show them what you’ve got. And when you start seeing the results – more leads, more sales, and more success – you’ll know it was all worth it.
Now, go forth and conquer your sales funnel dreams! Seize this moment, and let your actions create a legacy of success.
Happy funneling, my friend.
Disclosure: This content is reader supported, which means that if you click on some of our links then we may earn a small commission at no cost to you. You can read our disclaimer for more info.
Want To Learn More About Sales Funnels?
